
Lithium batteries
In this chapter we will mainly talk about type batteries 18650 which are the ones used in all notebooks, as well as in bicycles, scooters and electric cars, in PowerBanks and many other small devices.
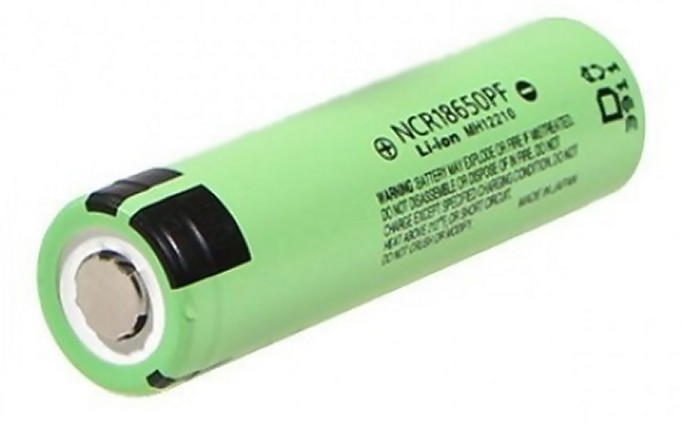
In this image you can see an excellent 18650 Panasonic da 2000 mAh
The 18650 they are the most convenient in terms of price / performance ratio and the only ones that are used when you need to store a lot of energy.
But unfortunately we have found that they are often scams !
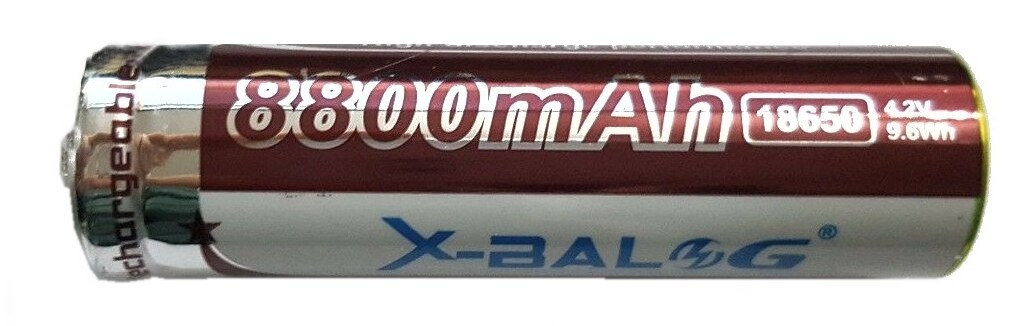
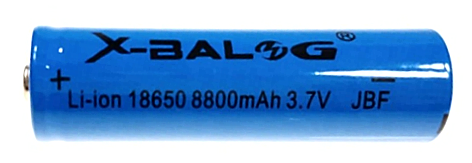
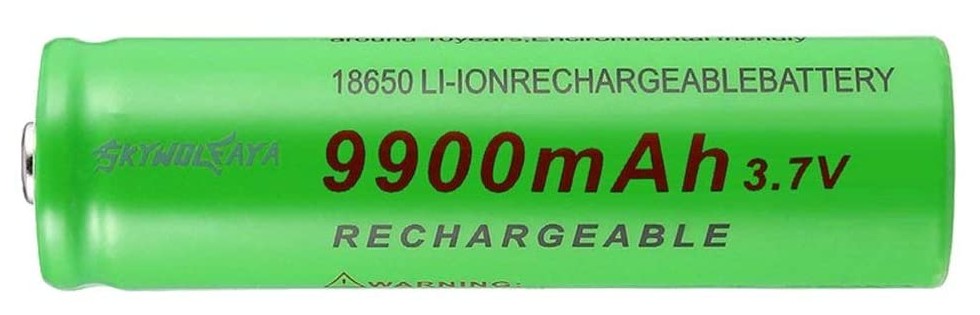
5800, 6800, 8800, 9800 and even 12000 mAh ?!

It's not just about common scams but about huge rip-offs. In many cases the actual capacity isn't just a little bit’ minor, but not even half, not even a tenth and sometimes not even a thirtieth.
We beyond the scam, we are at levels to cut off his hands.
We write this not only for the extent of the deception in terms of electrical capacity,
but for the size that this trade has taken.
Hundreds of vendors sell fake batteries 18650 and they sell staggering numbers,
stealing huge amounts of money from thousands of users every day… that often they don't even complain!
In the next chapters we will explain the technical details of this deception and how to do the tests to prove beyond doubt that a battery is a scam., but for now let's talk about sellers.
We are not saying that all the sellers of these fake batteries are thieves. Many of them are bona fide and think they sell great batteries at a fair price. In these cases we will notify them and of course they will stop selling them.
What if they keep selling them?
In that case they will end up in the list of villains that we will publish below.
Seller advised…
List of sellers who have been notified
and who continue to sell fake batteries
- We haven't written to anyone yet.
- So for now the list is empty.
- Let's hope it stays that way.
Batteries purchased online
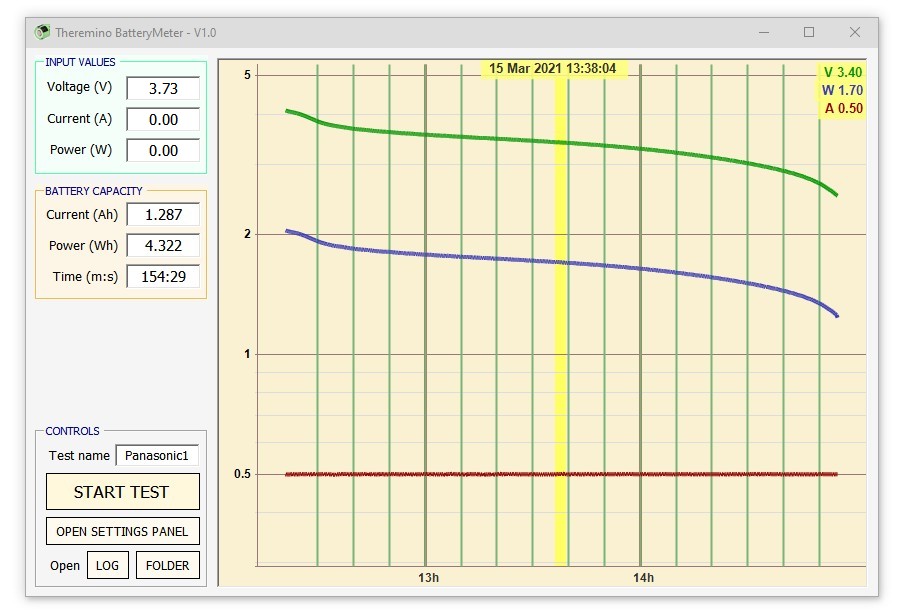
We have measured different models of batteries that you buy on eBay and Amazon, with the Theremino BatteryMeter application (you can find it later on this page).
The best (best so to speak, they are a nice rip off too), turned out to be the reddish-colored X-Bal that weigh 44 grams and that give about 2400 mAh (discharging them at constant current with 500 mA).
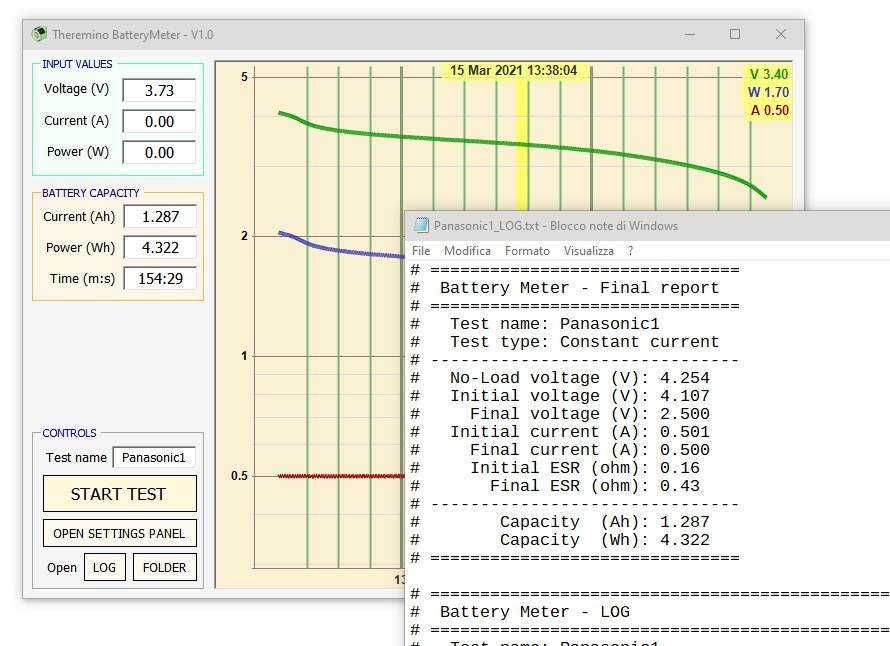
 # ===============================
# Battery Meter – Final report
# ===============================
# Capacity (Ah): 2.395
# Capacity (Wh): 8.631
# ===============================
The complete report can be downloaded with This link
The worst were the blue X-Bal, that weigh 24 grams and what they give 240 mAh (discharging them at constant current with 500 mA).
 # ===============================
# Battery Meter – Final report
# ===============================
# Capacity (Ah): 0.233
# Capacity (Wh): 0.809
# ===============================
The complete report can be downloaded with This link
These are not isolated cases, defects or errors. We tested at least three batteries for each model and always made sure they were fully charged, charging them with a good charger, checking with a second charger, checking that the battery made good contact in the battery holder and also verifying that the initial voltage exceeded i 4.2 volts.
We also tried the same batteries several times to see if there were any variations. The variability within the same model was very low and even lowering the discharge current a 200 but significantly greater capacities were not obtained.
Battery capacity 18650
An easy way to spot feints 18650 is to read the declared capacity.
It is super and 4000 mAh then it is a scam.
There are no batteries 18650 with capacity of 4000 mAh or greater, nor can they exist from 5000, 6000, 8000, 9000 or even 12000! Even the best Panasonic and Samsung come to the max 2500 mAh, and cost over five euros each.
We challenge any vendor to send us a battery that truly exceeds 3000 mAh.
If it is true that they exist, prove it !
So if you find batteries from 5800, 6800, 8800, 9800, 12000 mAh and which may cost less than three euros, you can stay safe to 100% which is a scam.
And unfortunately it's not just about losing 8800 milliamps declared. You won't end up with a good battery from 3000 mAh, but you will have lost the money and the battery too. These scam batteries when you measure them don't even get to 2500 mAh and some not even a 250 mAh.
Some of the ones we measured gave 230 mAh, new and just loaded !

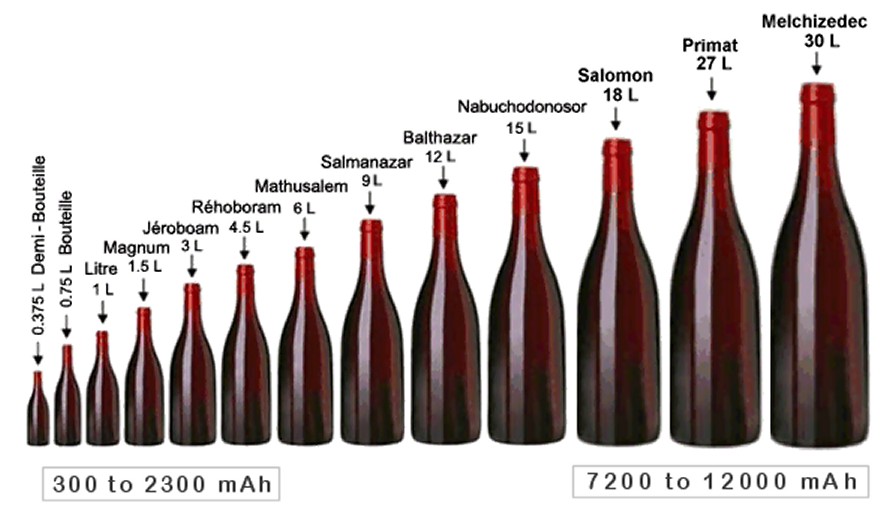
And’ as if they sold you a one-liter bottle and then inside you find only the bottom of a glass, or in the best cases a half glass.
The relationship between 8800 mAh e 230 mAh is 38 times, the same that can be seen between this bottle and the bottom of the red colored glass.
In other words it is as if they are selling you 30 liters of wine and then they sent you a small bottle, which does not even contain a liter.
…………………![]()
Capacity per kilogram
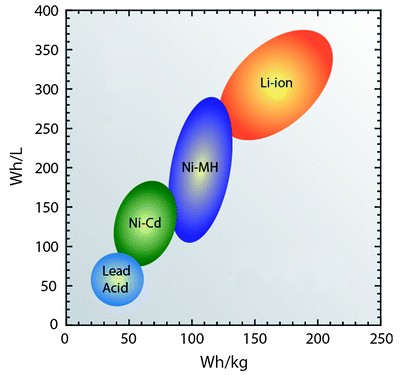 According to all publications on the subject, the maximum energy density of lithium batteries does not exceed 250 Watt Hour per kilogram.
This Page contains links to over 290 publications on lithium batteries and none indicate capacities over 265 Wh/kg.
With a battery 18650 from 44 grams can therefore be had at most 11.66 Watt-Hour, which divided by 3.6 volts do 3239 mAh. If the weight of the casing is then subtracted, approximately 30 grams, what a damage 2430 mAh. And these are in fact the maximum values that are measured in batteries 18650.
Once again it is confirmed
than the batteries 18650 for over 3000 mAh
they are definitely scams.
Recovery batteries, a safe and ecological alternative

These batteries are tested one by one, so you can know the actual capacity before buying them.
Plus, you avoid disposing of perfectly functioning batteries and help reduce pollution.
https://www.wesellcells.eu/18650 HTTPS://www.wesellcells.eu/18650/it
Measure the battery capacity
We have written an application that measures battery capacity with great precision.
Features of the application “Theremino_BatteryMeter”
– Constant Current Test, Constant power or constant resistance.
– Ampere display now, Watt hour and internal resistance.
– Precision calibration of current and voltage measurement ADCs.
– Current regulation, discharge power or resistance.
– Adjustment of the minimum end-of-test voltage.
– Ability to measure batteries from 12 volts, 6 volts, 3.7 volts, 1.5 volts and 1.2 volts
– Possibility to switch the stairs automatically (with an additional module).
– Adjustment of the storage interval for the LOG file.
– Final report with tensions, currents, ESR and Watt-Hour and Ampere-Hour Capacity
– Final report with Volt, Ampere, Watt-Hour and Ampere-Hour incremental over time.
– Final report also in CSV format, usable for making charts with Excel.
INSTRUCTIONS FOR USING THE APPLICATION
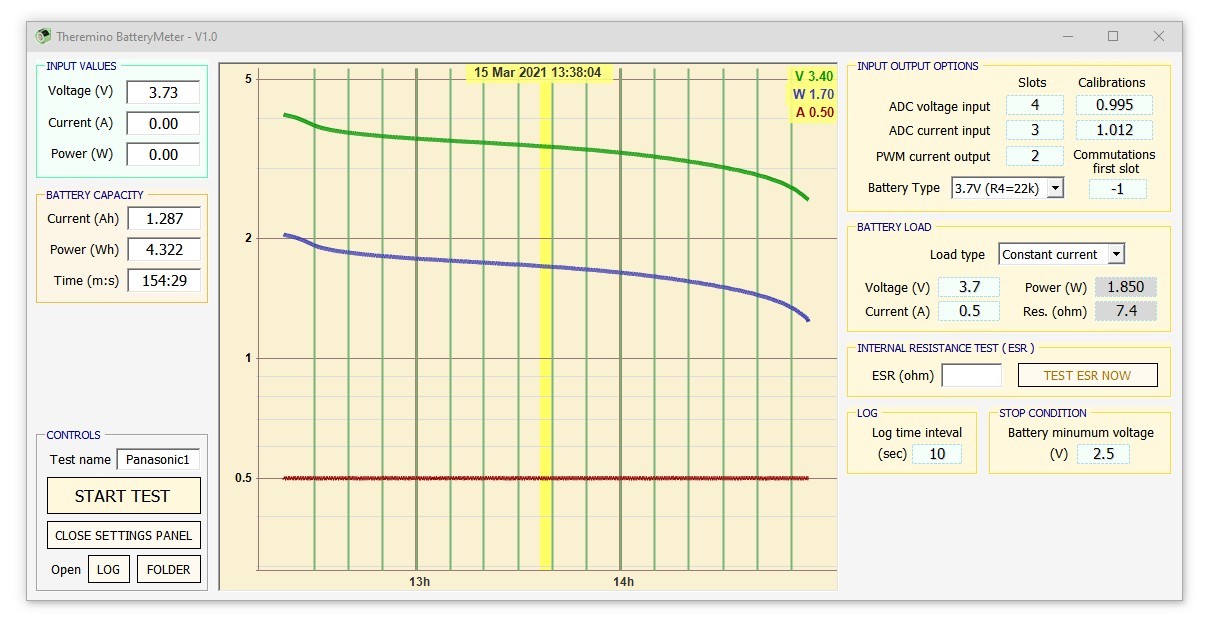
Central panel with graphics
– By pressing the left mouse button on the graph and moving it left and right, the central point is moved and the voltage values can be read (V), power (W) and current (A), for each instant until the start of the test.
– If the cursor is on the graph, rotating the mouse wheel changes the horizontal time scale.
– You can also change the horizontal scale by pressing the left mouse button on the lower scale area and moving the mouse left and right.
– You can change the vertical scale by pressing the left mouse button on the vertical scale area and moving the mouse up and down.
– If you change the vertical scale by pressing the mouse button in the upper half of the scale, then the maximum value of the scale is modified, otherwise the minimum value is changed.
Panel on the right: INPUT OUTPUT OPTIONS
– Adjust the Slots to match those adjusted in the HAL application
– Regular “Calibrations” with the help of a tester. If you don't know how to do it, set them both to “1”.
– Regular “Battery type” for the battery type (see below how to match the hardware).
Panel on the right: BATTERY LOAD
– Adjust the type of discharge “Load Type”, it is usually used “Constant current”
– Adjust the discharge current “Current (A)” without exaggerating, it is usually used 0.5 A
Panel on the right: LOG
– Adjust a time interval, they are usually used 60 seconds.
Panel on the right: STOP CONDITION
– Adjust the end-of-charge voltage, usually for Lithium it sets from 2.5 to 3 volts.
Left panel: CONTROLS
– Set the test name (for example the name that you write on the battery with a marker).
– Before starting the test make sure the battery is fully charged.
– Remember that the battery must make good contact in the battery holder.
– Press START TEST and wait until the end sound (usually from 3 to 5 about hours).
– Pressing START TEST again can stop the test early.
– The button “SETTINGS PANEL” opens and closes the right panel with settings.
– The Open LOG and FOLDER buttons open and view previous test files.
Left panel: INPUT VALUES
– Voltage (V), Current (A) and Power (W) indicate the instantaneous measured values.
Left panel: BATTERY CAPACITY
– Current (Ah) and Power (Wh) indicate the capacity that grows during the test.
– Time (m:s) indicates the time from the start of the test in minutes and seconds.
WARNINGS
To obtain accurate measurements, the batteries must make good contact in the battery holder. To make sure it touches well, you start the test and wait a few minutes for the voltage to drop a little’ and stabilize. Then the battery is slowly rotated until the maximum voltage value is marked in the first box at the top left “Voltage (V)”. If turning the battery the measured voltage does not change then the battery holder is of good quality, if it changes a lot then you have to find the best spot. If the voltage changes a lot and it is not possible to stabilize it at the point of maximum voltage, then you should replace the battery holder with a better quality one.
We wrote it but it is good to repeat it. The previous test (rotate the battery) it must be done with the test started, ie with the green START TEST button. If the test is not started then the current is zero and the battery holder contacts are not stressed enough.
The two fine calibration boxes for the voltage and current are for the fussy eaters who want to reach accuracies of around one per thousand. A tester must be used to adjust them, connecting it in parallel to the battery first (and adjust the voltage) and then in series on the drums (the test is started and the current adjusted). But in practice the normal accuracy of about the 5% it's more than enough so you can safely set these two boxes with the value “1” and forget about it. If you use them, keep in mind that the settings are separate for each range you choose with “Battery Type”.
The battery must be fully charged before starting the test, it is recommended that you use a charger and try, at the end of the charge, if by moving the battery in the connector it is possible to restart the charge and add a little more.
To save time, you could adjust the discharge current to about one amp and do the test in an hour or two (with the 18650 lithium). But a smaller capacity would be measured and the problems of false contacts in the battery holder would increase. It is therefore advisable to use a half ampere current, which allows to measure the batteries 18650 in a time from 3 at 5 hours. Possibly lower currents could also be used, for example, 200 or 100 mA but the test time would increase a lot.
Under some conditions the temperature of the TIP42 transistor, of the MOSFET and of the load resistor R_LOAD, it could go up a lot. If currents over i 200 mA and especially with 6 or from 12 volt it is good to check the temperature of these components and eventually connect them to a larger heat sink.
The minimum end-of-discharge voltage must not be too low, otherwise the batteries will be damaged.
– For lead-acid batteries from 12 volt the minimum is 10 volts
– For alkaline batteries from 9 volt the minimum is 4.7 volts (and use the scale from 12 volts)
– For lead-acid batteries from 6 volt the minimum is 5 volts
– For lithium batteries the minimum is 2.5 volts (but during normal use it is best to stop at 3 volts)
– For alkaline batteries the minimum is 0.7 volts
– For NI-MH batteries the minimum is 0.9 volts
Connect the battery only after selecting the right range (1.5, 3.7, 6 or 12 volts) and unplug it after finishing the test. If the flow rate is not right, nothing breaks, but the batteries from 6 and 12 volt could cause the USB communication to stop and you will have to restore it by pressing “You acknowledge” on the HAL application or by closing and restarting Battery Meter.
Be very careful to connect the batteries with the positive on the right side. By connecting the batteries from 6 volts up, you could burn the transistors, the MOSFET, the resistor R_LOAD, and the PIC of the Master. With batteries of 1.2, 1.5 and 3.7 volt shouldn't break anything but it's best to avoid it anyway.
DOWNLOAD OF THE APPLICATION FILES
Download the Theremino BatteryMeter application – Version 1.0
Theremino_BatteryMeter_V1.0
Theremino_BatteryMeter_V1.0_WithSources (for programmers)
For all systems from Windows XP to Windows 10, both 32 which in 64 bit (Linux and OSX with Wine)
The necessary hardware modules
The Theremino BatteryMeter application needs a special hardware and in the next chapters we will explain how to build it. They are few components but it takes a while’ of experience in electronics. Eventually have it built or have a kit made by Lello. You can find him on eBay as a seller “maxtheremino” or you can write him to: ufficiotecnico@spray3d.it
At least one module is required to operate the BatteryMeter application Master and a Battery Meter module, or a Master and a Battery Meter V2.
If you add one of the two Battery Meter Switch modules, you get the switching of the ranges from the software and you can measure all types of batteries, without manually modifying the resistor R4.
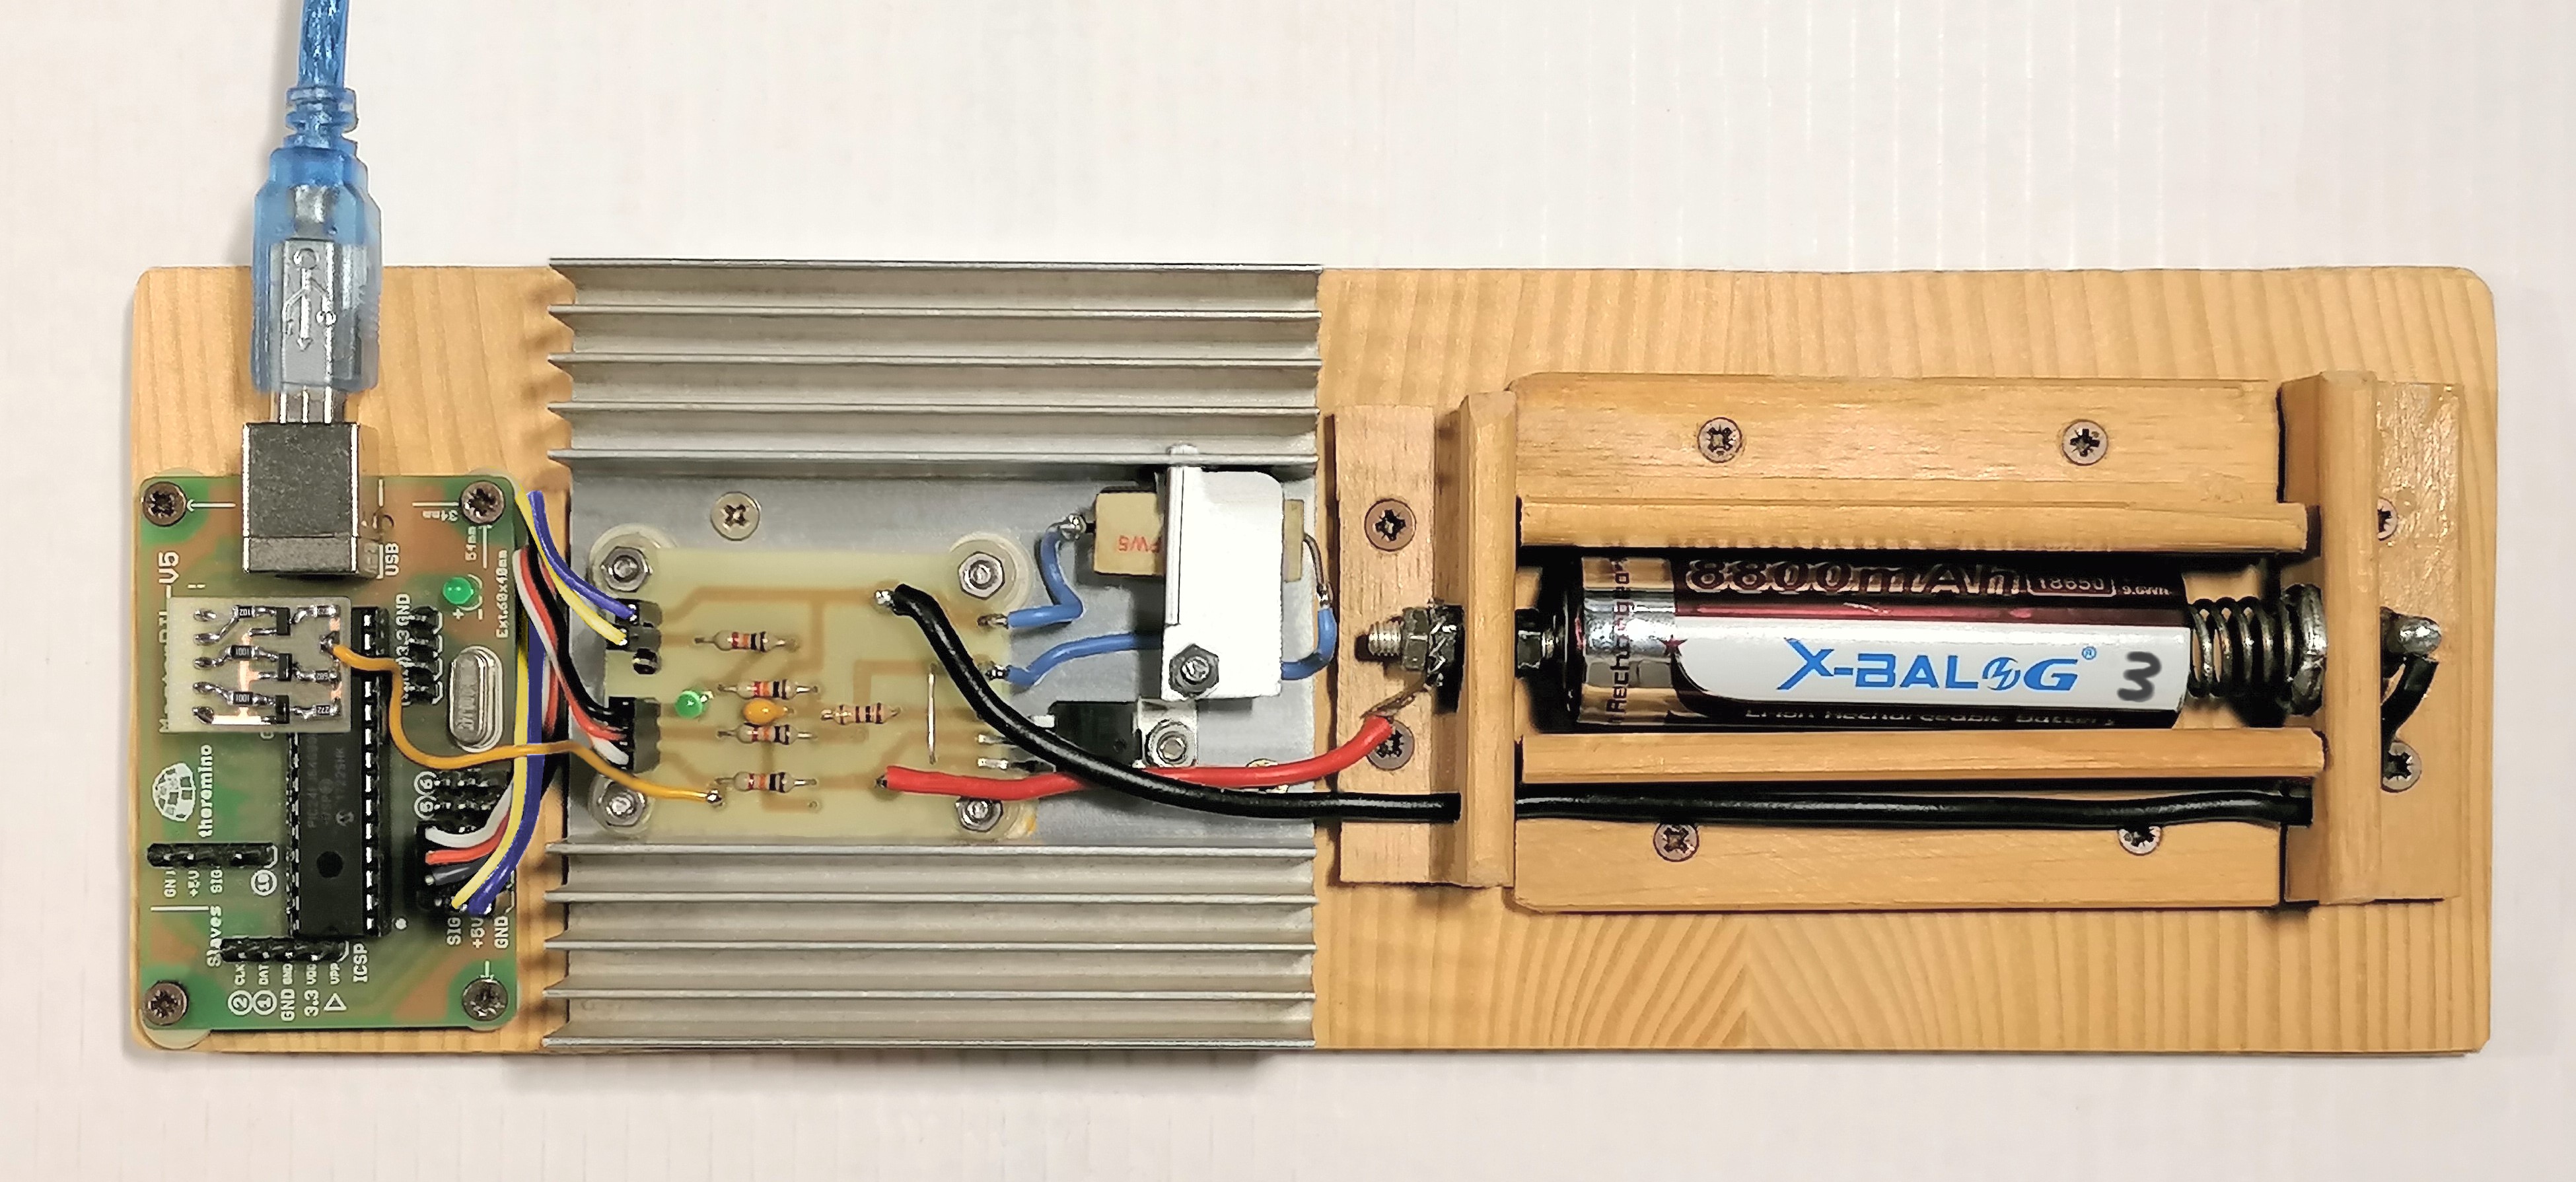
In this image you can see an example of the connections to be made. In this case the Master modules were used, Battery Meter V2 e Battery Meter SwitchSMD.
The heatsink in this example is abundant, in many cases a smaller heatsink could be enough but exaggerating a little’ you are more relaxed. Note the MOSFET and the R-LOAD resistor that have been pressed against the aluminum of the heatsink.
The battery holder has a good spring, we recommend paying close attention to the contacts and the spring, because maintaining a good connection with the battery is important and also quite difficult.
In a second trial version of the Battery Meter we tried using commercial battery holders purchased on eBay.
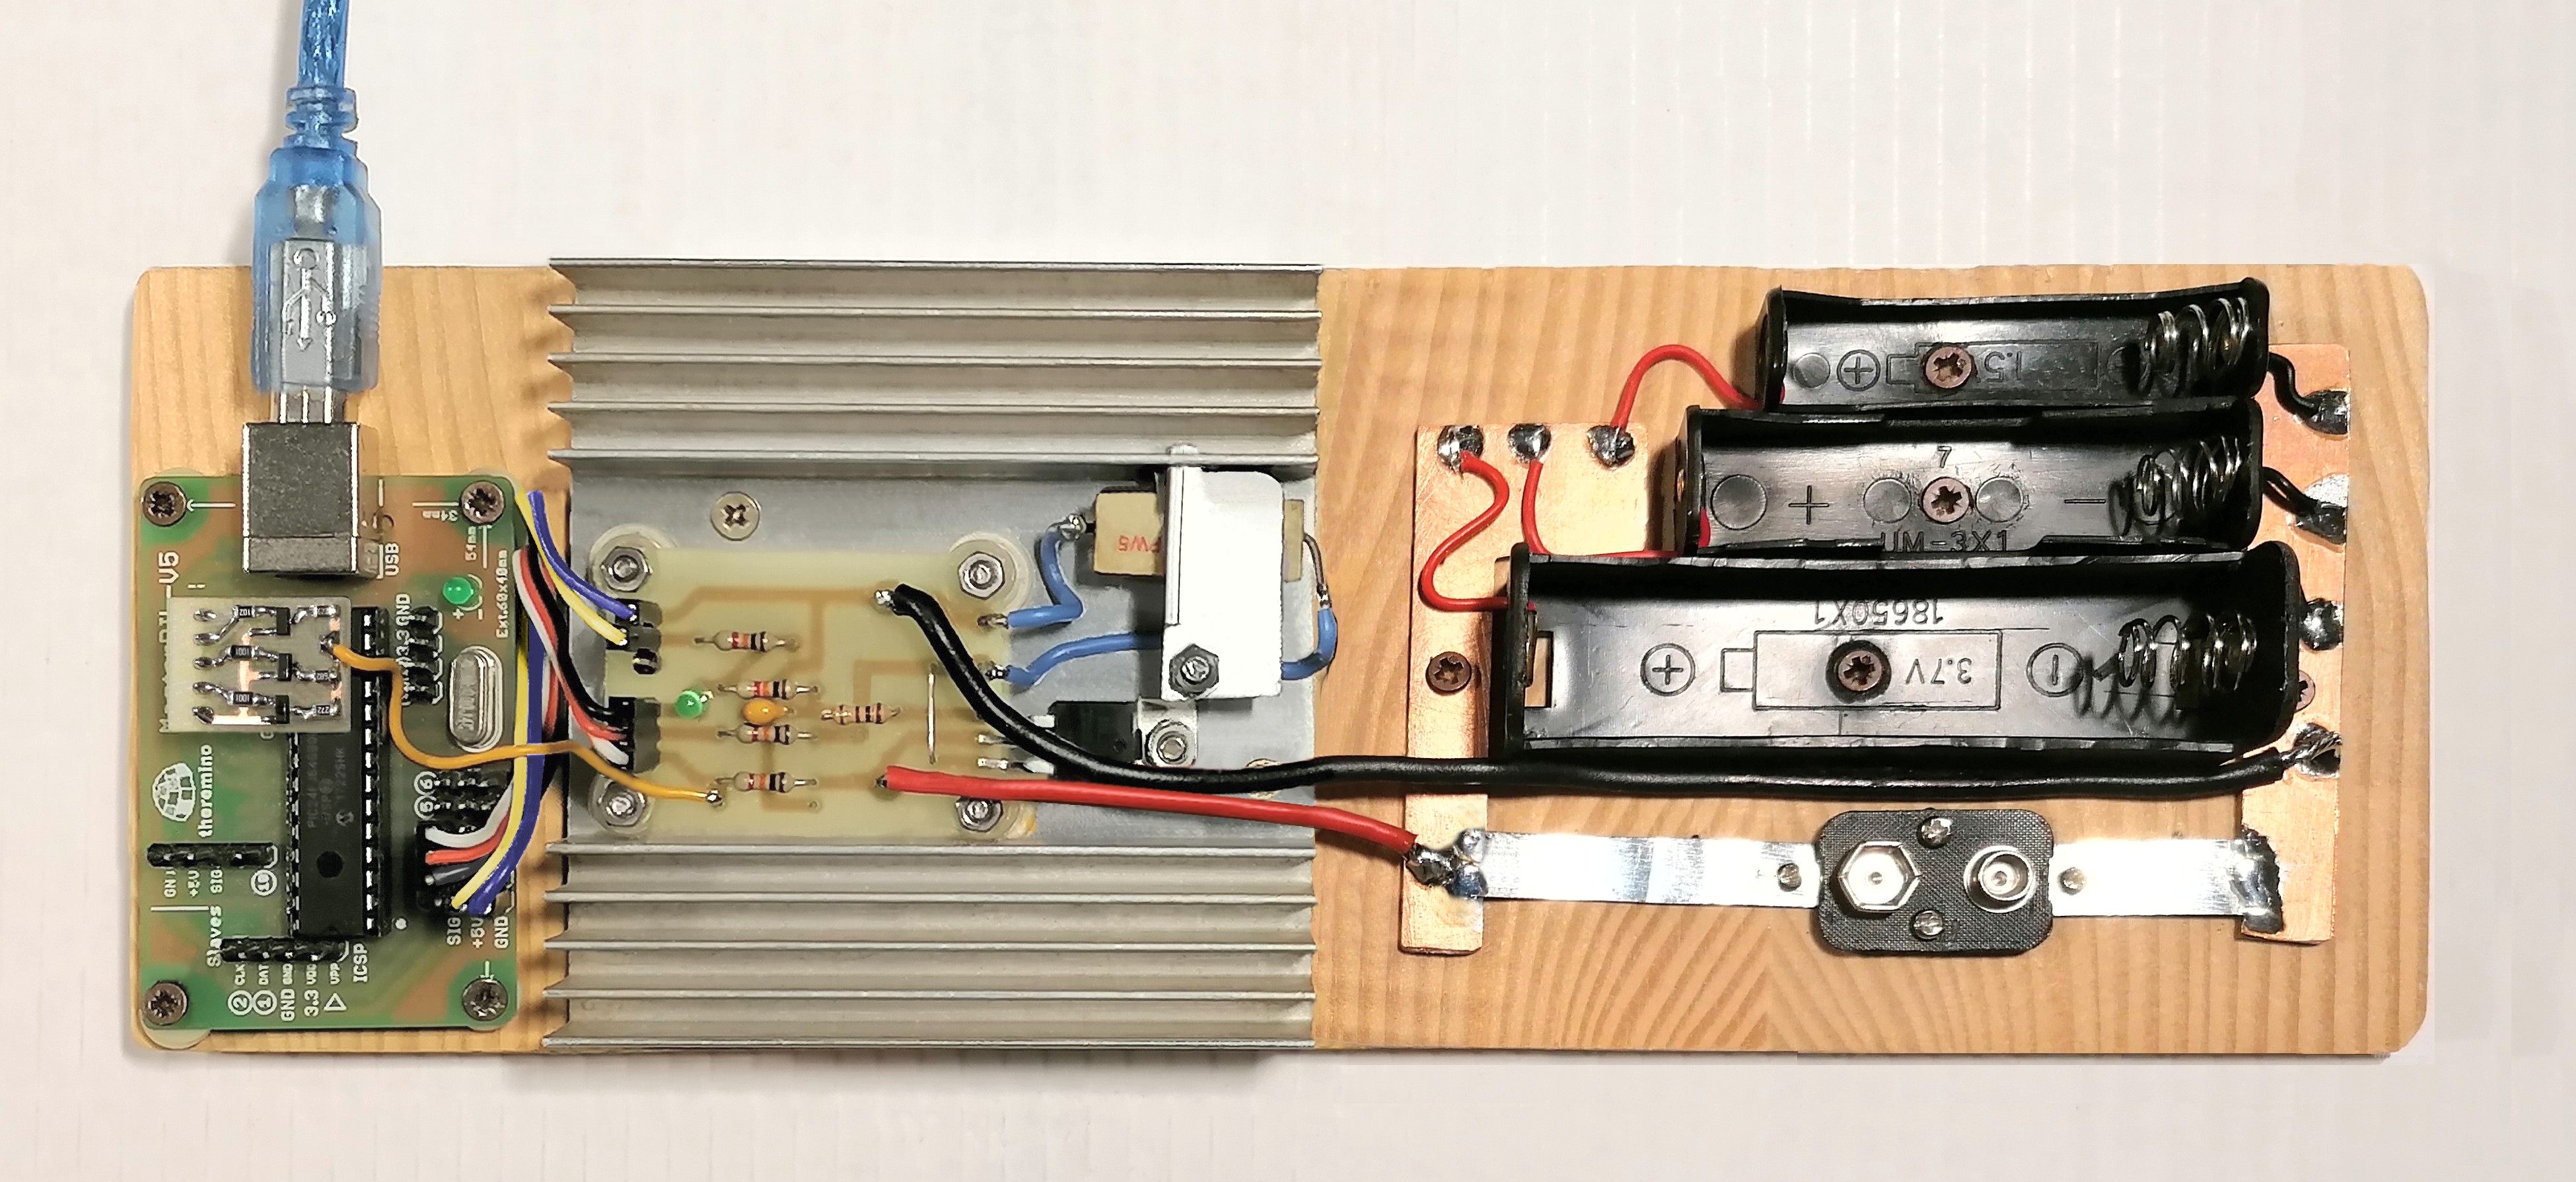
We were skeptical because if the battery does not make good contact the measured voltage drops, but the commercial battery holders performed better than expected. If you do a little’ be careful and rotate the battery to find the best spot you can definitely use them.
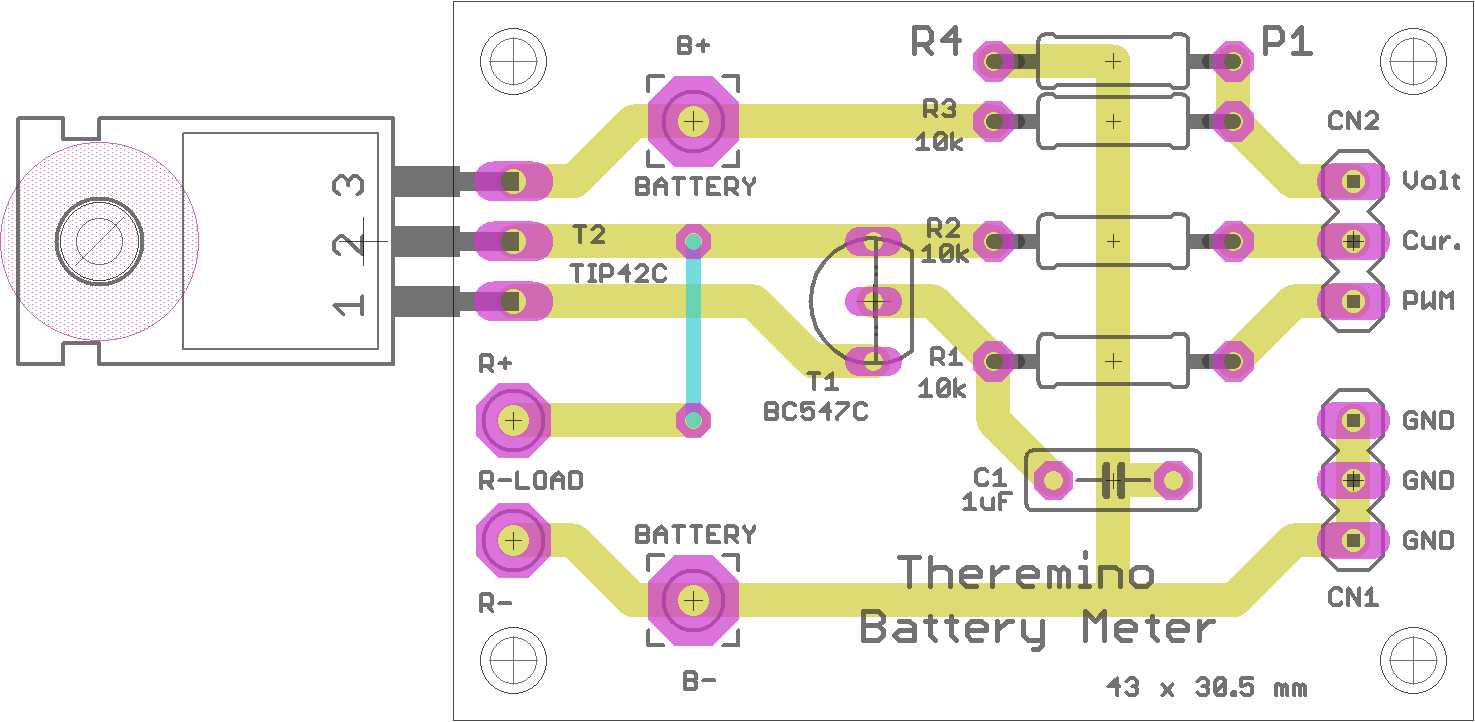
Form “Battery Meter”
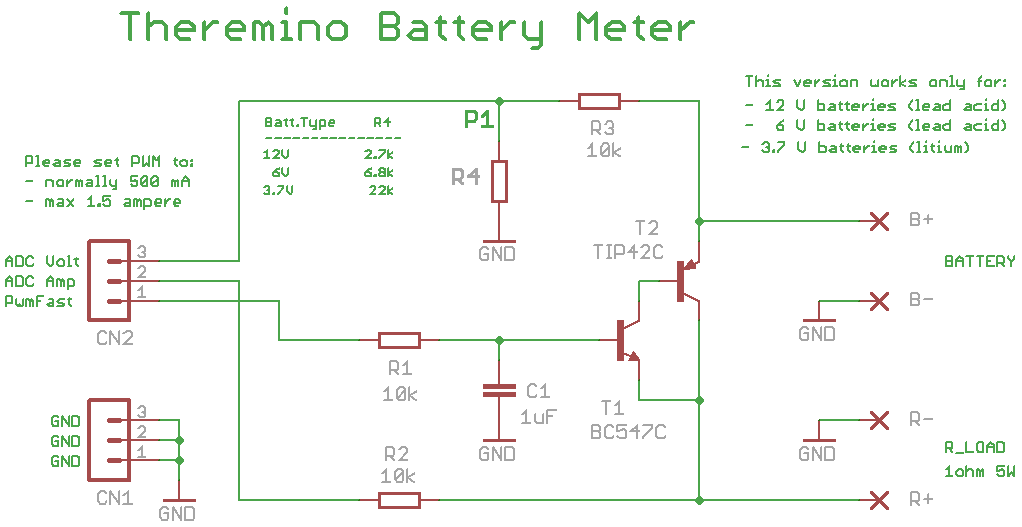
This circuit uses only two common transistors and a few other components. It can be used to measure lithium batteries from 3.7 volts and, replacing the resistor R4, also for batteries from 6 or from 12 volts (or even from 9 volts using the scale from 12 volts).
With this circuit you will not be able to measure batteries from 1.5 volts and from 1.2 volts, if you think you want to measure them use the next Battery Meter V2.
- R3 and R4 form a divider which lowers the battery voltage below i 3.3 volts (maximum voltage measurable by the ADCs of the Master module).
- R1 and C1 create a direct voltage starting from the PWM signal arriving from the Master and send it to T1 and T2, which on the basis of the control voltage regulate the current absorbed by the battery.
- The battery current passes through the R_LOAD resistor which dissipates a part of the power and therefore must be connected to a heat sink where T2 is also screwed.
- The current on R_LOAD develops a voltage which is measured by a second ADC across R2.
- The PwmFast inputs, ADC Amp and ADC Volt of the CN2 connector, connect to PINs 2, 3 and 4 of the Master. Pay attention not to the Pins 1, 2 and 3, ma ai Pin 2, 3 and 4.
- All three pins of the CN1 connector connect to GND on the Master.
Form “Battery Meter V2”
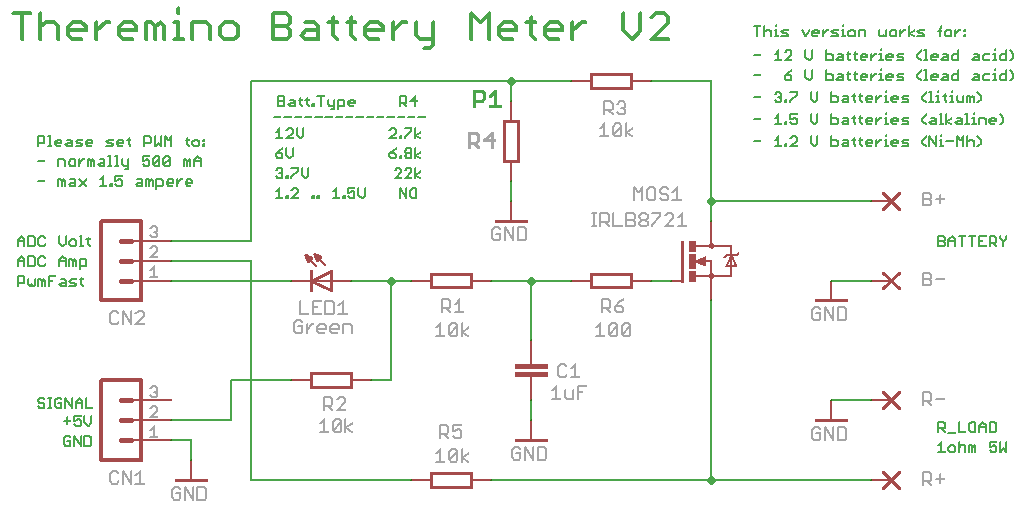
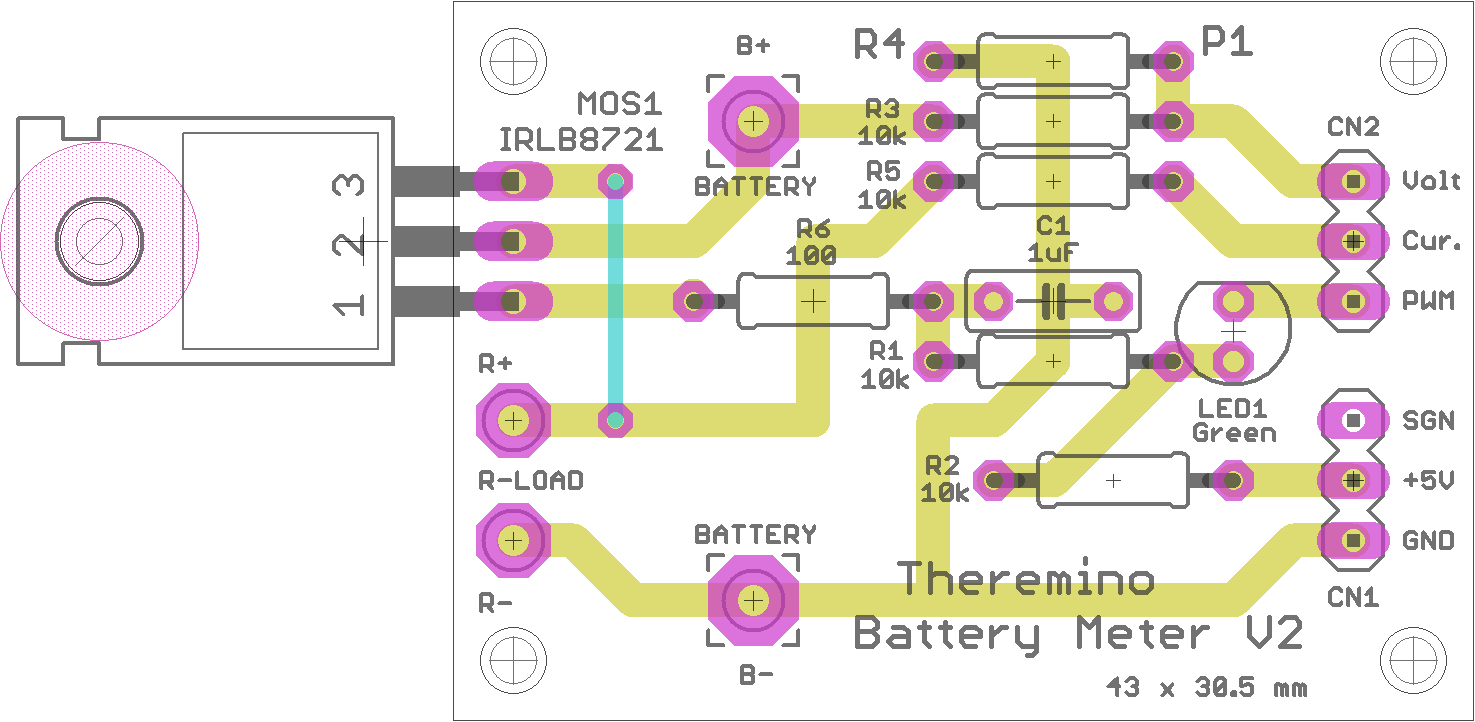
This V2 module replaces the previous one, but with the additional possibility of measuring the capacity of batteries from 1.5 volt and also from 1.2 volts. The circuit uses a special MOSFET with very low gate voltage (IRLB8721) which cannot be replaced with others, but that can be found easily on eBay.
- R3 and R4 form a divider which lowers the battery voltage below i 3.3 volts (maximum voltage measurable by the ADCs of the Master module).
- The LED raises the voltage by about 1.8V to drive the MOSFET in the right working area. It must be a red or green LED. Do not use purple LEDs, blu, orange, White, or infrared.
- R1 and C1 create a DC voltage starting from the PWM signal arriving from the Master and send it to the MOSFET, which, based on the control voltage, regulates the current absorbed by the battery.
- The battery current passes through the R_LOAD resistor which dissipates a part of the power and therefore must be connected to a heat sink where T2 is also screwed.
- The current on R_LOAD develops a voltage which is measured by a second ADC across R2.
- The PwmFast inputs, ADC Amp and ADC Volt of the CN2 connector, connect to PINs 2, 3 and 4 of the Master. Pay attention not to the Pins 1, 2 and 3, ma ai Pin 2, 3 and 4.
- The three pins of the CN1 connector are connected to GND, +5V and SIGNAL of the first PIN of the Master.
Form “Battery Meter Switch”
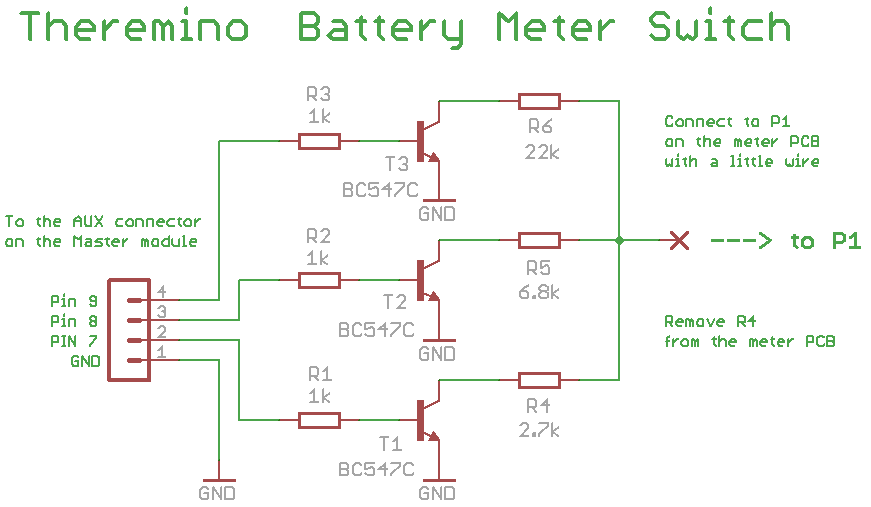
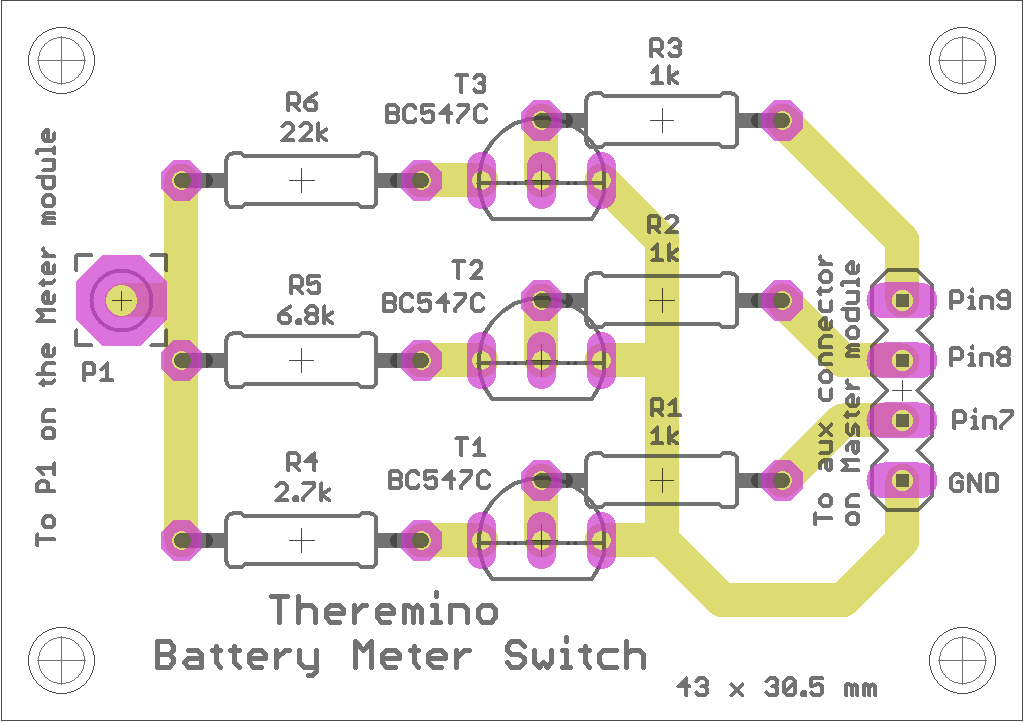
This form is not strictly necessary. It is only used to change scale automatically, by editing the box “Battery type” in the software.
Without this module to change scale you would have to manually replace the resistor R4 of the Battery Meter module, or use a multi-position rotary switch to connect the three 2.7k resistors, 6.8k and 22k instead of R4.
If you are using this module remember to connect a small insulated wire between point P1 of this circuit and point P1 of the Battery Meter module. And also to delete R4 from the Battery Meter module.
Form “Battery Meter SwitchSMD”


This module is identical to the previous one but in SMD version. Those who prefer to use traditional components can use the previous version, also buildable on a millefori.
This SMD version is designed to have a small and light module. So light that it can be plugged directly onto the Master connector and do without screws and the connecting cable.
Without this module to change scale you would have to manually replace the resistor R4 of the Battery Meter module, or use a multi-position rotary switch to connect the three 2.7k resistors, 6.8k and 22k instead of R4.
If you are using this module remember to connect a small insulated wire between point P1 of this circuit and point P1 of the Battery Meter module. And also to delete R4 from the Battery Meter module.
Download the projects of the four Battery Meter modules
This file includes projects in Eagle format, the Spice simulations, 3D images, the wiring diagrams and GCode files for the cutter of the four Battery Meter modules:
Theremino_BatteryMeter_Modules.zip