
Theremino Translator
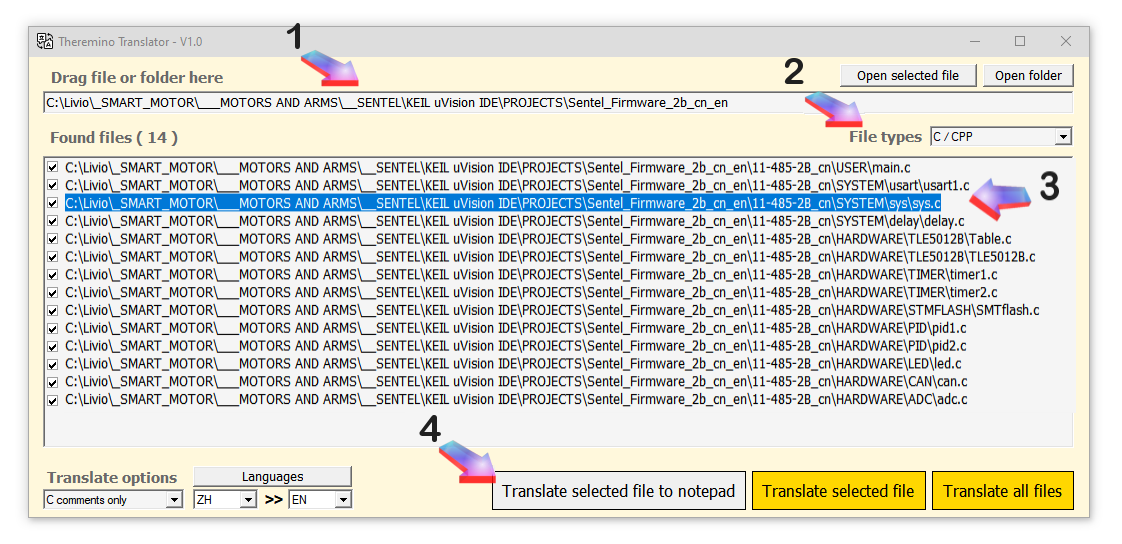
This application is one of a kind, currently (2024) You won't find anything like it online or use locally, Not even paying for it. We have searched for a long time but there are only applications to translate documents and they are all unsuitable for those who work with the software.

Translating software is a terribly tedious and stressful task.
All it takes is to lose focus for a moment and it can happen that something important changes and cause strange and hard-to-find errors.
So in the end we decided to write this application and it wasn't easy because you have to do delicate surgical operations on the files without missing a single character.
However, don't expect this app to do everything on its own,
Read the documentation to learn how to use it well.
![]() Documentation files in Italian
Documentation files in Italian
Theremino_Translator_Help_ITA.pdf
![]() Italiano documentation file
Italiano documentation file
Theremino_Translator_Help_ENG.pdf
![]() 中文文档文件
中文文档文件
Theremino_Translator_Help_CHN.pdf
![]()
![]()
![]() Original documents in ODT format
Original documents in ODT format
Theremino_Translator_OpenOfficeDocs.zip
Notes for versions
Version 1.0: This version, even if it's your first published, is already well proven and should not contain errors.
Downloads di Theremino Translator – Version 1.0
Theremino_Translator_V1.0
Theremino_Translator_V1.0_WithSources (complete design for programmers)
Version for all Windows in 32 and 64 bit. For Raspberry Pi, Linux, Android and OSX, read the installation notes.
Theremino OCR
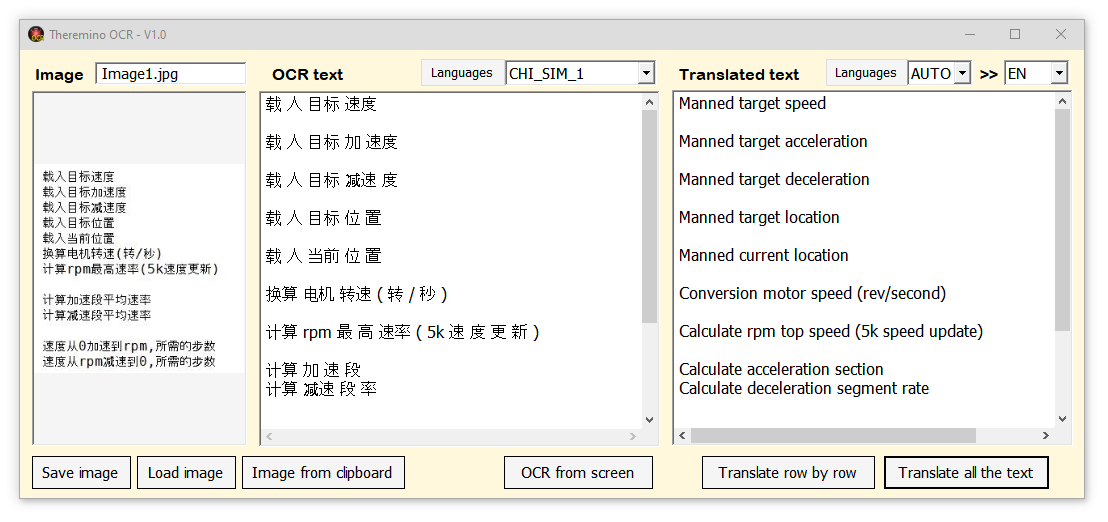
This application is very useful for extracting text from images and after extracting it you can also translate it immediately, without the need to copy the text to Google Translator and then copy it back where you need it.
A godsend in these times of globalization for those who often have to deal with Chinese software and objects, and perhaps even more so for the Chinese who have to live with a world of software all in English.
Notes for versions
Version 1.0: This version, even if it's your first published, is already well proven and should not contain errors.
Downloads di Theremino OCR – Version 1.0
Theremino_OCR_V1.0
Theremino_OCR_V1.0_WithSources (complete design for programmers)
Version for all Windows in 32 and 64 bit. For Raspberry Pi, Linux, Android and OSX, read the installation notes.
Theremino Updater
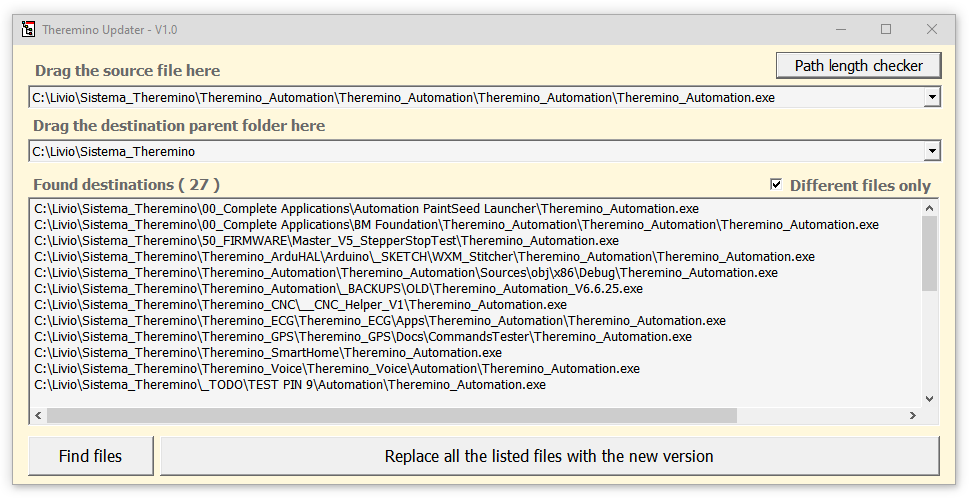
This application is very useful to update the EXE file of our applications in all your projects.
This application can update any type of file, but we recommend that you keep your INI files in your projects, and replace only the EXE file (except in special cases where DLL or other files also need to be replaced).
In our system, we usually keep a folder for each project that contains all the applications of that project. So if we publish a new version of the HAL, or the SlotViewer, or Automation, You may need to update it in dozens of different projects. In such cases, by using this application you will save quite a bit’ of time.
Operation
- In the first box, drag the EXE file of the new version.
- In the second box, drag the parent folder under which are the folders with all your thereminic projects.
- Keep the picture active “Different files only”
- Press the “Find files”
- In the large text window, all the files to be updated will appear.
- Pressing the big button “Replace all the listed files…” You'll update them all in a second.
Notes for versions
Version 1.0: This version, even if it's your first published, is already well proven and should not contain errors.
Downloads di Theremino Updater – Version 1.0
Theremino_Updater_V1.0
Theremino_Updater_V1.0_WithSources (complete design for programmers)
Version for all Windows in 32 and 64 bit. For Raspberry Pi, Linux, Android and OSX, read the installation notes.
Theremino 3D


What is this? The Theremino System already knew little, with the Theremino3D we are just fine. Is not a 3D object editor, you don't need to make games, the playstation is better… but then it's no use, SPQT!
Calm, Theremino3D is an educational application, a basis to deal with 3D, gravity and physics of solids. Theremino the system doesn't want to produce or sell, but is content to show “How do you”.
And, for pleasure, don't start to say that there are games that have better graphics, We know, but there is a difference, You can open and edit them. The Theremino3D is Open Source and DIY, his code is free and you can do whatever you want.
Theremino3D is a collection of 3D techniques, simplified to the point of being “almost” usable. The best algorithms available to the “Diy”. The application is divided into one hundred “scene” and there are many scenes leave specially empty for experiments. Use 3D objects is not easy at all, but the Theremino3D might be, for some, the easiest way to get started.
The physical parameters of objects, gravity, interactions between solid bodies (Rigid Bodies) and fabrics (Soft Bodies) are simulated very well from Bullet (Open source engine that handles collisions). The shadows (very realistic) are calculated with unpublished algorithms, designed by us. The 3D is run under DirectX. Efficiency is “monstrous”, with hundreds of objects in collision and 3D sounds attached to objects, CPU consumption is practically zero (on machines that have a good video card)
Of course, Theremino3D can communicate with other applications on the system, through the slots. It then becomes possible to every “Fey” interaction, How to move 3D objects with MIDI commands, or with bananas, like in this video: www.youtube.com/watch?v = 5aYvvhURFaU

This is the control window, to open it, press F1. All other commands are well explained in the box “Commands” This prompt.
Mini HELP
Remember to press F to see better, try the arrow keys and mouse buttons, also in conjunction with CTRL and SHIFT. Attract and repel the mouse wheel. The left mouse button “takes” the objects to move them and, with CTRL and SHIFT, Moves them back and forth. The space bar is used to change modes of movement. The 0 to 9 and by CTRL-0 CTRL-9, to change the scene. To make friends with the Theremino3D, point your cursor over something and hit the right mouse button.
– – – – – –
Libraries needed
In the event that the application doesn't work, install DirectX, as indicated in the installation notes. From version 1.4 on the DirectX installation should no longer be needed, on any operating system.
Downloads of Theremino 3D – Version 1.7
Theremino_3D_V1.7
Theremino_3D_V1.7_WithSources (version for programmers)
Version for all Windows in 32 and 64 bit. For Raspberry Pi, Linux, Android and OSX, read the installation notes.
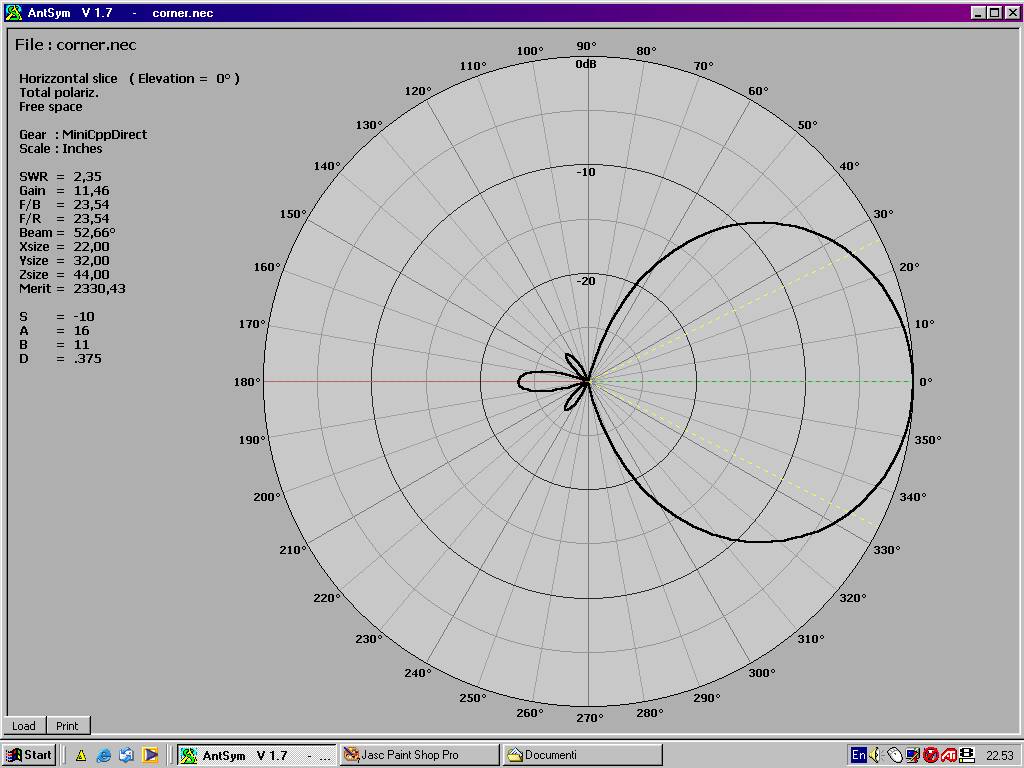
Antenna Optimizer
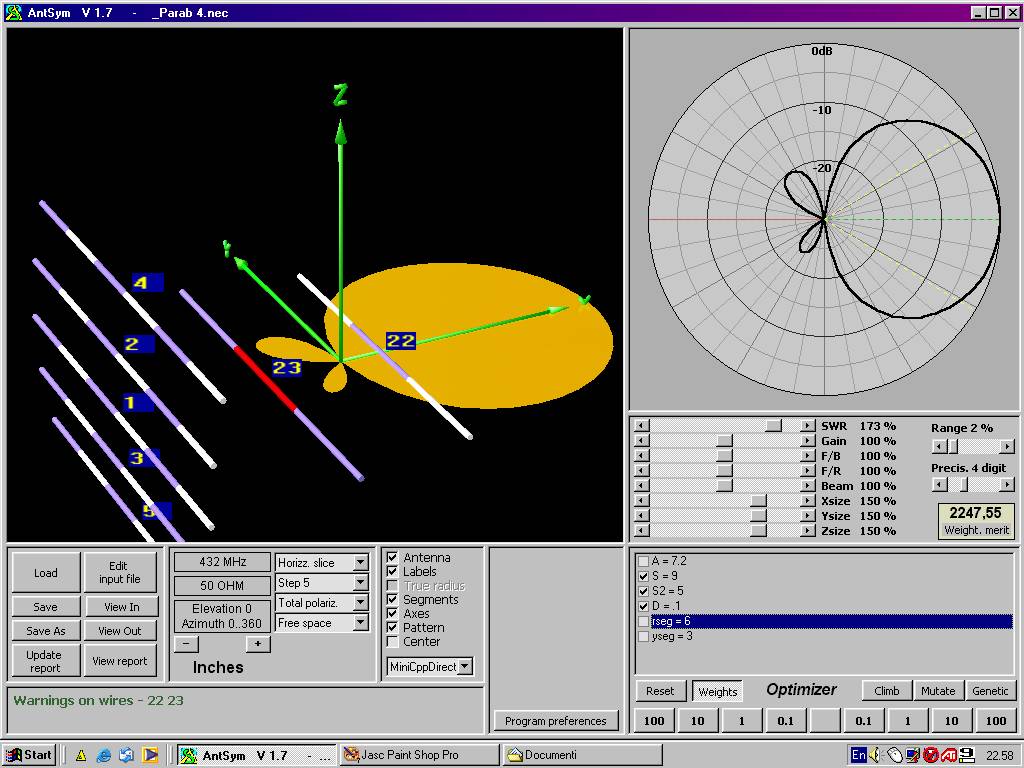
This application is a numerical Simulator of electromagnetic fields. It mainly uses to optimize antenna. Provisionally we publish the application “AntSym”, ancestor of “Theremino_AntennaOptimizer”, We will publish by spring 2017.
Both AntennaOptimizer that AntSym are compatible with the file format “.NEC” used by 4Nec2 (well known application written by our friend Swedish Arie Voors). So in the internet you will find many examples and it is possible to Exchange files. If you prefer you can also edit the appropriate editor for files of antennas. In the folder NecFiles are already available over 1200 examples of antennas (some well made, other absurd or incomplete, but all useful and interesting).

Simple instructions
Not all files can be used to perform optimizations. For the optimization process the files should be structured properly, with SY defining the editable parameters.
To edit the files you press “Edit input file” and edit your text with the default editor on your system (typically Notepad or Notepad ++) . Figuring out how to edit the files you browse the sample files.
The files are then processed in NEC's input format. You can see how they are transformed by pressing the button “View In”. The Protocol accepted by NEC is in the file “NEC User's Guide“.
Finally the engine output files and you can produce an NEC explore it by pressing the button “View out”
The optimization process depends on the parameters:
- Weight (merit) – This is the score that is given to the antenna and optimization algorithms seek to improve. The score is calculated based on the “weight”, who are the “weights”, that is, the relative importance you from the characteristics of the antenna. The “weight” are explained one by one in the next paragraph.
- Range – Adjusts the amount of change that is made to any attempt of optimization.
- Precision – The number of significant digits to be used in the parameters of the antenna,
The optimization process depends on the weights (weight) that you set by pressing “Weight” and adjusting the sliders to promote certain characteristics rather than other:
- SWR – This is the standing wave ratio, the optimal value would “1”, but normally we consider acceptable values up to 1.5 and, in some cases, If you have an antenna tuner, even higher values.
- Gain – The gain of the antenna. Usually it should be as high as possible.
- F/B – Relationship between the gain in forward and lateral. Usually it should be as high as possible.
- F/R – Relationship between the gain in back and forth. Usually it should be as high as possible.
- Beam – Beam width for a gain of – 3DB below maximum.
- Xsize – Length of antenna in mm. It is usually better to have small antennas.
- Ysize – Width of antenna in mm. It is usually better to have small antennas.
- Zsize – Height of the antenna in mm. It is usually better to have small antennas.
There are three different optimization algorithms:
- Climb – Each selected item is changed slightly and the process is repeated several times until the local maximum was found. One can imagine the local maximum like the tip of a hill in a complex consisting of several valleys and hills. The method detects only the tip nearest Hill Climb but is unable to overcome the valleys and locate distant hills that may be higher.
- The changed – Each selected element is modified with random mutations. This method can, in some cases, splurge on a territory broader than just Climb.
- Genetic – In addition to random mutations using a population of many individuals and each generation only the best breed (using a random half pairs of parameters they). This method is similar to that of natural selection and in some cases is considerably faster than the previous two methods.
key: “Reset” reset the red and green lines that show the aggravations and improvements when tuning.
The button “Weight” view the sliders that you regulate the weights and then instructs the optimizer which characteristics must favour.
The buttons with numbers (100 10 1 0.1 – 0.1 1 10 100) change the selected parameter. With these buttons you can change the characteristics of the antenna to drive the optimization or manually part of optimization.
Similar applications
There are similar applications, for example, the ’ great 4Nec2 written by our friend Swedish Arie Voors. About in 2000 We started together to write these applications and we exchanged a lot of code, us we taught him how to use 3D and he taught us many aspects of NEC. Then we took two different directions. Ariel wrote a very complete application, investigating every aspect of antennas including, for example,, even the “Near field”. Instead, we are dedicated to maximizing and comparing the calculation engine NEC2 and various simplified versions in C++ and VB with name “Mininec”.
You can compare different calculation engines can increase the reliability. If two different engines give similar results then the antenna is not critical and the simulation is well set. All versions of Mininec are functionally identical, but some are considerably faster than NEC2, which is basically the original version written in Fortran on punch cards.
There are other more complex applications, commercial and closed source, but especially heavy to install and difficult to use. Are applications that require a long initial learning time, so we recommend to use them only if you are industry specialists.
The NEC2 originally written in Fortran
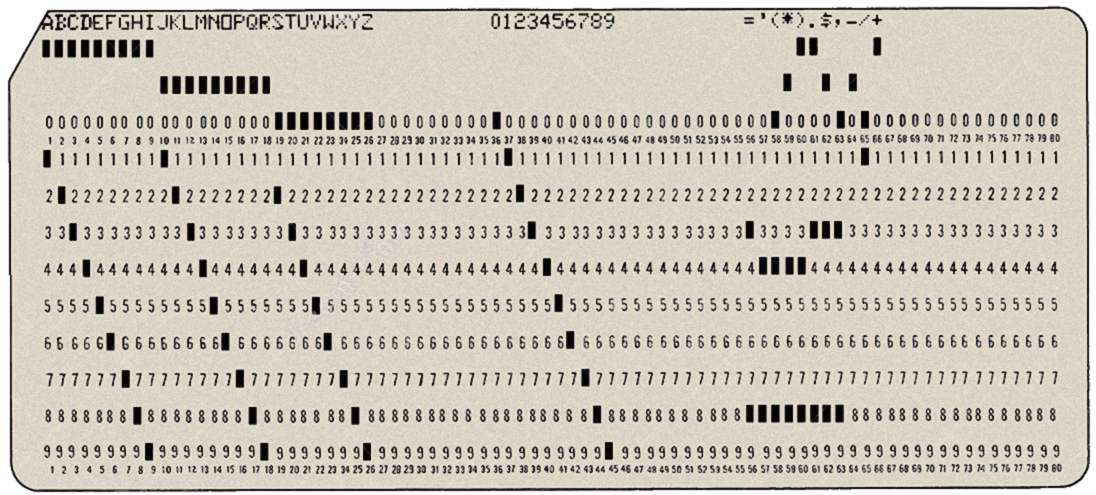
The generous Open Source publications Jerry Burke and A. Knoll, who wrote the original versions of NEC (Numerical Electromagnetic Code) at the “Lawrence Livermore Labs”, in 1981, they started all this. They deserve a big thank you and even admiration. The algorithms that have written with the limited means of then (and it was not easy) are still valid after nearly forty years ’.
Documentation
- NEC2 documentation in files: “NEC Theory“, “NEC Method of Moments” and “NEC User's Guide“
- The original sources written in Fortran you download from here: “NEC_Sources_Fortran“
- Other information is in This site and in the instructions of the application 4Nec2.
Downloads
Soon (Spring 2017) pubblichereMo the Theremino_AntennaOptimizer application, complete with instructions and thereminico style. For now (only for the impatient and experienced programmers), We publish the original version of AntSym with a few small tweaks. This version is essentially the same as it was in 2002, including the ’ error in the title (Simulator instead of Simulator), nothing wild and naïve statements and programming style.
Note pER versions
Version 2.0: Fixed some bugs but the UI is always that of the 2002.
Version 2.1: Fixed a bug that caused the loss of some areas of 3D using NEC2 on very complex antennas – The user interface is always that of the 2002.
AntSym downloads – Version 2.1 – Ancient written version in 2002 in VB6
AntSym_VB6_V 2.1 (just to look forward, There are no instructions and the UI is wild)
To run this version you must register the DLL by pressing the right mouse button on the file “CopyAndRegisterDLL(run as admin).exe” located in the folder “Registerdll” and then choosing “Run as administrator”.
Led Calculator

This application is a wildcard for the measures on LEDs, facilitates conversions between units and helps design lighting systems and led array with maximum efficiency. The help file “Measuring devices” Describes a simple measuring instrument available in few minutes, with three components that cost a total of less than 9 Euro.
Notes for versions
Version 2.2: Corrected errors in reading files that some values were changed or lost decimals. Even the names of the files were not restored and saved correctly. Now the instructions are in English.
Version 2.3: Improved colors and the gradient menu to Windows7 and Windows10.
LedCalc downloads – Version 2.3
2.3 LedCalc_V
LedCalc_V 2.3 _WithSources (complete design for programmers)
Version for all Windows in 32 and 64 bit. For Raspberry Pi, Linux, Android and OSX, read the installation notes.
Original documentation for Auditors of translations
LedCalc_OpenOffice_Docs
Flicker Meter

The "Flicker", also called "Flicker", is the instability of the light produced by electric lamps.
Numerous studies have shown that flickering, Although high frequency and then totally invisible, It can also cause headaches, eyestrain and nausea.
Also pets are much more sensitive than we are to the effects of flicker. Many of them, for example birds, see light variations up to frequencies around 200 Hz, then ten times greater than what we. For them a movie appears as a sequence of photographs and a light to our eyes it seems perfectly stable, It may appear as a strong timing light and cause a severe discomfort.
Commercial appliances exist to measure flicker very expensive (from 700 to 3000 Euro). But we can easily build this meter, spending ten euros or even less, leveraging a Master module and a Tablet that we already have.
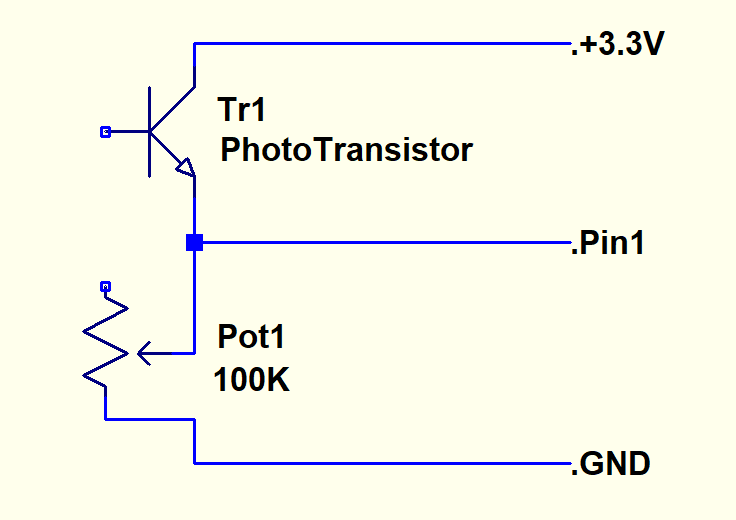
The meter only contains three components so you can build it “DIY”. The third component that here you don't see is the Master module. The three wires GND, PIN1 and 3.3 V go to ICSP connector of the Master as described in the following documentation.
Once built this device, simply take a tablet and take a panoramic tour of his home and those of friends. It will be a surprise to discover that a good half of the lamps, even the most unsuspected, have high average flicker and are to be deleted.
A special note for those who will build this appliance
While the measure is the lamp that the meter must be well fermi. It takes minimal vibration or rocking to distort the measured values. This effect is compounded when measuring very low values, around one percent or less. In these cases even just walking into the room to alter the measured value.
Documentation in Italian
Theremino_FlickerMeter_Application_ITA.pdf
Theremino_FlickerMeter_Hardware_ITA.pdf
Theremino_FlickerMeter_TestLamps_ITA.pdf
English documentation
Theremino_FlickerMeter_Application_ENG.pdf
Theremino_FlickerMeter_Hardware_ENG.pdf
Theremino_FlickerMeter_TestLamps_ENG.pdf
Original documentation for Auditors of translations
FlickerMeter_ODT-Docs.zip
Notes for versions
Version 1.1: This version, even if it's your first published, is already well proven and should not contain errors.
Version 1.2: Correct the alignment of the text in the box “Percent Flicker”
Downloads of FlickerMeter – Version 1.2
FlickerMeter_V 1.2
FlickerMeter_V 1.2 _WithSources (complete design for programmers)
Version for all Windows in 32 and 64 bit. For Raspberry Pi, Linux, Android and OSX, read the installation notes.
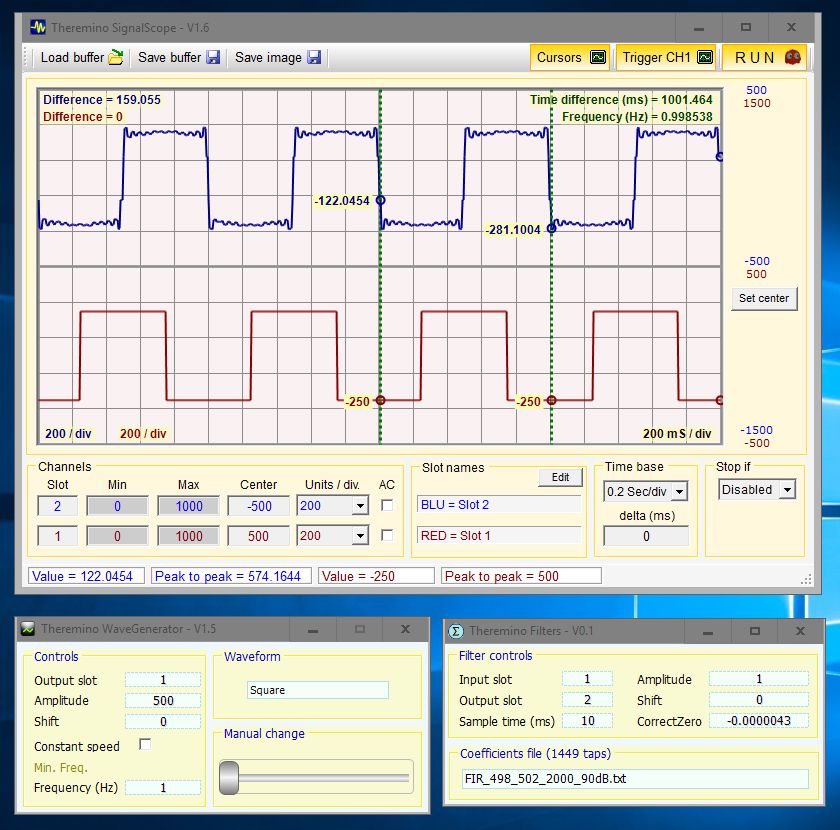
DAA – audio analyzer and oscilloscope
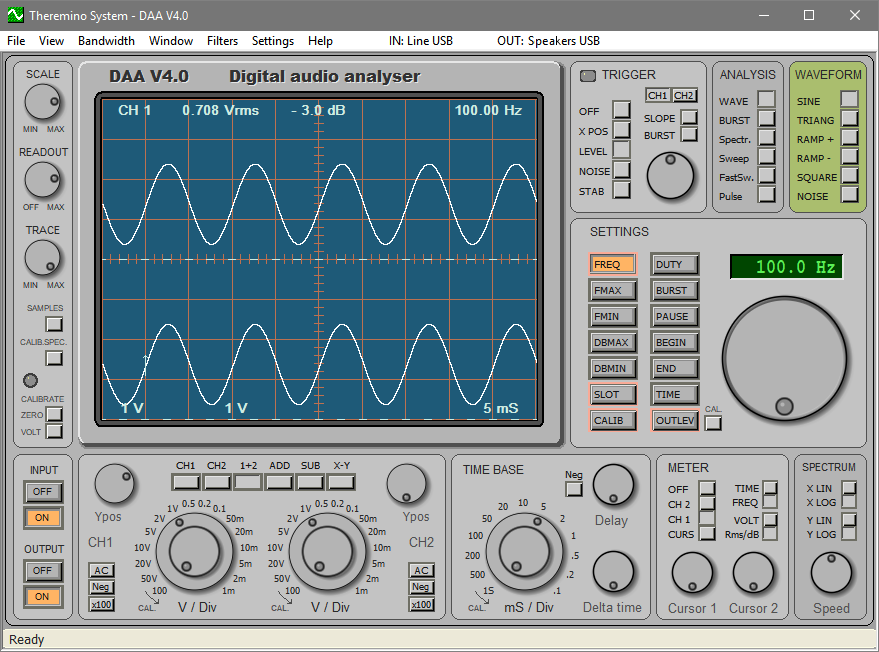
This application was written over 22 years ago, at the time of Windows95 and Windows98. It is not only an oscilloscope, also it includes a signal generator, a spectrum analyzer and sophisticated functions for measuring acoustic systems. In the audio range it is better than any oscilloscope that samples at 16 bits while the classic oscilloscopes (for example, Tektronix and Lecroy) They have the ADC from 8, 10 or at best 12 bit. On the other hand the classic oscilloscopes also measure high frequencies while the DAA will get to a few tens of KHz (depending on the sound card and its driver).
We have long used this application to equalize the large sound systems in clubs and concerts and when I worked as a sound engineer in the recording studio. Latest Versions (from 4 onwards), They have improved significantly. Now the app also works just like a classic two-channel oscilloscope.
You can measure the voltages and currents, both direct and alternating, as a tester. It measures the average value, the true effective value and the peak value with accuracy up to a millivolt. It measures the frequency down to hundredths of Hz, the period up to tens of microseconds, and the amplitudes up to tenths of a decibel.


Signal generator, measurement cursors and spectrum analysis with over 110 dynamic DB.


Analysis of systems with Pulse signals, Sweep and FastSweep and 3D spectrum analysis.
– – – – – –
sound Cards
PC sound cards have a bandwidth from 10 Hz up. In order to also pass the DC component of the signals you must use an external adapter plugged into USB, with a slight modification to the input circuit. The file “InputDevices.pdf“, you download below, explains what to buy and how to change tabs.
Using sound cards that we recommend (and that cost less than 10 EUR on eBay) you get two channels coupled in continuous. These sound cards are so precise and stable, once the calibration is performed, the zero line stays in place forever. No need to recalibrate every time you turn, as instead they used to do many oscilloscopes, Also among the most expensive.
– – – – – –
Download
Notes for versions
Version 2.1: Minor improvements including better control of Delay and pulse direction DeltaTime and alignment to those shown by other software such as GoldWave and FitzPeaks.
Version 2.2: Further improvements in controls Delay and DeltaTime.
Version 2.3: Further improvements and raised sampling to 192 KHz
Version 2.4: Fixed bug with overflow with signals exceeding 2 Volt pep. Fixed FastSweep which now works fine even with the random sample 192 kHz. Added the MFC libraries that will be useful to the brave to rebuild.
Version 2.5: Improved resolution of spectral lines also with sampling in 192 kHz.
Version 3.0: Significant improvements both in the run that in the documentation. Sampling boxes. Possibility to choose the input and output devices. Increased overall stability. Fixed some flaws about calibration. Ability to remember all the settings between boot and subsequent. Increased the maximum frequency in 100 KHz. Now the DAA is truly a complete application.
Version 3.1: Now it also has a measure of the frequency of CH2, before ever reading the CH1. Added documentation files in German: “DaaHelp_DEU.pdf”.
Version 4.0
– Great improvements, too many to write them here, read the documentation.
– Now the convenience of use is outstanding, We sent retired the largest oscilloscope. Except for rare cases of having to measure high frequencies, we always use this.
– With the calibration is obtained by a precise calibration of the tensions that allows you to do with measures such as a tester.
– RMS measurements, medium, peak to peak, decibels, period and fraquenza.
– The measured values can be sent to the slot and are therefore also available for other applications of the system Theremino.
– Digital filters to clean up the waveforms and facilitate the trigger.
– AC and DC coupling
– Ability to make precise DC measurements, with a USB sound card that costs less than ten euro.
– It only takes four common resistors, non-precision, and a minor modification, that is done in two minutes, you get two input channels and two output, all coupled in continuous.
– You get an input impedance from 1 mega ohm (as oscilloscopes) and measuring voltages up to +/- 70 V
– With the addition of a probe 10:1 (nine resistors 1 mega in series), you can measure voltages up to +/- 700 V
– With the addition of a high voltage probe for measuring voltages up to many thousands of volts.
– bigger display and resizable.
– The window of the application is to be enlarged to full screen and remember the size and position.
– All commands can also be adjusted with the mouse and keyboard.
– And many other news…. Read the documentation.
Version 4.1
– Added type STOP trigger, which stops sampling when it exceeds a certain voltage value.
– Improved and simplified controls to adjust the “Delay”
– Convenient display of minimum and maximum voltages measured with the current calibration (just move the cursor on INPUT OFF and ON and read the bottom line of the application).
Version 4.2
– Eliminated error with XY and time base <= 1mS
– Corrected and updated documentation files.
Download Theremino DAA – Version 4.2
DAA_V4.2
DAA_V4.2_WithSources (complete design for programmers, very difficult to modify because written in MFC, non-Visual. In recent years we have him cleaned up a bit '. But the basic programming dates back to twenty-two years ago)
For all Windows systems to 32 and 64 bit. For Raspberry Pi, Linux, Android and OSX, read the installation notes.
MFC Libraries (you need to recompile the DAA)
Microsoft_MFC_LIBS (to recompile with Visual Studio)
– – – – – –
Documentation
Currently the documentation is only in Italian.
The files in English and Chinese are automatically translated drafts,
bear with me, to correct it takes a long time.
Files documentation for application DAA
DAA_V4_Help_ITA.pdf
DAA_V4_Help_ENG.pdf (automatic translation)
DAA_V4_Help_CN.pdf (automatic translation)
Documentation Files for sound cards and input circuits
DAA_V4_InputDevices_ITA.pdf
DAA_V4_InputDevices_ENG.pdf (automatic translation)
DAA_V4_InputDevices_CN.pdf (automatic translation)
ODT format documentation files for translators
DAA_V4_Help_ITA.odt
DAA_V4_Help_ENG.odt (automatic translation)
DAA_V4_Help_CN.odt (automatic translation)
DAA_V4_InputDevices_ITA.odt
DAA_V4_InputDevices_ENG.odt (automatic translation)
DAA_V4_InputDevices_CN.odt (automatic translation)
Documentation Files for previous versions
DaaHelp_ITA.pdf
DaaHelp_ENG.pdf
DaaHelp_DEU.pdf
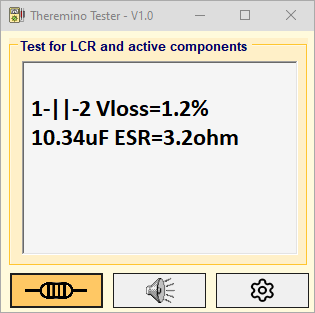
Theremino Tester
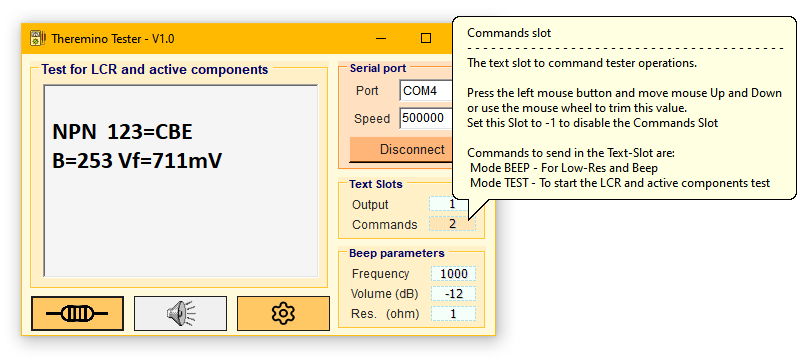
This application combines the features of a traditional tester with those of a Transistor-Tester, offering a wide range of features for those who design and repair electronic devices.
Thanks to the possibility of controlling it from the outside and communicating the measurements through the Slots, Measurements can be automated. This allows us to coordinate measurements with other applications in our system: Oscilloscopes, Signal Generators, logger, etc.
Also, writing a few lines of code in our app Theremino_Automation, Unusual configurations can be achieved, unthinkable with other measuring systems, such as using voice commands to start the measurement and listen to the results with the speech synthesizer, leaving your hands free to hold the tips in place, or move test leads with motors to automate measurements on printed circuit boards.
Features of the Theremino_Tester
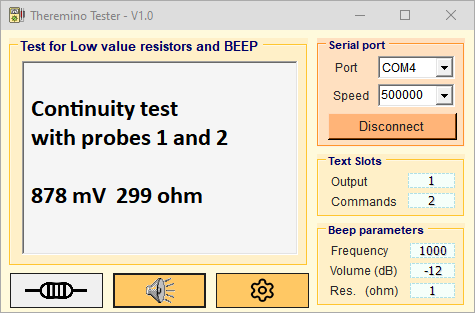
- Fast resistance measurement and acoustic continuity signalling.
- Adjusting the frequency and volume of the acoustic signal.
- Resistance measurement from fractions of ohms (better than a normal tester)
- Capacitance measurement from tens of pF up to thousands of UF
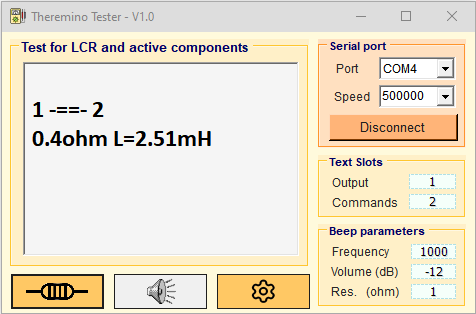
- Impedance measurement from a few micro Henrys up to many Henrys
- Measuring the Additional Characteristics of Passive Components (ESR, Loss Factor, etc…)
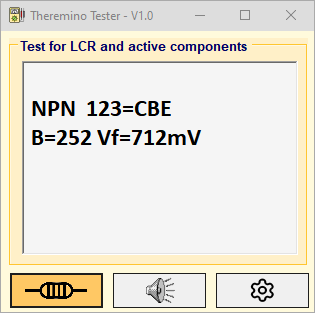
- Finding the Type of Active Components (NPN, PNP, MOS, FET, SCR, TRIAC, DIODES etc.)
- Finding the Order of Links (CBE, ECB, CEB, GDS, DSG, Anode, Cathode etc…)
- Measurement of the characteristics of active components (Beta, Vbe, Vgs etc…)
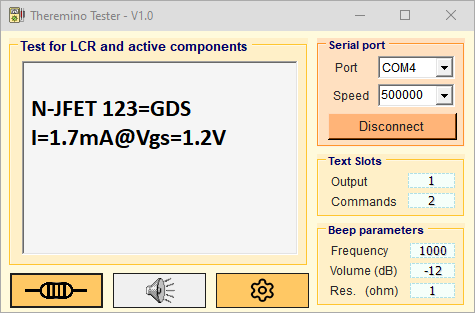
Instructions for getting started
This program only works if you have programmed the Arduino Nano module, as explained in the following pages. Once programmed, follow the instructions below:
- Make sure the module is connected to the USB
- Launch this app “Theremino_Tester.exe”
- Choose the door in the first box at the top “Port” (Note 1)
- Choose your speed 500 000 in the second box “Speed” (Note 2)
- The Output and Commands boxes will only be needed later, For now, leave them to their own devices. “-1”.
- Leave the sound boxes to their own devices for now. “1000”, “-12” and “2”.
- If everything is fine, the connection button turns orange when you press it.
- Now you can use the buttons with the speaker and the resistor to take measurements.
Note 1
If you don't know which port it is, unplug the USB cable, Open the box “Port” and signify the names of the doors. Then plug the USB cable back in, Close and open the box again “Port”. Then choose the door that appeared and wasn't there before. If you change the USB socket then the port changes its name and you will have to change this box.
Note 2
We recommend using the 500 000 bits per second, but if you wanted you could change it in the options that are on the first pages of the firmware and then also in the box “Speed” of this application. If you make changes, use only 250 000, 500 000 or 1 000 000, Slower speeds would slow down communication, and some of them are inaccurate up to 3.7% (which is very) and cause miscommunication.
One of the worst communication speeds is 115 200, which sadistically is the one chosen by the Arduino designers for the new bootloader. In fact, when you load the firmware with Arduino IDE on a board with ATmega 328P that has the new bootloader, It can happen that occasional errors occur. Sometimes it loads the firmware without errors, other times an error comes along “avrdude error… etc..”.
In This page You can find detailed explanations about this defect. I translate from English: “Clocked at 16 MHz (default on most Arduinos) the speed of 115 200 gives an error of the 3,7%, which is usually too much for the other party to work without error correction.”
And in This page you can find a great Baud Rate Calculator to explore the various communication speeds and error rates of each one.
Fast measurement of resistors with beep
Transistor Tester designs that are networked take a few seconds for each measurement, therefore they are not suitable for continuity testing.
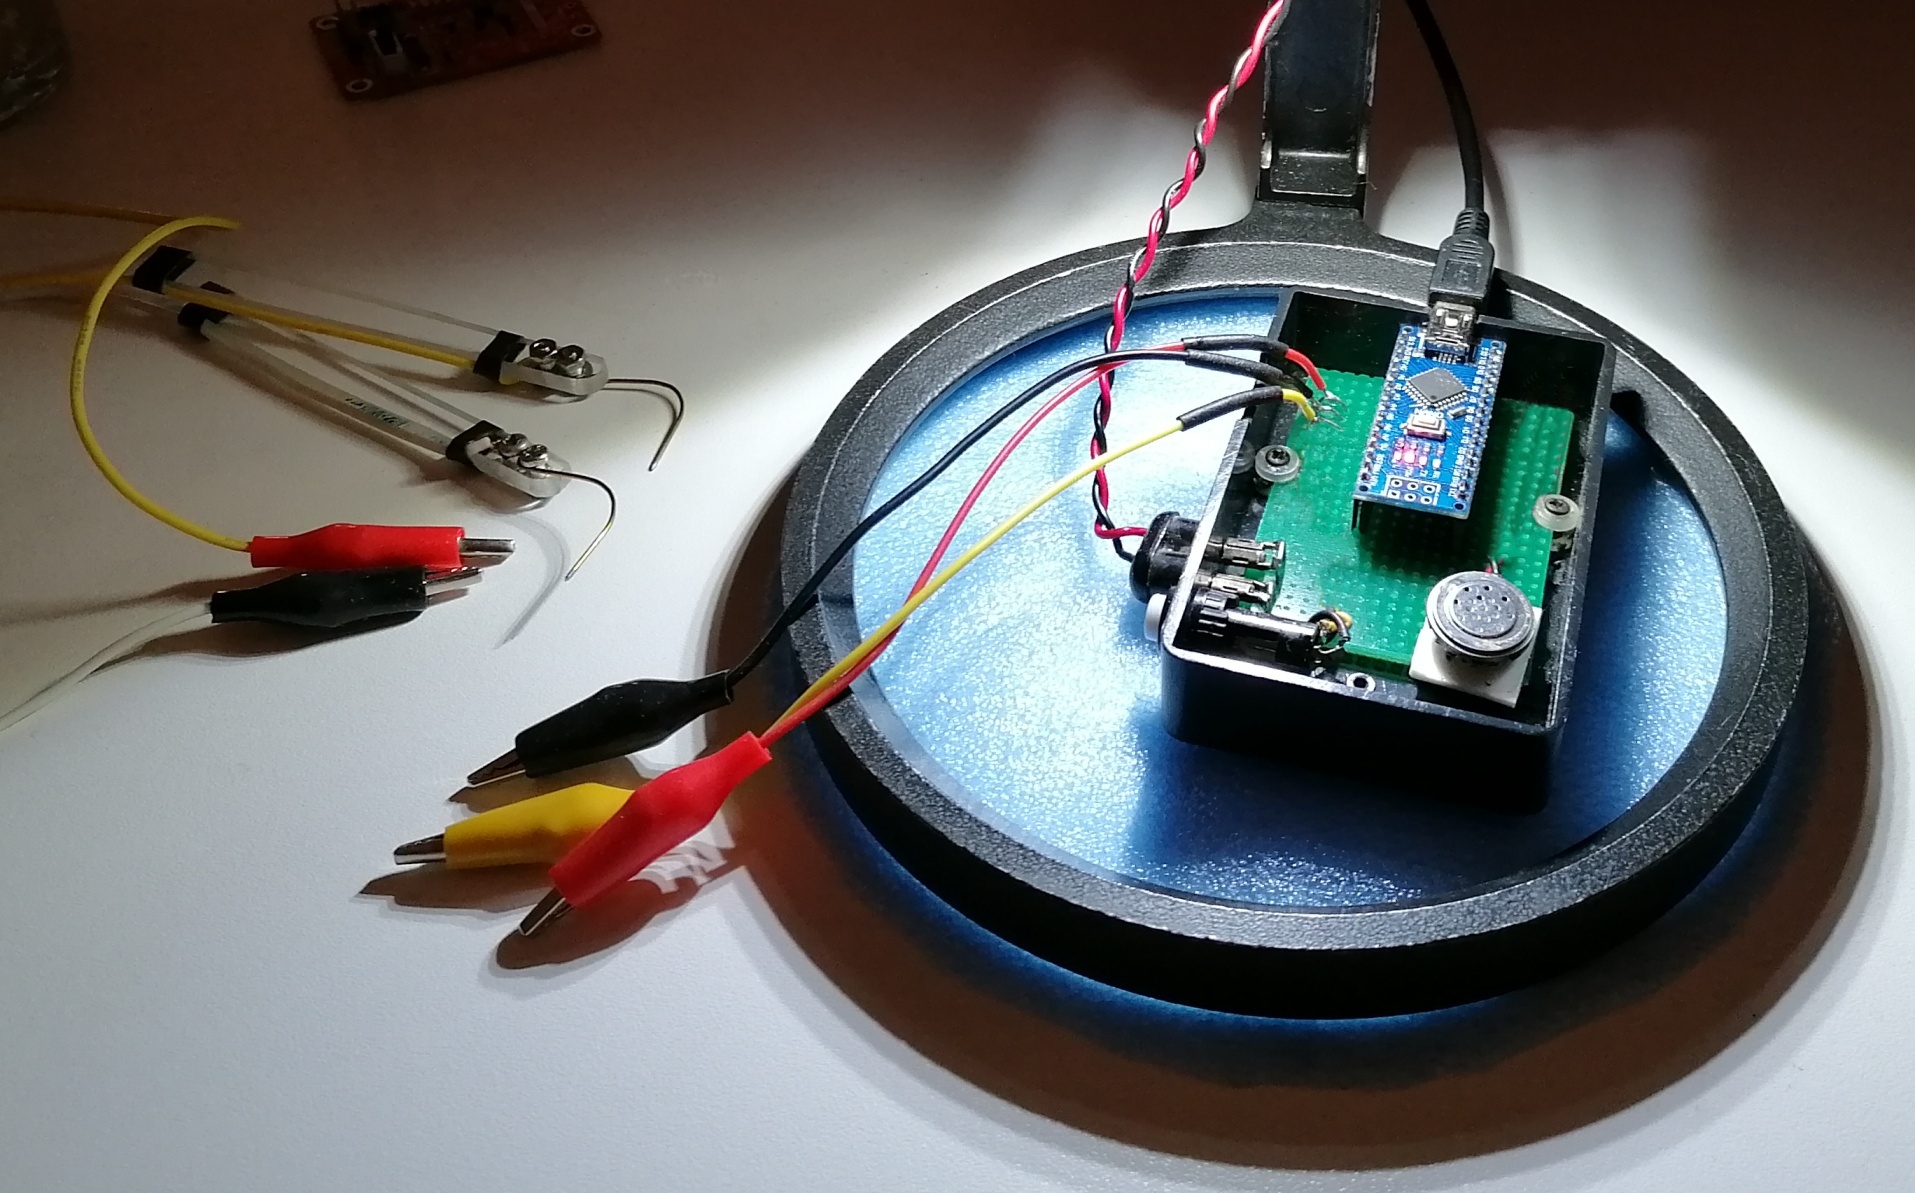
Here's an example of how you can use our version to check the tracks of a printed circuit board. In this case we used a lens but you could also use a camera as a microscope.
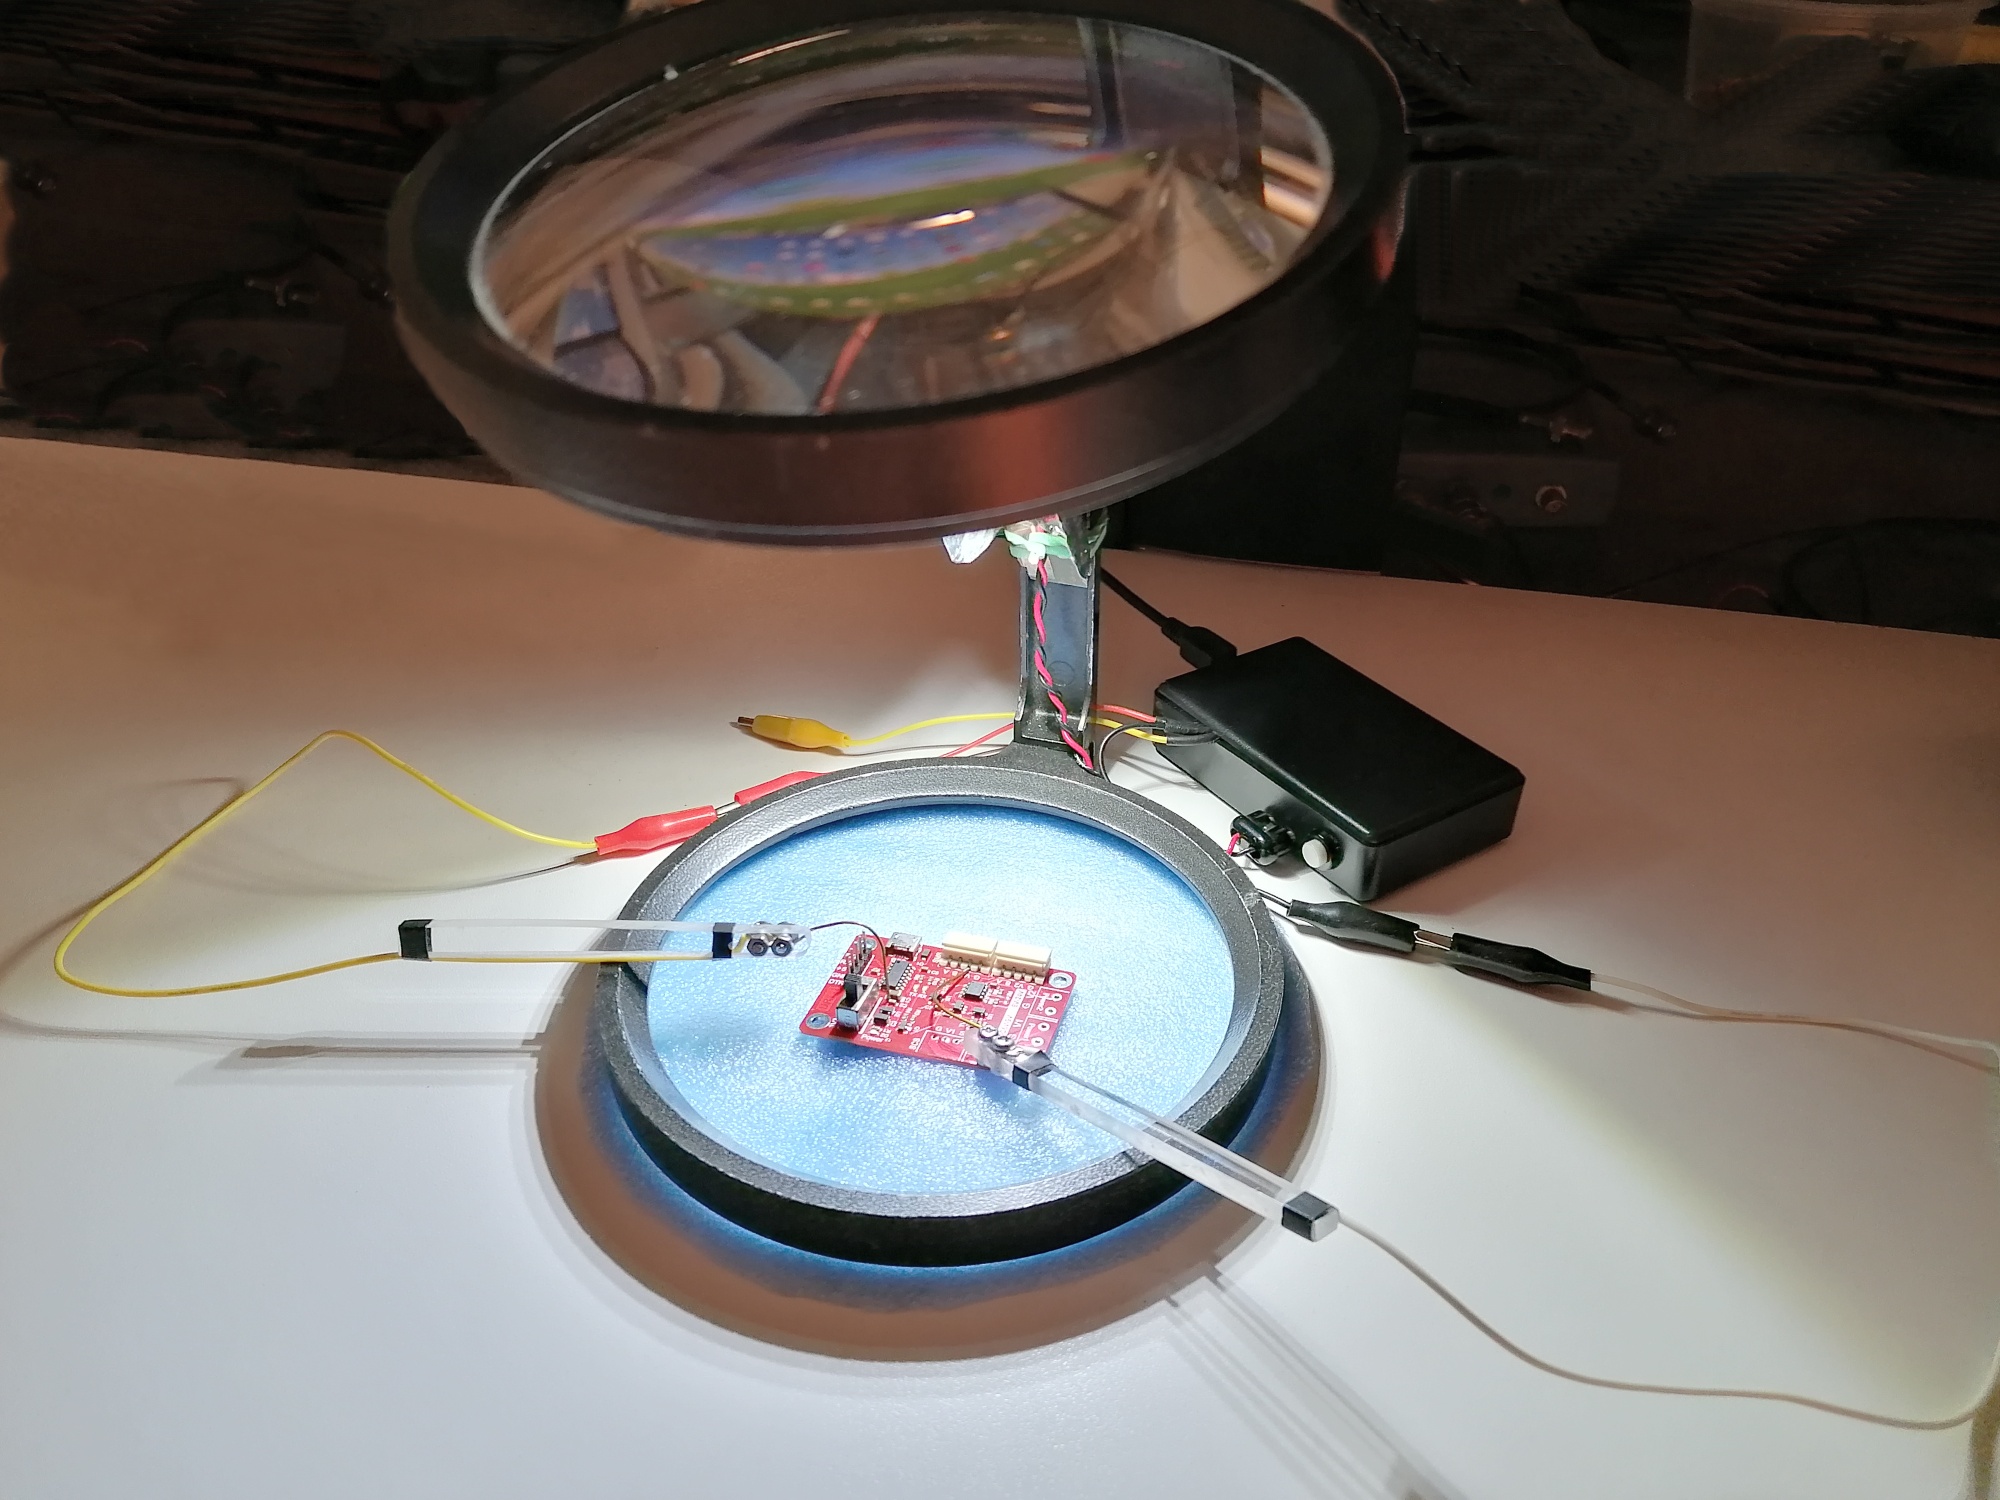
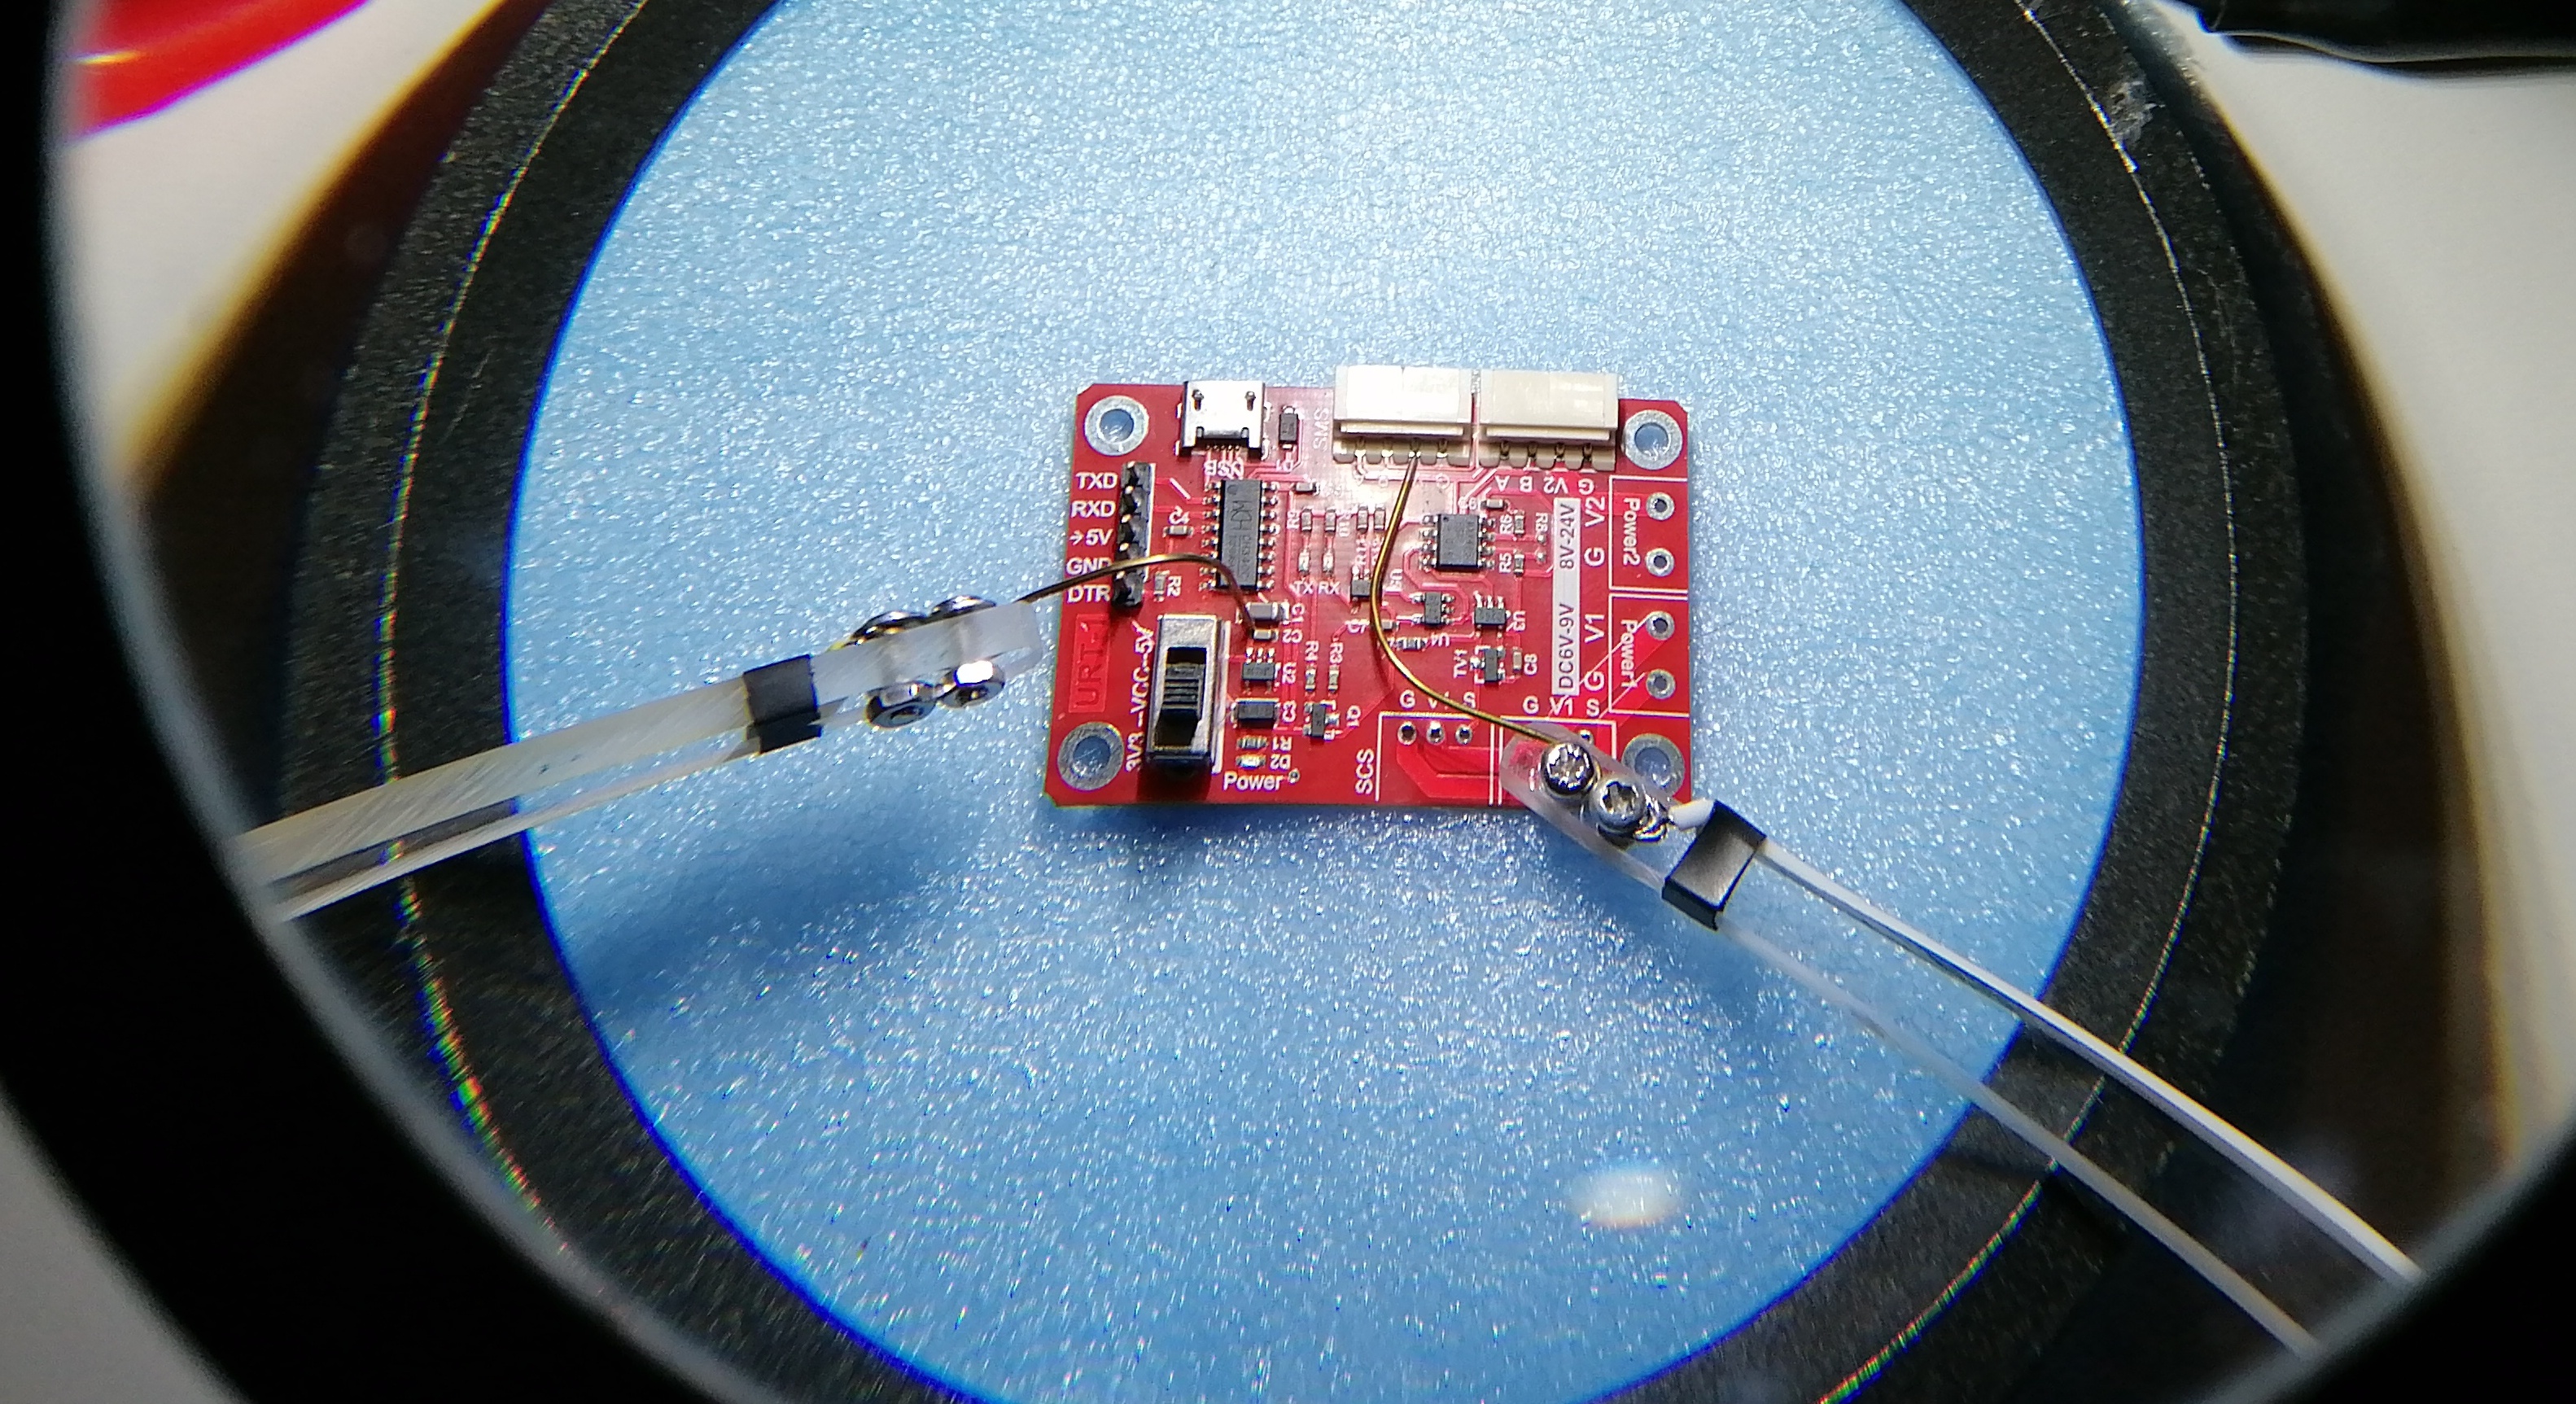
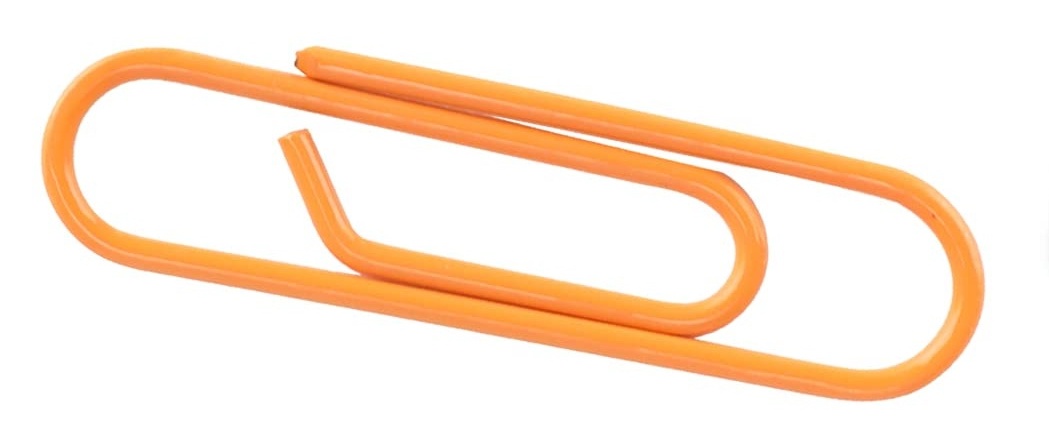 In this example, the measuring leads, that connect to wires 1 and 2 of our Tester, have been obtained from Clips for sheets of paper. Colored clips lead only to the tip. We sharpened them with a file and then with fine sandpaper.
Thin, elastic tips, Sharp as a pin, allow you to Make good contact even in the most difficult places, which would be impossible with normal tester tips.
Construction
To build this tester, all you need is
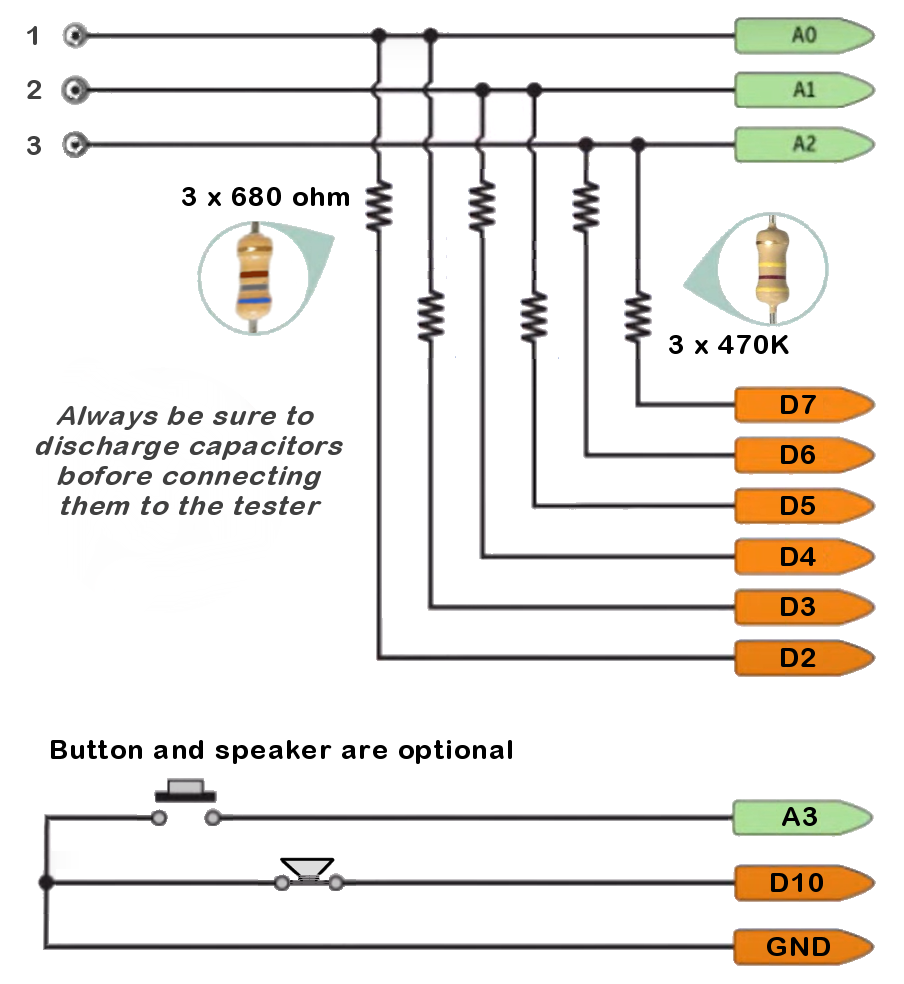
- An Arduino Nano
- Three resistors from 680 ohm resistor
- Three resistors from 470 k
It is recommended to select resistors with a good tester, choosing them from many, and must have values between 678 to 682 ohm and between 468 to 472 kohm. It's better if they're from 680 and 470 k exactly,.
If necessary, you can add
- A button.
- A small speaker, Taken as an example from the old headphones of Walkmans, or a small piezo buzzer.
In the next images you can see the Pins of the Nano to which we will connect the components and a possible placement in a plastic box.
In this version we have also added a connector that gives the voltage of 5 volts to LEDs that illuminate the working range. So with just the USB connection we have everything we need to test the continuity of the tracks even in the smallest and most difficult to reach places.
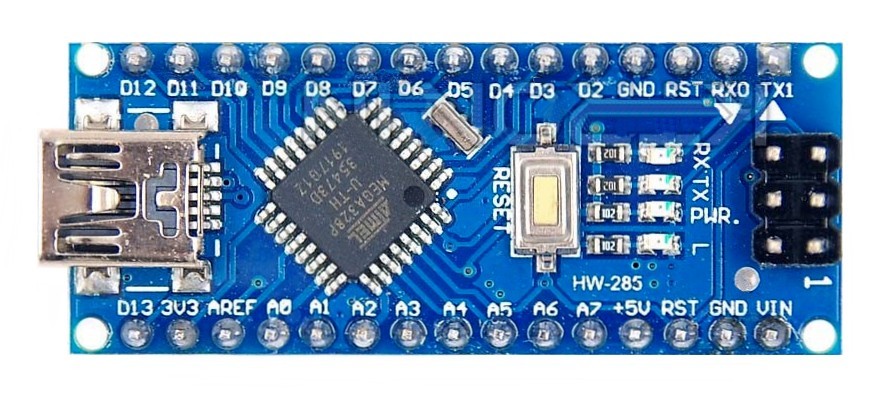
- It is recommended to place the Dwarf on a Millefori with two strips of female Pin.
- The six resistors are underneath the Nano, connecting them from D2, D3, D4, D5, D6 and D7 and towards A0, A1 and A2.
- And finally, we will connect three colored wires, ending in small crocodiles, to A0, A1 and A2.
Wires must be flexible, thin and a dozen centimeters long. Their colors are used to identify A0 terminals, A1, A2 (which are then called in the measures 1, 2 and 3). For continuity testing, use wires 1 and 2.
If you want to use the tester to test connections without the PC, you could also add a button connected between A3 and GND and a small speaker between D10 and GND.
Firmware for the Arduino Nano module
The firmware “Theremino_Tester_Sketch.ino” it must be opened with the Arduino IDE and programmed in the Nano module. Our version is written specifically for the Nano module with the ATmega 328P processor, don't use it with other Arduino modules.
To write the firmware to the Arduino Nano board you need to:
- Open the menu “Tools” and choose the “Board Arduino Nano”
- Open the menu “Tools” and choose the right door (the one that is only there if you connect the USB of the module)
- Open the menu “Tools” and choose “ATmega 328P Processor”, with “Old Bootloader” if you need.
- Open the menu “Sketch” and choose “Upload”
- If the Upload doesn't work and gives errors, try “ATmega 328P” with and without “Old Bootloader”
Part of our firmware comes from the Transistor Tester codes written by Karl-Heinz Küubbeler and Markus Reschke, But our version is completely rewritten. We've simplified the code a lot and we've fixed and improved some features. In addition, the code is now formatted and commented to make it more readable, comprehensible and easy to maintain.
In our version, we have eliminated all unnecessary options such as the display and options menu, The Signal Generator, Measurement of voltages and frequencies, which were difficult to use and of low quality. We have vastly better tools in our system, Oscilloscopes, Signal Generators, Analyzers, digital filters etc… So we won't miss it.
Calibrations
Among the parts that we have eliminated from the firmware are also the manual calibration procedures. These functions were so difficult to use that few would have performed them successfully, thus risking getting completely wrong measurements.
Instead, we did everything we could to get enough accuracy from the automatic calibration. The newly built instrument is ready and is recalibrated with each new ignition, as far as possible without manual procedures and sample components to be used as a reference.
If you use six resistors with one percent accuracy, then the accuracy of this fixture is quite good. Accuracy appropriate to its intended use, i.e. identify unknown components, check that they are not defective and that they have values within normal tolerances.
Accuracy can be improved by manually calibrating the parameters at the beginning of the firmware to be written on the Arduino Nano.
The first few pages of the firmware contain adjustable calibration parameters to increase the accuracy of the measurements. Instructions are at the beginning of each parameter. Modify them only if you understand their meaning and then remember to write the firmware on the Nano after each change.
Among the editable options there are also various adaptations. For example, use the D8 to D13 Nano Pins as classic Transistor-Tester designs do.
Downloading files
In the file “Theremino_Tester_V1.0.zip” You will find:
– A folder “Theremino_Tester” which contains the application to be used on your PC
– A folder “Sources” with the files of the program for those who want to modify it (use Visual Studio 2008)
– A folder “Arduino / Docs” which contains diagrams and images useful for building the meter.
– A folder “Arduino” which contains “Theremino_Tester_Sketch.ino” to open with Arduino IDE and then compile and write in the Nano module, as explained in the previous pages.
Downloads di Teremino_Tester – Version 1.1
Theremino_Tester_V1.1
Version for all Windows in 32 and 64 bit. For Raspberry Pi, Linux, Android and OSX, read the installation notes.
Theremino Helper

This little app acts as a collector for the additional functions that are currently:
– Turning off your computer with the middle mouse button (If the Enable button is enabled)
– Manual shutdown of all programs (with name “Theremino_xxxx”)
– Displaying CPU usage
– Transmission of X/Y coordinates of mouse towards the slots.
– Import data from bar-code readers and sending data to the slot.
Downloads by Theremino Helper – Version 1.8
Theremino_Helper_V1.8
Theremino_Helper_V1.8_WithSources (complete design for programmers)
Version for all Windows in 32 and 64 bit. For Raspberry Pi, Linux, Android and OSX, read the installation notes.
WaveAnalyzer Theremino
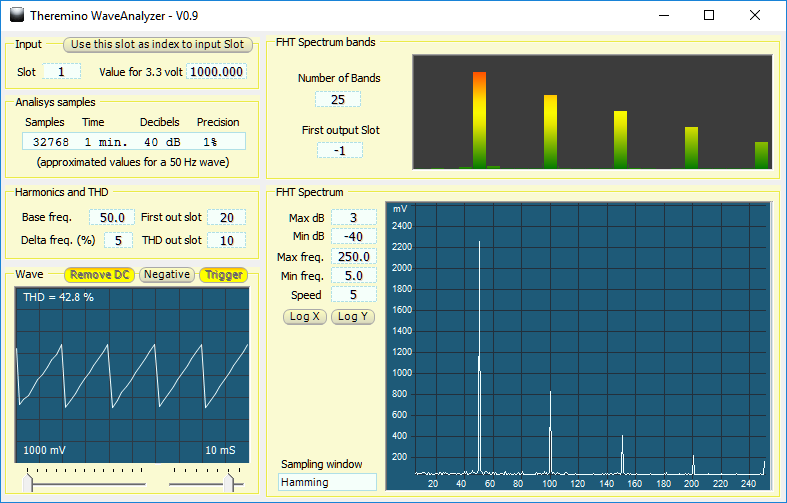
This application runs the ’ spectrum analysis of periodic signals from a Slot and writes on a number of other slots to values measured at different frequencies and the calculated distortion rate.
Its main use is to analyze slow periodic signals, by the continuous (zero Hertz) up to frequencies of a few Hertz, or at most a few tens of Hertz.
These directions for ’ use and the full specifications are in this file:
Theremino_WaveAnalyzer_ITA.pdf
WaveAnalyzer Theremino downloads – Version 0.9
Theremino_WaveAnalyzer_V 0.9
Theremino_WaveAnalyzer_V 0.9 _WithSources (complete design for programmers)
Version for all Windows in 32 and 64 bit. For Raspberry Pi, Linux, Android and OSX, read the installation notes.
Theremino WaveGenerator
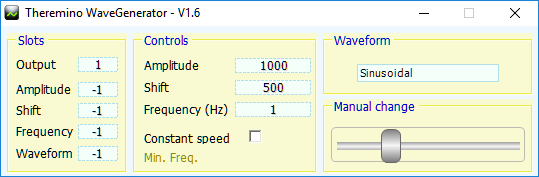
This generator sends the output signal to a Slot, and not to the sound card as similar generators usually do. Since the signal passes from the slots, the maximum frequency is limited to a few hundred Hz. On the other hand the minimum frequency extends up to scratch.
You can use it to prove the Pwm outputs or PwmFast and to test applications that read the signal from the slots (for example, ECG, EEG, SignalScope, AdcTester, and Waveanalyzer). Or you could use to try stepper motors, servo motors, Geophones and accelerometers.
Meaning of parameters
SLOTS
- Output slot: The number of the Slot where to write the output signal.
- Amplitude: The Slot number that is used to control the generated signal amplitude ’. If you set it to “-1” then the Slot is not used and set the width manually with box “Amplitude”.
- Shift: The Slot number that is used to control the movement of the zero signal. If you set it to “-1” then the Slot is not used and adjusts the Shift manually with box “Shift”.
- Frequency: The number of slots that you use to control the frequency of the signal generated. If you set it to “-1” then the Slot is not used and adjusts the frequency manually with box “Frequency”.
- Waveform: The Slot number that is used to control the generated signal wave shape d ’. If you set it to “-1” then the Slot is not used and you choose manually the form d ’ onda with box “Waveform”.
CONTROLS
- Amplitude: Manual adjustment of output signal amplitude.
- Shift: Manual adjustment of the shift of the zero of the output signal.
- Frequency: Manual adjustment of the repetition frequency of the output signal.
- Constant speed: Enabling this option the output hike depends on the frequency so as to achieve a constant rate. By disabling it you get a steady hike.
- Min Freq.: You use along with Constant speed to determine the minimum frequency, which corresponds to the maximum excursion.
WAVEFORMS
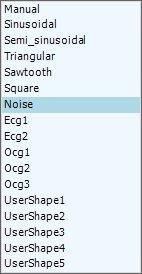 To choose the form of wave ’ you click on box Waveforms and then you click the drop-down menu.
- Manual, Sinusoidal, Semi sinusoidal, Triangular, Sawtooth and Square are classic waveforms of signal generators.
- Noise can be used for various sizes, for example in conjunction with a Spectrum Analyzer to check the bandwidth of filters
- Ecg1 and Ecg2 they serve to simulate signals from an electrocardiograph classic (first branch).
- Ocg1 and Ocg2 they serve to simulate signals from an electrocardiograph optical.
- Ocg3 It also contains a disorder at 50 Hz to test filters.
- UserShape1.. 5 They are freely programmable waveforms.
To program the UserShape you open files from “Shape1.txt” to “Shape5.txt” with a text editor and write the number of values that make up the waveform.
The number of values is not important, can be from two to thousands. Whatever the number of values that they represent a complete cycle. You choose the number of values to get enough resolution to measures that must be carried out. If you use a few values the waveform is “appear pixelated”.
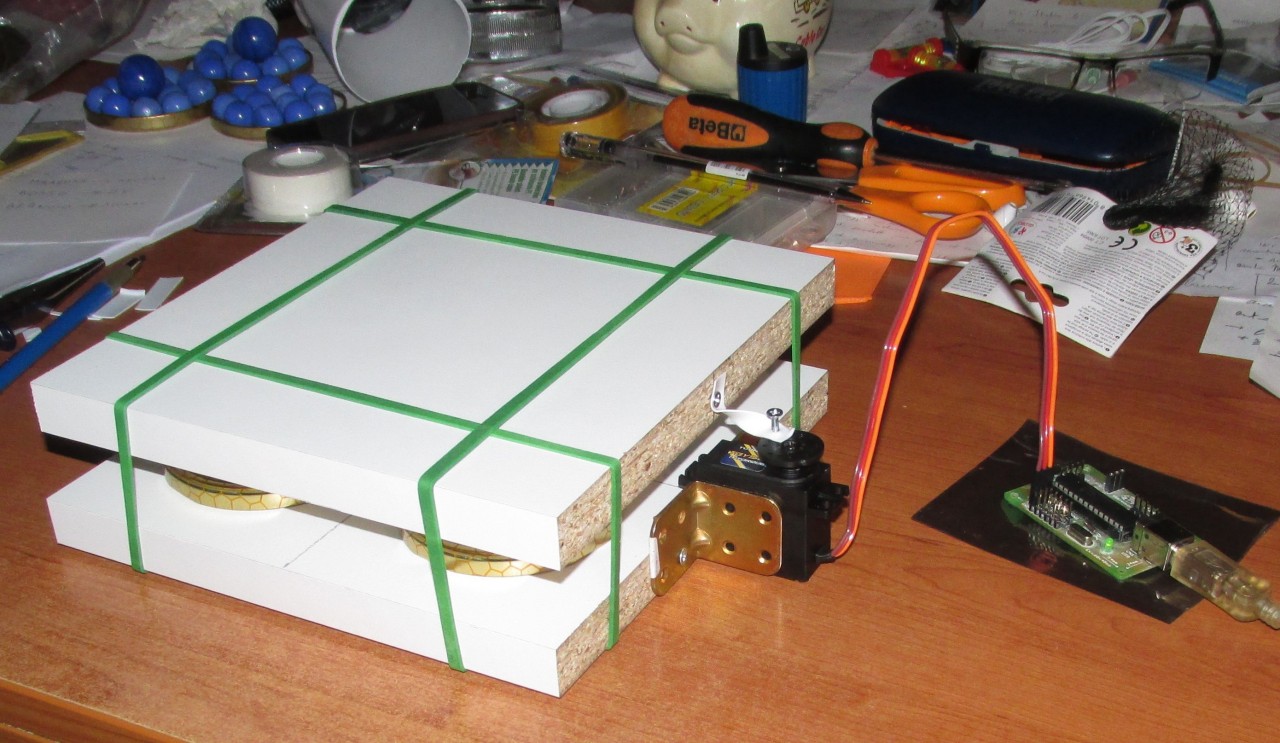
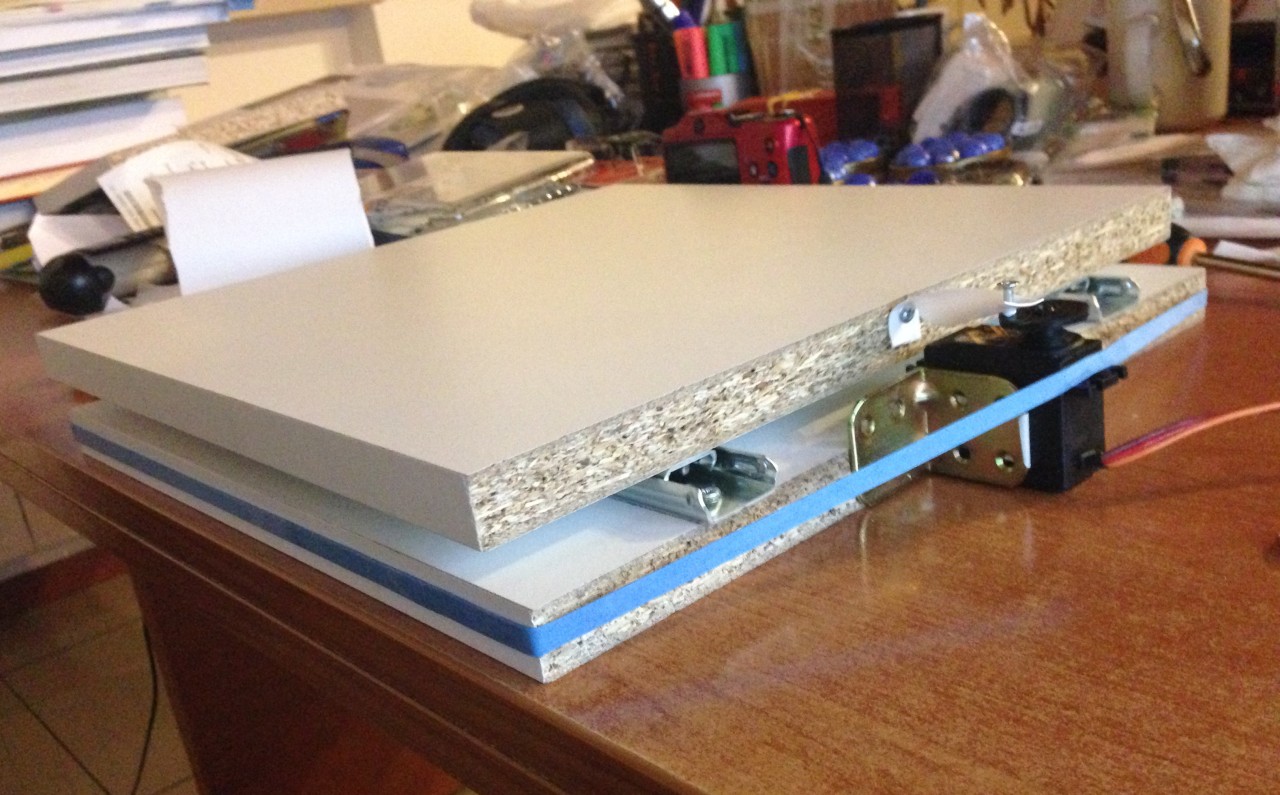
Vibrating table to try Geophones and accelerometers
An interesting use of this application is move a servomotor to vibrate a Board and try accelerometers and Geophones. You spend a few euros for the servant and a few hours of time to build it and you can adjust the amplitude and frequency of the oscillations. The frequency is very accurate because it generated by the software, not the rotation of a motor with eccentric mass.
The servant must be attached to the base and connected to a connecting rod to fork. Better to fix it with a layer of rubber to minimize noise. The connecting rod should be a little’ supple to absorb high frequency vibrations generated by the engine. Connect the connecting rod less than 10 mm from the axis of rotation of the motor, so you have more strength. One of the most suitable servo, with very small die area, is the TGY930, If you accept some performance’ minors over 10 Hz you can also use HXT900, rediculously. For information about the servant read This page.
The table should be suspended with balls or linear guides and sealing with rubber bands or rubber straps. And should be free to move about 10 mm.
The following images are prototypes built by Conrad Sheep, the first with balls and trays to hold them in place, the second with linear guides (probably available at Brico Center as drawer slides).
Software settings:
- In HAL you set the output as Servo16 with Min = 0 and Max = 1000.
- Always in the HAL you set the values Time min (uS) and max time (uS) to 1000 and 2000. Wanting to decrease the motor trip there are set with two values always centered 1500 but with fewer deviations from it. For example, 1100 and 1900 or 1200 and 1800.
- In sinusoidal Waveform is adjusted as WaveGenerator.
- Also in WaveGenerator setting a minimum frequency 0.5 Hz. You could also set it to 0.1 Hz but you will have a smaller hike at high frequencies (10 Hz and beyond).
- With these settings you can set Min frequency Freq. up to 10 Hz and beyond.
Recommendations:
Use servo with dead area very small, We recommend the TGY930 because we tried it but also other more powerful servant could be fine.
The connecting rod should be very close to the PIN so you can use larger excursions without straining too much the engine.
Turn the cross hair (or the disc) on the pin of the motor so that the center of the excursion is 90 degrees from biella.
I normally use a maximum of about 80 degrees but you could take her almost 180 degrees by setting Time min (uS) and max time (uS) to 1000 and 2000. With very large excursions you may partially fix the errors caused by the geometry of the connecting rod, using the waveform “Triangular”, but the difference is minimal on move.
– – – – – –
DOWNLOADS
Notes for versions
Version 1.4 and 1.5: The new textbox control themselves better with the mouse. – The new precision timer (that is in the file "Accurate Timer") makes the generated frequencies much more precise and not dependent on the operating system and CPU workload.
Version 1.6
In previous versions change frequency generates discontinuity in the waveform. Now you can change the frequency and other parameters continuously and you get a sweet variation and safely. This allows you to check the generator from outside and then Sweep-type measures.
In this version we have added the ability to control frequency, volume and waveform from the outside (through the slots).
Version 1.7
Now “Waveform” change correctly even if you use the keyboard arrows.
Version 1.8
Now “Waveform” also includes “Noise” and “Ocg3” with a disturbance in 50 Hz overlaid.
Version 2.0
Now you can keep multiple copies of WaveGenerator (con nomi Theremino_WaveGenerator1.exe …2.exe …3.exe) in the same folder, and each copy will use a separate initialization file.
Version 2.0
– Controls now update instantly and quickly when you change the numeric value with the mouse.
– The application now uses the new class “AccurateTimer.vb”
Downloads Theremino WaveGenerator – Version 2.1
Theremino_WaveGenerator_V2.1
Theremino_WaveGenerator_V2.1_WithSources (complete design for programmers)
Version for all Windows in 32 and 64 bit. For Raspberry Pi, Linux, Android and OSX, read the installation notes.
Theremino Filters
Unlike the theoretical examples found in networked publications, This application is really usable to filter the signals from sensors. So you can do experiments on real data and not only mathematical theory, which often leads to overstate some aspects and neglecting other.
For example, you can filter the signals for application Theremino OCG power frequency to remove noise and baseline rocking caused by patient movement. Instructions for setting up the slots of the apps are in the files “Filter ECG Notes” which are located in the “Overhead rate”.
Characteristics of digital filters
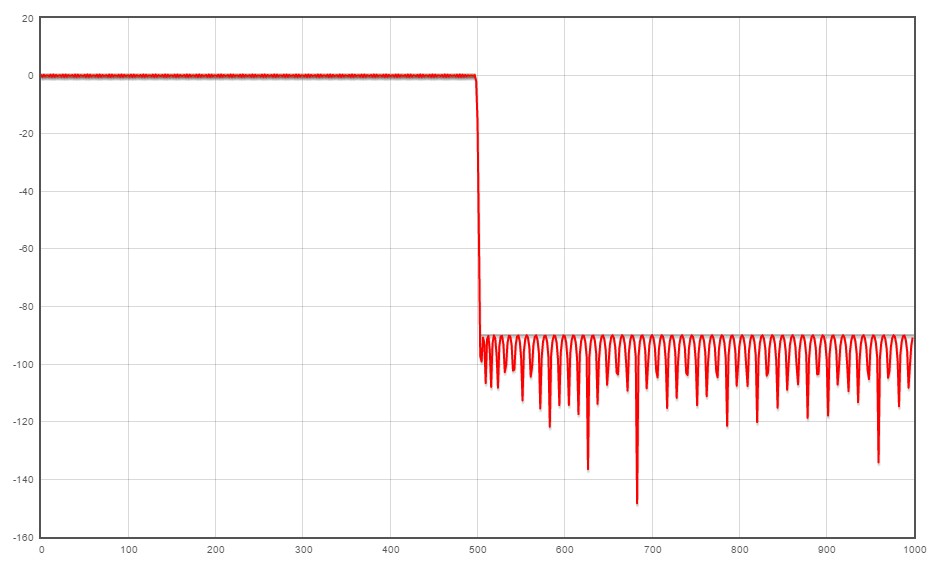
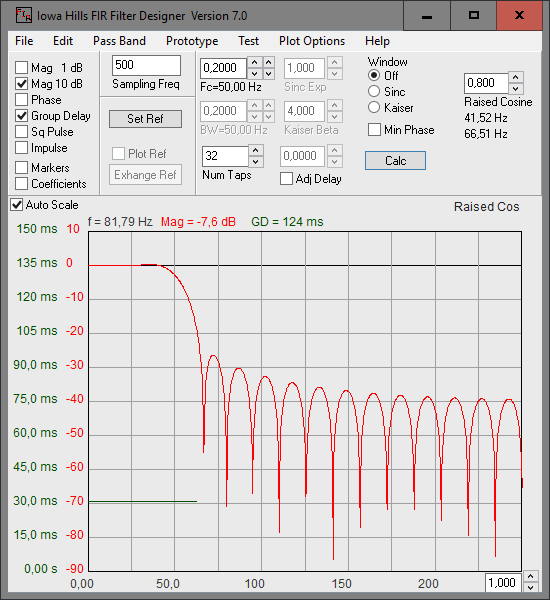
Here we see the response curve of a FIR filter with frequency range from 0 to 498 Hz within a decibel and that from 502 Hz up reduces by at least 90 decibels. For those accustomed to the analog filters features like would have been unthinkable. A hardware implementation with these features would require pounds of material (In addition 2000 components) and in practice would not work even (would not produce the response curve calculated physical component tolerances).
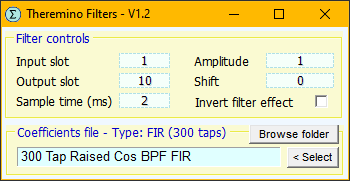
Mini instructions
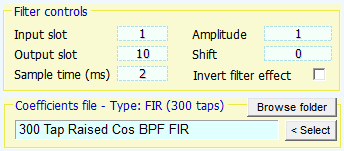
- Input slots – The Slot from which to read the input signal.
- Output slot – The Slot to which to write the filtered signal.
- Sample time – Sampling time. With 10 Ms sampling rate is 100 Hz. You must set this parameter for a sampling frequency equal to that for which it was designed the filter, otherwise the filter is translated upwards or downwards according to the ratio between two values. Since we are working on slots and through USB the maximum sampling rate is 500 Hz. So the minimum amount of time that you can set in this box is 2 mS.
- Amplitude – Mfiltered output data oltiplica. With the value “1” the output is equal to the input.
- Shift – Add a cost tol filtered output data. With the value “0” the output is equal to the input.
- Invert filter effect – By enabling this check box the filter effect is reversed. Why a low-pass filter becomes a high pass, a low-pass and high-pass, band-pass becomes a becomes a notch. This effect is achieved in a simple way, by subtracting the filtered signal input signal.
- Coefficients files – To the right of the word “Type” reading the filter type currently in use (FIR or IIR) and the number of coefficients or poly.
- Browse folder – This button opens the folder that contains the filter currently in use. In the folder there are also project files with extension “ih_fir” and “ih_iir”. To open these files with the appropriate applications read the instruction file “Help ENGLISH” “Help ITALIAN” which are located in the “_ Filter_Designers”.
- Box with light blue background – In the box you see the name of the filter. By clicking on the name of the filter opens a dialog that lets you choose the filters (exactly the same function as pressing the button “Select”).
- Select button – With this button opens a dialog box that allows you to choose filters.
FIR and IIR filters
IIR filters are often recommended for their implementation simpler and less need of memory and computational power. This was true in the past but on current systems, for example Windows10, and even very powerful computers, for example, a Tablet quad core, a FIR filter, implemented with well-written algorithms, constitutes a negligible load for both the CPU and operating system.
If you know how you can implement digital filters with just a few lines of software. We have therefore prepared an educational application, #8217 efficient computational aspect yet; l & easy to read and easy to understand. L ’ 's all filter algorithm in twenty rows and the rest of the application (user interface and communication with other applications of the system Theremino) in a few pages.
The application Theremino Filter by version 1.0 onwards may use either IIR and FIR filters that accepts many different applications coefficients formats. For more information about filters read the instruction file “Help ENGLISH” “Help ITALIAN” which are located in the “_ Filter_Designers”.
Implementation of FIR filters
The next image shows the basic structure of an FIR filter.
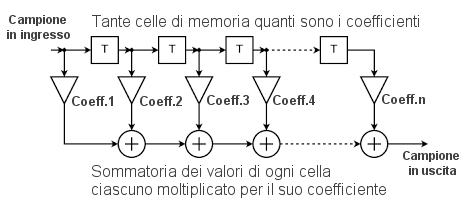 In our implementation we shift values from one cell to the next but we do use a ring buffer and update a single pointer. In this way the workload for the CPU is significantly reduced. We can also use thousands of coefficients with less than one percent of CPU.
IIR filter implementation
Basic structure of an FIR filter in single cells of the second order.
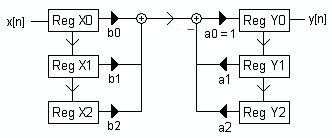
Here you see a single cell of the second order. To compose the filters you use multiple cells as this in cascade. This method makes it possible to synthesize filters with any number of Poles. With the other methods beyond the three poles would be generated between infiniti and the filter will stop working.
Software implementation
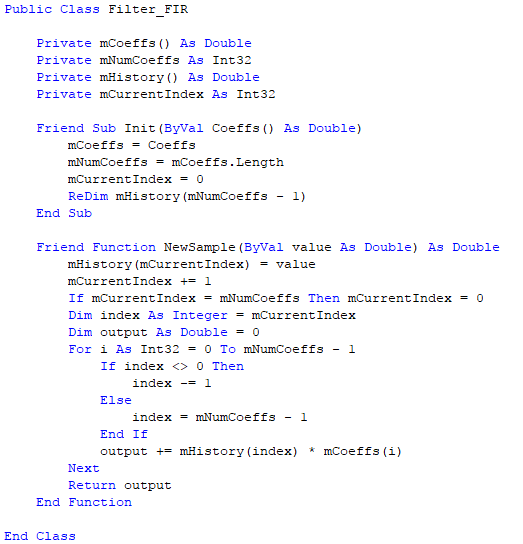
The algorithms that we studied for this application are simple but efficient.
We use a ring buffer for not making copies of data. So even with thousands of CPU load is always negligible coefficients.
On the left you see how simple the code that is running FIR filters (click on the image for a larger view).
The code for IIR filters is only slightly more complex. Quite complex is the code to read the coefficients from files, because apps to create filters that write files without rules, each in his own way.
Applications to generate the coefficients
With special applications can specify the desired parameters, see if the resulting curve meets the specifications and finally copy the coefficients and insert them into the filter. Some of these applications also use sampling Windows (Hamming, Hanning, Blackman etc..) that improve certain characteristics of the transfer function. You can also specify the types of filters (Band pass, Low pass, High pass or notch), the minimum attenuation in bandgaps, l ’ maximum ripple in the passband, start and end frequencies transition, and other parameters.
The real magic is that all these features are finally “tablets” in a single list of coefficients.
This list will be longer or shorter depending on the features you want. You copy the list into the software and the filter will have a response curve “exactly” same as designed.
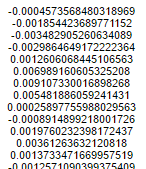
The coefficients should be written in simple text files in folder “Coeffs”. This will allow you to choose them by name and try quickly the behavior of each version and the differences between them.
Applications attached to Theremino Filters
Your download of Theremino Filters you will find a folder called “_ Filter_Designers” It contains two applications to design FIR and IIR filters. Inside the same folder you'll find the instruction file “Help ENGLISH” and “Help ITALIAN” explaining how to use them. Each of the two applications also has its own Help files can be opened from the menu “Help/Program help”.
The first application is called “Iowa Hills FIR Filters” and it looks like this:
The second application is called “Iowa Hills IIR Filters” and it looks like this:
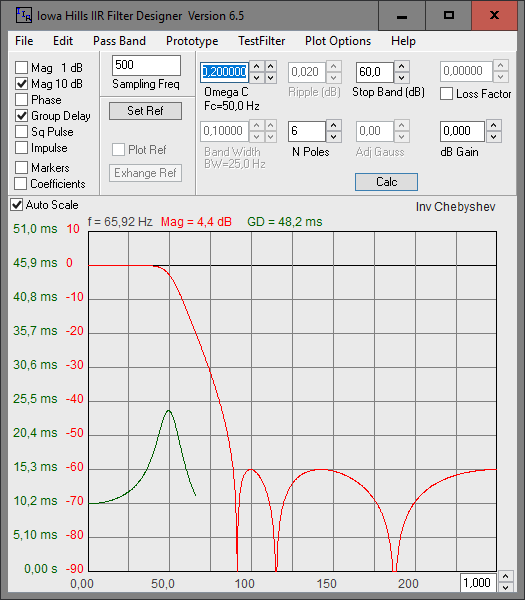
Many thanks Daniel Klostermann of “Iowa Hills Software” for his fantastic work and for making it freely available to all. Visit his website where you can find excellent documentation on filters and other useful applications: http://www.iowahills.com
The AnaDig application
In the folder “_ Filter_Designers” you will also find the AnaDig application that creates IIR filters that behave as analog filters Constructible with discrete components.
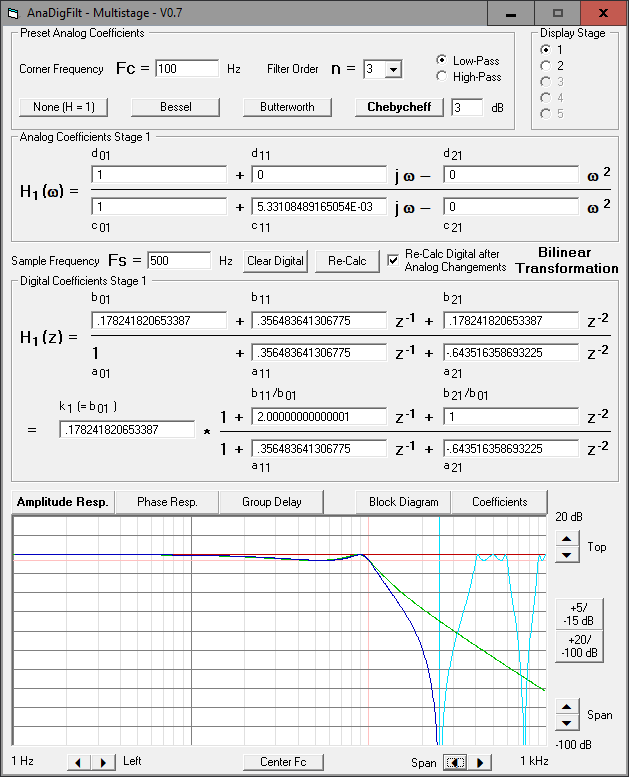
The instructions for using this application are in files “Help ENGLISH” and “Help ITALIAN” and by following the link to the site www.beis.de located in the folder AnaDig.
Unfortunately, this application is not treated as the previous, Save and load projects but is not usable to design simple filters and is the only one who can design digital filters with behavior equal to analog.
Online applications to generate the coefficients
Online applications do not have all the options of applications Iowa-Hills. Coefficients files must be manually copied to a text file, and you must also give it a name. Also, you cannot save your project so you can review the projects and every time you have to start from scratch.
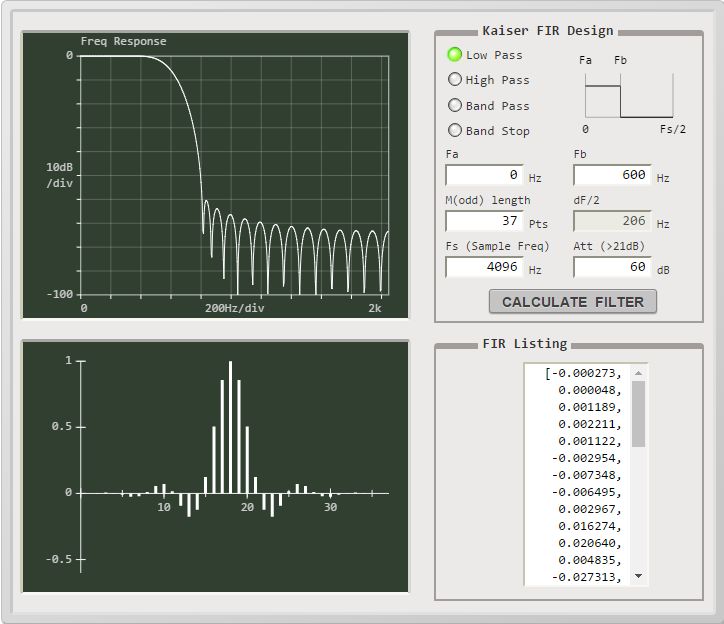
In recent years (2017) the following applications are probably the best:
http://t-filter.engineerjs.com
http://www.arc.id.au/FilterDesign.html
How many coefficients to use?
The real limit on the number of coefficients is not given the workload, that in all cases is nearly zero ever, but by the time delay between input and output of the filter. The delay grows linearly with the number of coefficients and calculates, in a coarse and simple way, as the sampling time multiplied by half the number of coefficients.
Some applications may tolerate lengthy delay but typically it is always good to have the lowest possible delays. Why you always try to use the minimum number of coefficients that allow to obtain the required characteristics.
Iowa-Hills applications also contain an option to minimize the delay time, see their Help files for more information.
Applications to test the filters
With applications Theremino_SignalScope and Theremino WaveGenerator You can try the filters with signals that travel on the slots from one application to another. To filter the signals coming from the sensors you would use the application Theremino HAL and a Master module.
DOWNLOADS
Download Theremino Filters – Version 1.2
Theremino_Filters_V1.2
Theremino_Filters_V1.2_WithSources (complete design for programmers)
Version for all Windows in 32 and 64 bit. For Raspberry Pi, Linux, Android and OSX, read the installation notes.
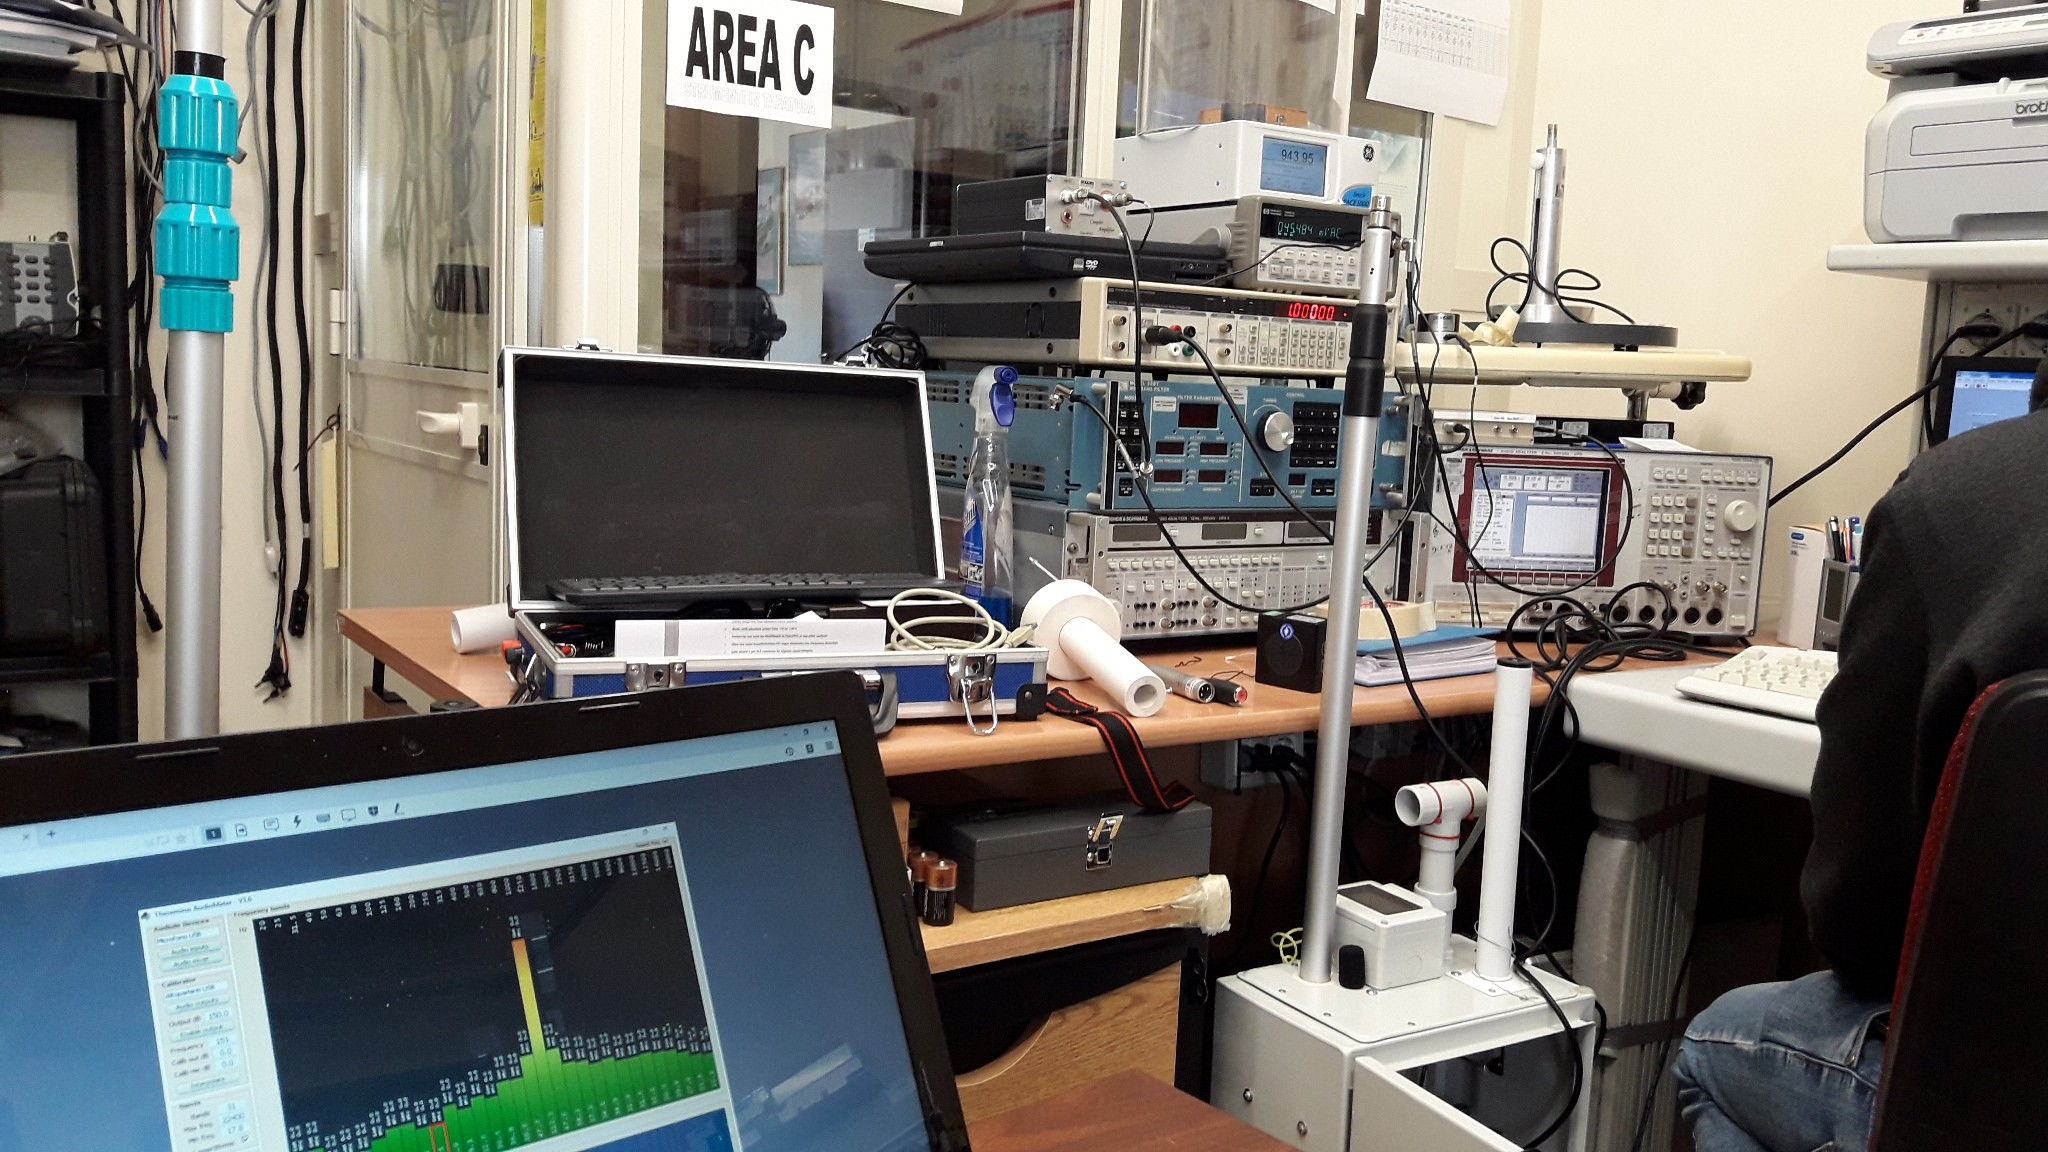
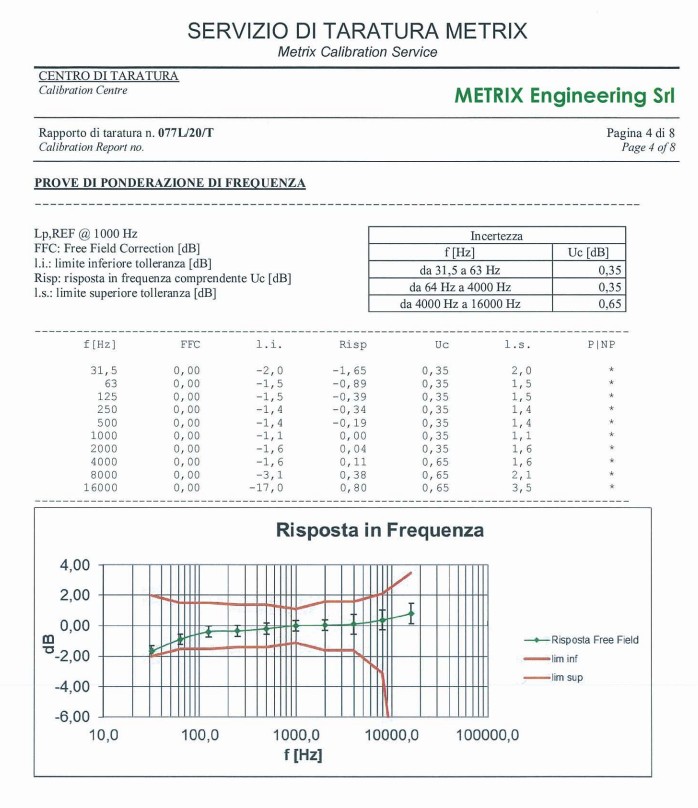
Theremino Phonometer
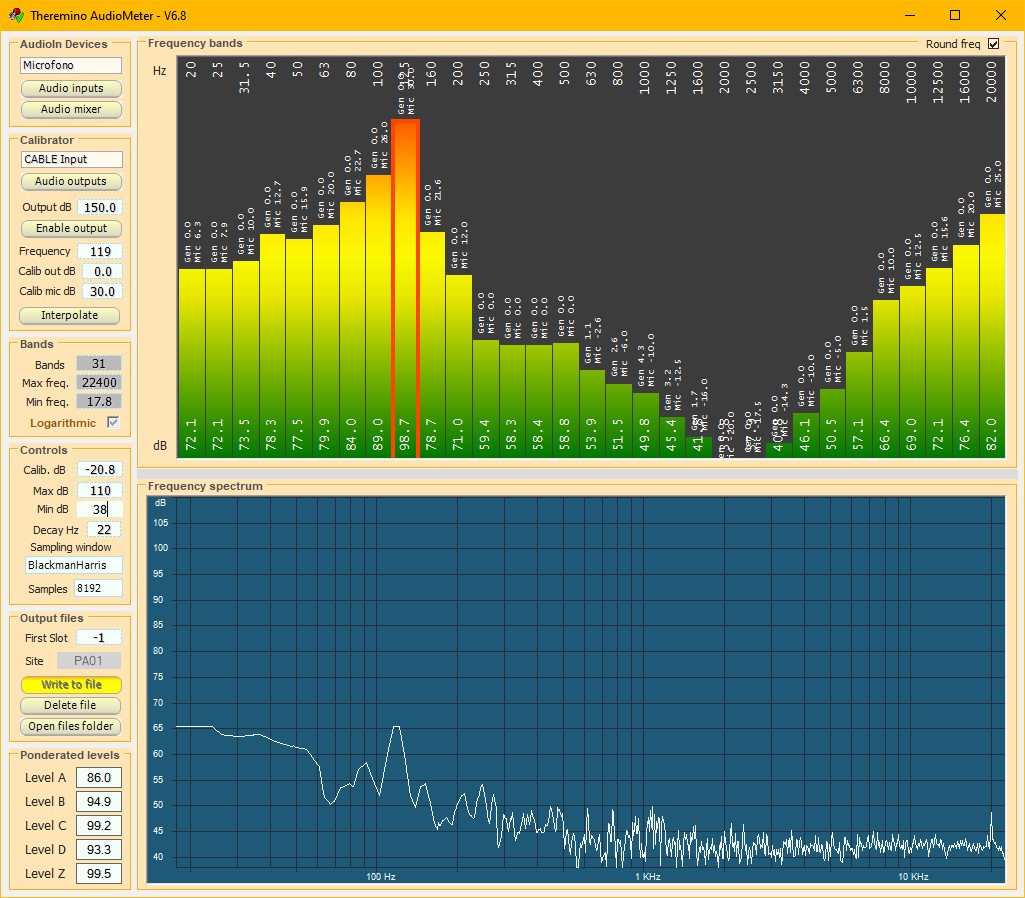
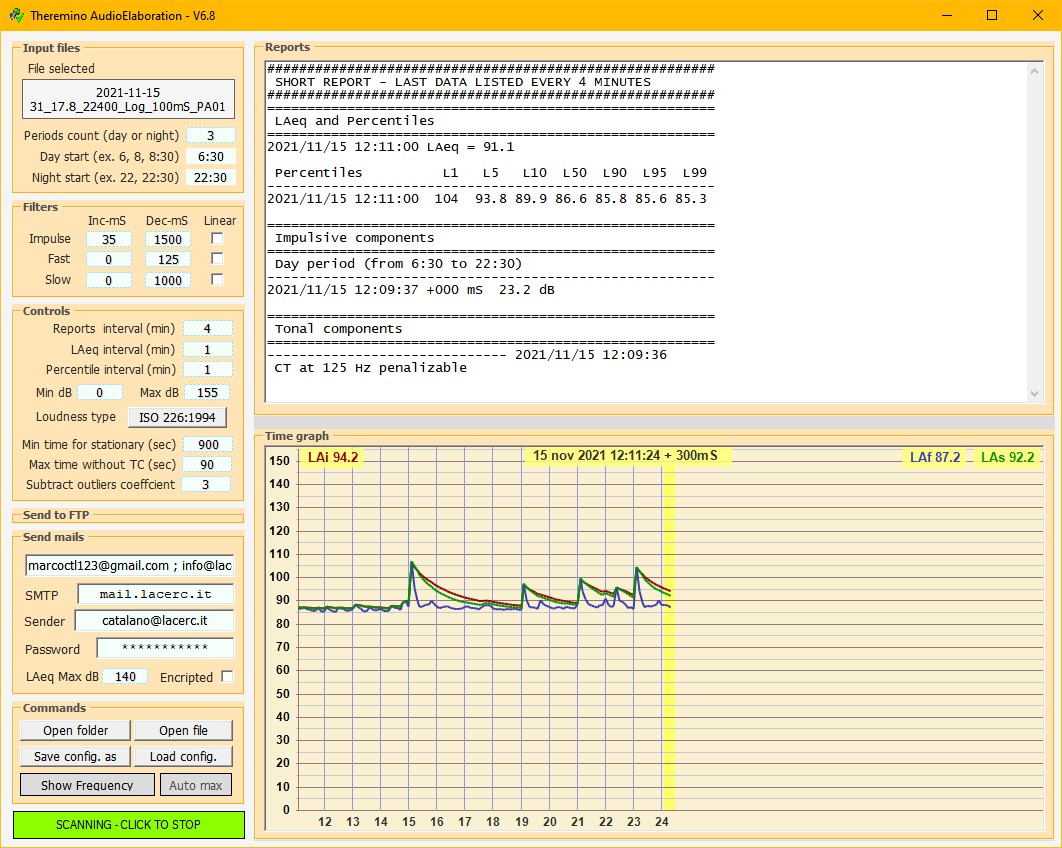
This sound level meter consists of two applications: AudioMeter which reads the microphone input and carries out the calibrations and frequency analysis, and AudioElaboration which reads historical files and carries out sound level analyzes according to ISO directives 226:1994 and ISO 226:2007
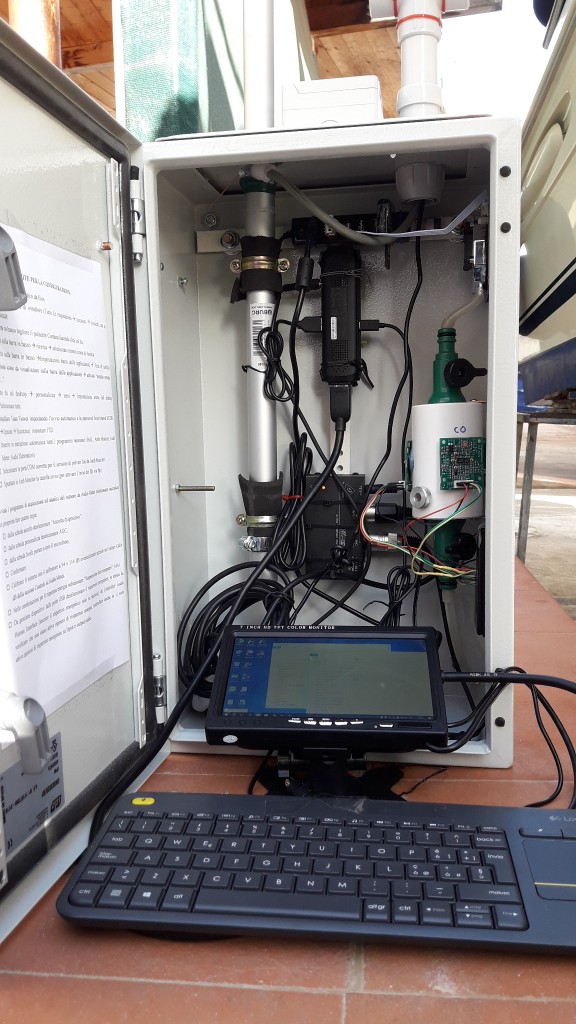
ours collaborator Marco it has built numerous control units that communicate through the cellular network and has used them for revelation campaigns that lasted many years.
These control units can also detect other data, for example the concentrations of dust and gas.
You can contact Marco to know the construction details and receive advice or possibly even to have the custom-made control units built for you.
The system has some features that cannot be found even in the best sound level meters on the market, especially as regards the connectivity with the PC and the possibility of logging data on the Internet. Automatic measurements can therefore be made for long periods, even years, without manual intervention, while commercial sound level meters, even the expensive ones, require someone to press their buttons for each new sample.
The complete measurement chain (ECM8000 microphone, AudioMeter e AudioElaboration) passes the tests for the standards that regulate this type of equipment and has been certified with an uninterrupted chain of traceability, starting from the first-line samples of the national metrological institute Accredia
Documentation downloads
Theremino_Phonometer_ENG.pdf
Theremino_Phonometer_ITA.pdf
Original documentation for any translations
Theremino_Phonometer_ENG.odt
Theremino_Phonometer_ITA.odt
Download di Theremino Phonometer
Theremino_Phonometer_V9.1_WithSources (complete project, also for programmers)
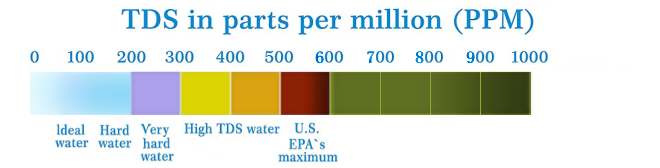
Theremino WaterQuality
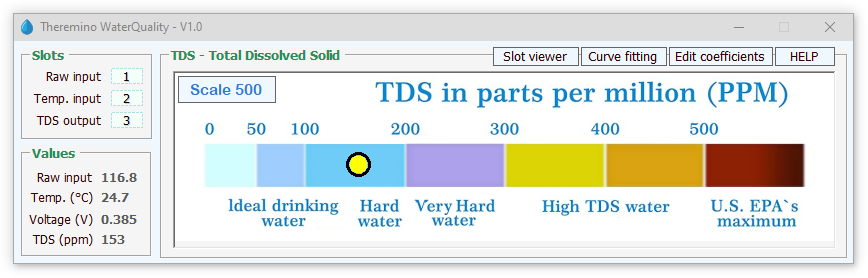
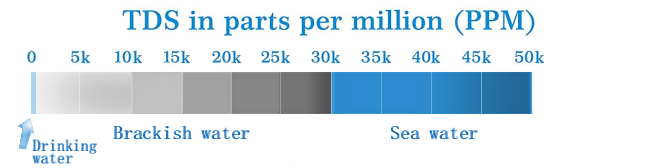
This application measures the Fixed Residue or TDS which is the degree of mineralization of the water, i.e. the amount of perfectly dry solid matter that remains after the evaporation of a known amount of water.
A TDS sensor module is required for operation (there are different types and they cost a few Euros), a Theremino_Master module and possibly also a temperature sensor.
For details on construction and use, please read the documentation files.
The documentation also explains how to measure water with very high conductivity, up to the saltier seawater with PPM = 50000
Documentation files
Theremino_WaterQuality_Help_ITA.pdf
Theremino_WaterQuality_Help_ENG.pdf
ODT format documentation files for translators
Theremino_WaterQuality_ODT_and_PDF_docs.zip
Download at Theremino WaterQuality – Version 1.0
Theremino_WaterQuality _V1.0
Theremino_WaterQuality _V1.0_WithSources (complete design for programmers)
Version for all Windows in 32 and 64 bit. For Raspberry Pi, Linux, Android and OSX, read the installation notes.
Theremino KeyManager

This small application, allows using the capacitive buttons, as they were normal keys, of a standard keyboard. The buttons are easily, clicking on the line and pressing the selected key.
You can configure up to 255 keys and special keys can be simulated, with Shift, CTRL and mouse buttons.
Are also available, auto-repeat and auto-repeat delay. The delays are adjustable, exactly like a normal keyboard.
Capacitive buttons
The capacitive button is cut with scissors from copper adhesive tape. Or you can use bananas, flower pots, liquids or any other object slightly conductive. You get the equivalent of MakeyMakey, but without the danger of connecting an electric wire on your wrist.
A Master does the same things as a Makey Makey, but costs less than half and is more flexible. In addition, the dangerous electrical connection on your wrist, necessary to operate the Makey Makey. System buttons are capacitive Theremino, resistive not, then can be isolated and you should not touch any metal part.


In this video and also in This, you see the KeyManager used with some awful BananaKeys. Bananas work but are uncomfortable. Better to use capacitive keys rectangular or round at least, such as lemons or mandarin oranges: LemonsPiano – Scriabin's s_lemons
Download Theremino KeyManager – Version 1.3
Theremino_KeyManager_V1.3
Theremino_KeyManager_V1.3_WithSources (complete design for programmers)
Version for all Windows in 32 and 64 bit. For Raspberry Pi, Linux, Android and OSX, read the installation notes.
Theremino Simon
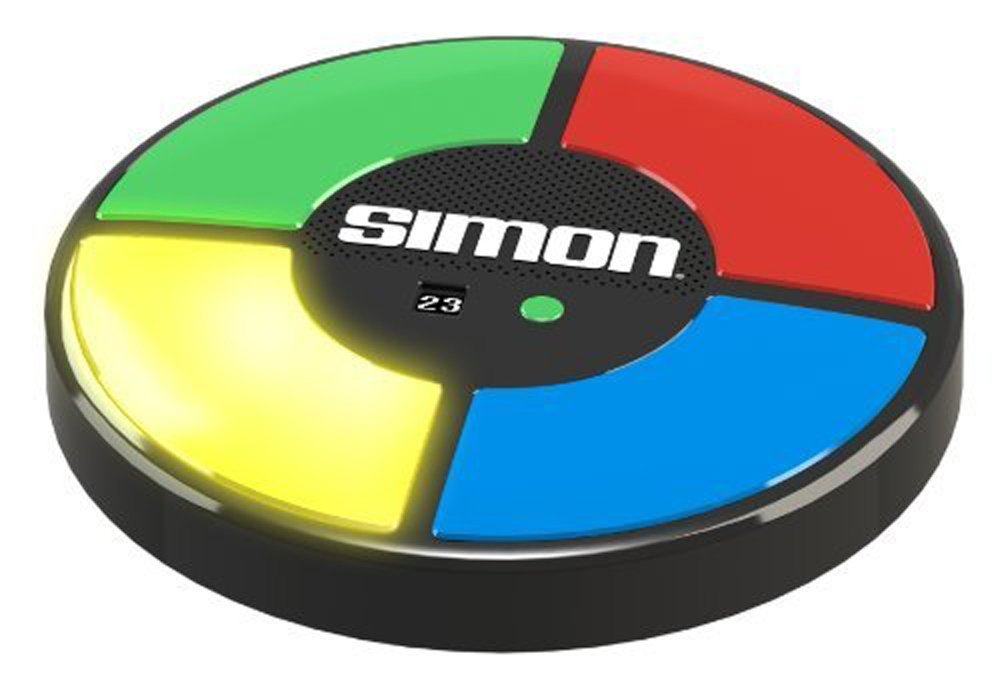
This is a key thereminica reissue of the hit game “Simon Says”. To build three or four LEDs and a few pieces of metal or wire, or bananas, or other fruits.
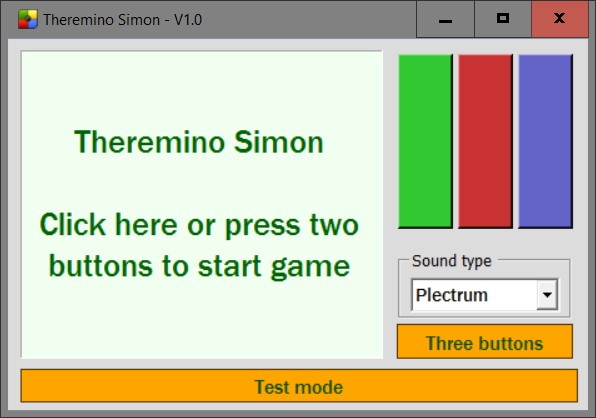
The software can simulate exactly the original game, with four buttons arranged in a circle, or a more modern arrangement, type keyboard piano, both with three with four keys, allowing you to play faster.
This application is also a good example and a starting point to build other games based on Input-Output.
Links
The three (or four) capacitive sensors are connected to pins 1, 2, 3 (or 1, 2, 3, 4) a Theremino Master. These pins must be configured as Cap16 and with the slots with the same Pin numbers, i.e. 1, 2, 3 (or 1, 2, 3, 4).
The three (or four) LED are connected to pins 4, 5, 6 (or 5, 6, 7, 8) a Theremino Master. These pins must be configured as Dig_Out and with the slots with the same Pin numbers, i.e. 4, 5, 6 (or 5, 6, 7, 8).
Theremino experts could, If necessary, use other slots, changing the value “FirstSlot = 1” in the file “Theremino_Simon_INI.txt” located next to the application “Theremino_Simon.exe”.
To make it very similar to the original game you could print the image “Saka” located in the folder “Sources/Images” on a sheet of translucent paper. The image is then glued on a bed with LEDs and sensors consist of thin aluminum clippings.
Or you could use a piano keys, or even just the LEDs and wires (that act as sensors), set the table with masking tape.
Download Theremino Simon – Version 1.0
Theremino_Simon_V 1.0
Theremino_Simon_V 1.0 _WithSources (complete design for programmers)
Version for all Windows in 32 and 64 bit. For Raspberry Pi, Linux, Android and OSX, read the installation notes.
Theremino GamePad
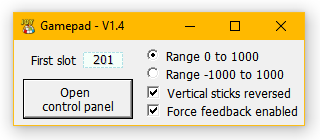
This application reads any number of GamePad, Joysticks and other similar devices. The control values are copied into the slots and made easily available, any other application of Theremino.
If you set “First slot = 1”, then the first device uses the slots from 1 onwards, the second from 31 onwards, the third from 61 onwards, And so on.

Here you can see the button numbers from 1 to 4. Other 4 buttons are located behind, two are in the Centre (called select and start) and two are in stick (Press:).
For a complete list of controls and slots, read the following files:
GamepadButtons_ENG.txt
GamepadButtons_ITA.txt
These same files are also available in your application.
This application could not start because it uses DirectX. In this case we recommend download and follow the installation notes. The version 1.2 should no longer require the installation of DirectX, on any operating system.
Download Theremino GamePad – Version 1.4
Theremino_GamePad_V1.4
Theremino_GamePad_V1.4_WithSources (complete design for programmers)
Version for all Windows in 32 and 64 bit. For Raspberry Pi, Linux, Android and OSX, read the installation notes.
Theremino GamePad Tester

Some Gamepads have a dead zone (Dead Zone) horribly large. We then prepared the application “Theremino Gamepad Tester” to compare them.
To test the GamePad you make ten rotations, of different diameters, on each of the two sticks. Then you check the name and possibly change it manually. Finally save the image to compare with other. If you have significant images speditecele, possibly with brand, model and how much you paid.
A good GamePad should have the four lower percentages can (under the 5%). It should also show traces approximately circular.

This is an example of Gamepad “to throw” – Dead Zone around the 20%.

So instead you have the GamePad will work fine – Dead Zone around the 3%

Another example of good operation with very low Dead Zone – No matter that the circles are round, What matters is that you do not see discontinuities in the central areas.
Some examples of GamePad
Saitek P2900 – Wireless – Dead zone definitely small, about 2%. All Saitek should be fine. Unfortunately it is not easy to find them on eBay and they cost enough.
Logitech and Trust – About 50 Euro and 30 Euro. Expensive but should be fine.
SQONYY – Wireless, about 15 Euro. Talking about this well, will try it soon.
LINQ – With USB cable, about 10 Euro. Exaggerated dead zone, around the 15-20%.
Atomic PC – With USB cable, about 10 Euro. Exaggerated dead zone, beyond the 20%.
BOYU and FOYU – With USB cable, about 15 Euro. We haven't tested.
This application could not start because it uses DirectX. In this case we recommend download and follow installation notes. The version 1.4 should no longer require the installation of DirectX, on any operating system.
Download Theremino GamePadTester – Version 1.4
Theremino_GamePadTester_V 1.4
Theremino_GamePadTester_V _WithSources 1.4 (complete design for programmers)
Version for all Windows in 32 and 64 bit. For Raspberry Pi, Linux, Android and OSX, read the installation notes.
Custom Controls


Theremino system applications are easily controlled with the graphical controls “CustomControls” who fully configurable colors and shapes and editable numeric values in many ways, by clicking and moving the mouse, with the mouse wheel, with the arrow keys, with the keyboard and with normal methods of selection and copy-paste.
The CustomControlsLib collects the following controls:
– MyButton
– MyComboBox
– MyGroupBox
– MyListView
– Mytabcontrol
– MyTextBox
ATTENTION: Linux and MacOSX failing to use DLLs compiled along with the programs for which the “CustomControlsLib.DLL” should be copied close to every executable program.
Download Custom Controls – Version 1.7
CustomControls_V1.7_WithSources
For all Windows systems to 32 and 64 bit. For Raspberry Pi, Linux, Android and OSX, read the installation notes. This file includes the “CustomControlsLib.DLL”, the sources needed to modify and recompile and a small test application
– – – – – –
Custom Controls – Without DLL
We have been using for years the Custom Controls such as DLL, but now we have found a better way to include them in your applications. This is to include a folder called “CustomControls” among the sources of application and compile it along with any other files of the application. In the case of updates replace a DLL or a whole folder is pretty much the same thing, but will eliminate many problems and inconveniences from the DLL.
With this new method will have the following advantages:
- You can have an application that consists of a single EXE file
- You eliminate any difficulties of “embedding” the DLL
- The Custom Controls are actually compiled with the application and work well even on Linux and MacOsx.
- Connect the Custom Controls no longer requires delicate work with “References” and “CopyLocal property”
Switch from one application with “CustomControls.DLL” a without, requires some little intuitive operations. Included in the download is the “Notes.txt” that explains how to include and link the folder “CustomControls” Visual Basic applications.
Download di Custom Controls_Folder (Without DLL) – Version 1.7
CustomControls_Folder_V1.7
For all Windows systems to 32 and 64 bit. For Raspberry Pi, Linux, Android and OSX, read the installation notes.
SDR Controls
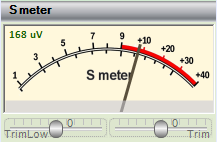
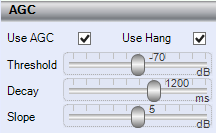
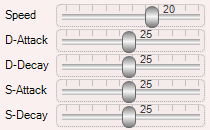
These checks are similar to the previous “CustomControls” but cover different needs. We called them “SDR Controls” Why were developed for application ThereminoSDR. To see how to use open ThereminoSDR, its controls work even without hardware.
MyTrackBar is the most important control and probably the only one that will be used often. This trackbar is significantly better than any other. In addition to the colors that can be configured in many ways, the text that is presented in an efficient and highly visible and fluid movements and ergonomic, This control introduces two innovations useful: the ability to do non-linear sliders “Logaritmicity” and the variable resolution “Smart Resolution”. Quick tips on how to use them are in the file “MyTrackBar_Notes.txt”. The more complete instructions are on page 44 application instructions file ThereminoSDR.
Other controls are:
– MyPanel (pretty hard to use)
– MySmeter (probably suitable for single application SDR)
– NumericDisplay (even this very specific for SDR)
![]()
Unlike CustomControls this time we experienced a different way to include them in your applications. Do not create a DLL but you copy the folder with all the files between the sources of the application. Then you use “Add item exixsting” and there are in addition to the project file.
Notes for versions
Version 1.1 – Fixed TrakBar, We now also work with the new mouse, with micrometric wheel (without shots).
Download the SDR-Controls – Version 1.1
SdrControls_V 1.1
For all Windows systems to 32 and 64 bit. For Raspberry Pi, Linux, Android and OSX, read the installation notes.
Theremino DeviceManager

The particularity of this Device Manager is to remember the last selected device. So if you have the need to rehabilitate frequently the same device, You can do so comfortably in two clicks.
In recent months, WordPress, (We use to maintain your site Theremino), has a new fault and drop frequently manage network. We wrote Theremino DeviceManager on purpose and now we can rehabilitate the network in less than five seconds.
This application is an example of how to control hardware devices easily. You rarely feel the need. but it may happen in cases where it is necessary to do so. Know this “How do you”, could solve otherwise impossible situations.
 >>> ATTENTION <<<
Disable System devices
may render your computer unusable
until it will be rehabilitated.
Notes for versions
Version 1.0: First published version. Sturdy enough but yet to try.
Version 1.2: Fixed an issue that prevented starting in case of Devices with no name. Added an identifier number to distinguish devices with the same name.
Download Theremino DeviceManager – Version 1.2
Theremino_DeviceManager_V 1.2
Theremino_DeviceManager_V 1.2 _WithSources
For all Windows systems to 32 and 64 bit.
ATTENTION: Raspberry, Linux and MacOSX have their own management system devices. Edit this application, to make it work on operating systems aliens, Might be difficult, if not impossible.
Simulations LTSpice

Electrical simulation system Theremino recommend LTSpice which is the fastest Simulator, efficient and well done for all the ones we tried so far. In years past we used them almost every, from suffering to another. Since we use PSpice everything is simplified and became a friend really enjoyable. LTSpice is freeware and even this does not hurt.
LTSpice, kindly distributed by Linear Technology, apparently, supports only integrated circuits produced by them, has very few generic components in its libraries, and it's a little’ strange (but just learn to use it well).
The schema components of LTSpice are disproportionate, the resistors and transistors are very big so the appearance of diagrams is not serious. These characteristics have prevented many to appreciate the simplicity and power of LTSpice and hijacked almost all, us including, toward simulators cumbersome Eurocracy must become employing hours to settle…
Solution:
- Download latest version from LTSpiceIV: http://www.linear.com.
- Install it normally.
- Go to the folder “C:\ProgrammiLTCLTspiceIV” and delete the folder “lib”.
(those who prefer to be less bad can rename it “lib-old”). - Download this ZIP: LTSpiceIV_Libraries_for_Theremino_simulations_V 2.0
- Extract the folder “lib” and put it in “C:\ProgrammiLTCLTspiceIV” instead of the original lib.
Doing this you can open all of our simulations without problems and you will find thousands of transistors and diodes. All the commonly used operational amplifiers are available by selecting them with OpAmp5. And finally the schemas are no longer strange, with resistors and transistors tits.
The version 1.8 includes many new models, including a thousand Mosfet in the file “Standard.mos”. Are models that are easily found on the net, just go and try one by one by the constructors. But having them all gathered in alphabetical order, in a single file, It is another thing. To control the models manually it would take weeks. We then wrote a special application to reorder models. With this application we've eliminated the defective or duplicate models, We reordered the parameters more readable (all with the same number format and number of decimals) and also reordered the models alphabetically.
The versions 1.9 and 2.0 include more new models, including hundreds of new JFET. This is definitely the list of Spice models, more complete and better ordered, that you can find on the net.
In this ZIP you will find all the simulations that have some relation to the system Theremino: ThereminoSimulations_V 1.6 (are our simulations “of work”, are not meant to be published, but they can be very useful for “insiders”)
This file contains all the main features of the most commonly used Op and is very useful to choose the best when designing: OpAmps_Table
PCBS with Eagle Eagle3D


Eagle is an excellent program to draw schematics and printed circuit board. Unfortunately the original Eagle libraries contain many components designed badly. If the components have the pins out of step (not a step 2.54 mm) it becomes difficult to connect the PCB tracks and do small and well made. Also not all components have the corresponding libraries in Eagle3D and you never know which components use.
We therefore recommend to proceed as follows:
Eagle
Normally we use the version 6.1.0, and it is good not to use versions other than this, to avoid the trouble of file conversion.
If you can not find the version 6.1.0 download it here:
https://www.theremino.com/files/eagle-win-6.1.0.zip
After installing Eagle, you will be asked if you want to use the paid version.
Select “Run as freeware”, that works 100% for all our projects (It has a size limit but our PCBs are all much smaller than the limit).
Eagle libraries
– Download this compressed file: EagleLibs.zip (fixed 20/01/2017 Now you can replace the package to terrible errors no longer incurring electrolytic “inconsistency”)
– Open the folder “LBR” Eagle
– Make a new folder called “Original Libs” and shift them in all libraries
(in the future if need other libraries will be easy going to regurgitate them between “Original Libs”)
– Put in folder “LBR” downloaded libraries, by pulling them from the ZIP file
Components to use for Eagle Eagle3D
To find out which are the best components to use, and make sure they are also viewable in 3D, Download these documents: EagleComponents (fixed 20/01/2017 now there are many types of capacitors available both with step 2.54 mm that 5 mm)
For now the documents are in Italian but the ODT version will allow translators to do the English and Japanese versions.
PovRay
Look for it on the Internet and install it.
Files of “includes” for PovRay (for 3D components)
– Download this ZIP file: PovRay_Include_Files (fixed 20/01/2017 now work fine even the capacitors available both with step 2.54 mm that 5 mm)
– Open the PovRay
– Find the subfolder “includes” and open it
– Copy to this folder “includes” the files, extracting it from the ZIP file and overwriting.
ULP Eagle3D
The ULP (user language program) are extensions of Eagle, with this ULP creating files “POV” that finally PovRay turn into 3D images.
– Download this compressed file: ULP_EAGLE_3D (fixed 20/01/2017 now work fine even the trimmer, from TRIM-1 h up to TRIM_M3, as shown in EagleComponents)
– Extract all the complete folder “EAGLE 3D” and put it in the folder ULP of Eagle
ULP FastGcode
The ULP (user language program) are extensions of Eagle, with this ULP creating GCODE files which are used to make printed circuit boards with the cutter. (at the beginning we do not understand anything but with lots of patience and a lot of experience eventually becomes easy)
The version of September 2013 It also works well with manual tip.
– Download this compressed file: FAST-GCODE _ July2015 (contains the new version 7.9)
– Extract all the complete folder “_ FAST-GCODE _” and put it in the folder ULP of Eagle
ULP FastGcode latest versions
The version 7.8 has a strange defect in large area cleaning (Sometimes he neglects some pieces). The 7.9 should be good to go and also fixes a bug that happened if you grew too “Overlap” (total block of the application when creating GCode). This ZIP contains the versions 7.7, 7.8 and 7.9, use the one that works better and you feel like it: FAST_GCODE_LastVersions
Theremino Fast FTP

There are many FTP software and also the basic functions of Windows folders allow you to Upload and Download files. But we always had problems in managing sites with this Protocol, why we wrote this little app.
“Theremino Fast FTP” could, in some cases, serve as an example for those who send and receive files in FTP. Like all our applications is Open Source and written in a very simple way, to be a useful teaching aid.
This little app is great to see the real address Upload folder for the program “Geiger”. Sometimes these addresses are very strange and only with “Fast FTP” You can find them (other FTP programs interpret internally addresses and do not show complete addresses)
Instructions for FTP addresses
Depending on your FTP address to be set can be different, in some cases also very strange, as per the following examples:
"ftp://ftp.sitename.org/sitename.org/folder1/folder2/" (Aruba)
"ftp://www.theremino.com/www.theremino.com/files/" (Aruba)
"ftp://indirizzo.dominio.it/cartella/images " (home.teletu.it)
If you can't then you should get the syntax provider.
Notes for versions
Version 2.2: Correct small defects were born during the transition from XP to Windows-7/8.
Version 2.3: Delete the flashes on startup.
Version 2.4
– Operation without errors even with sites that give an empty string instead of the length
– Operation without errors even with sites that give the time in AM/PM format.
Version 2.5
– Operation without errors even on folders with thousands of files.
– The loading time of the file list is reduced by more than ten times.
– Even long lists, from thousands of files, They are completed in a fraction of a second.
Version 2.6
– The HTTP Folder box now contains the correct addresses with http://www… Even if the provider wants them as FTP://FTP.
– The menu item “Copy path to clipboard” works again
– The button to try HTTP downloads works again.
Download Theremino FastFTP – Version 2.6
Theremino_FastFtp_V2.6
Theremino_FastFtp_V2.6_WithSources (complete design for programmers)
Version for all Windows in 32 and 64 bit. For Raspberry Pi, Linux, Android and OSX, read the installation notes.
Theremino WatchDog
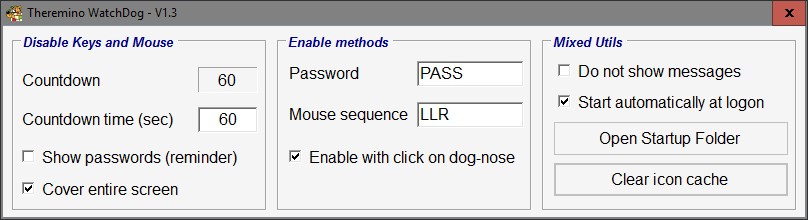

This application disables mouse and keyboard. Disabling can be manual, or it can happen automatically, When the computer is idle for some time.
Usefulness and application areas
Disable the keyboard is useful when cleaning the keys. Moreover this application will be especially appreciated by those who must defend against mischievous beings of various kinds. The network are other applications to disable keyboard, but none is specifically designed for defence from cats, Dogs & Birds.
Theremino WatchDog has been tested in worse conditions and is definitely a test of cats and magpies. The magpies are animals from the wild and mischievous soul ’, that some consider almost of raptors. If you are looking for network characteristics sits that are among the most intelligent animals ever. They are the only birds that they recognize themselves in the mirror, in the company only of man, of primates and dolphins (Read here). The Magpie “Chiko”, who lives in the garden out of the lab and that sweeps and flutters again even in the laboratory, He understood that the keyboards are magical and can recognize the computer unattended. Patiently awaits the best time to scamper on the keyboard right and do maximum damage. He also manages to press the buttons of the mouse in its beak and failed multiple times to open the flap of the battery of the mouse, remove it and take it away. In This video She is seen, from small, While taking a bath.
Now all computers in the laboratory have always-on Theremino_WatchDog, with a very short time to disable (30 seconds), so there are high hopes that this site is deleted from a shot of beak.
Opening and closing the application
When you enable the application does not appear a window, but only a small icon. The icon remains resident in the area of applications (at the bottom right, near the clock calendar), and is recognizable by the igloo and the dog. To completely close the application you press the right button on this icon and then choosing “Exit”. It should no longer his task until it restarts. The automatic restart can be, When you start Windows, or manual.
Disable keyboard and mouse
To disable mouse and keyboard you click with the left mouse button on the icon ’ application. Disabling can also take place in time, so if you will be away for some time your computer will turn by itself. This is very useful for those who regularly forgets to enable disable before walking away.
To reactivate the mouse and keyboard using a keystroke, a sequence of clicks on the left and right mouse buttons, or click on the dog's nose. If none of these methods is enabled then you might risk getting stuck, so in this case the keyboard and mouse will be always enabled.
Change the behavior of the application
To tailor the application to suit your preferences, you press the right button on its icon and choose “Properties”. The property sheet has the following controls:
- Countdown – This box displays the time remaining before disabling. With every movement of the mouse and for each key pressed this time sharing. Then disabling occurs only if you remain completely inactive all the time set.
- Countdown time (SEC) – Setting the time in seconds. We recommend a short time, for example, 30 seconds, If the “enemy” is very attentive and you turn each time you leave your computer unattended. Otherwise a time from 60 seconds to 180 seconds should be fine in all other cases. Setting this value to zero or leave this field empty, the countdown will stop and disable timer never occurs.
- Show passwords (reminder) – Enabling the password reminder and for the sequence of the mouse. The two strings of characters will be visible above the dog's head that appears during the computer to stop responding.
- Cover entire screen – By enabling this check box, l ’ whole screen is covered with a translucent Sheen, to indicate that the keyboard and mouse are disabled. Otherwise it is only covered l ’ bottom right corner.
- Password – Sequence of letters to be pressed on the keyboard to rehabilitate keyboard and mouse. Between a keyboard and other things you should not miss more than two seconds.
- Mouse sequence – Sequence of button presses mouse button, to rehabilitate keyboard and mouse. The buttons to be used are “sinister” (L) and “Destro” (R). The sequence “LLR” means that you must press the buttons “sinister”, “sinister” and “Destro”. Between and the next you should not wait longer than one second.
- Enable with click on dog nose – If you enable this control, You can end the block of keyboard and mouse, by clicking on the dog's nose. Not the small icon of the application, but on that great, appearing in transparency when the computer is locked. To make clicks you can use either the mouse or the touch screen.
- Do not show messages – Who was annoyed by the messages and their sounds, can suppress them with this option.
- Start automatically at logon – By enabling this check the application will start automatically each time you start Windows. Or more precisely each time the user connects with your computer (logon). Bootstrapping is obtained with a link to the application in the Autostart folder, call “Startup folder”. If you are using Autostart no longer move the application and you should not rename the path where.
- Open startup folder – Very useful command that opens the folder “Startup folder”. You can then control which programs to start automatically, and you can also add new ones. To add new programs to start automatically creates a link to the program and you put in this folder. Without this command find the Autostart folder it would be very difficult.
- Clear icon cache – Since this application is meant to be always online, We added this command in order to have it always at hand. Other useful commands will be added in the future in this area. Make a “Clear icon cache” need to update images of all desktop icons when, for some reason, they were wrong.
After you change the Properties window closes with the cross so that it doesn't clutter your desktop and do not consume resources unnecessarily. Even closing the application will continue to work minimized in the taskbar.
Programming and educational
Like all other applications on your system Theremino, This software is written in the simplest possible way and can be used to study the programming. Here are shown some things rather “difficult” as keyboard and mouse hooks. The hooks intercept system-level events, before they are sent to applications.
– – – – –
Notes for versions
Version 1.0: First published version.
Version 1.1: Fixed a bug for which you had to write the entire password all in a second. Up to two seconds the time allowed between two password buttons with the keyboard.
Version 1.2: Eliminated the possibility of launching twice the application by mistake. Also now the Properties window no longer opens each time you start Windows.
Version 1.3: Improved background color. Adding the icon with the signal blocking. Delete a minor flaw that occurs when restarting the application that is already open. Made sure that the properties sheet will never go off screen.
Version 1.4: Improved password recognition functions and Mouse sequence. Simplified Hook classes.
Download Theremino WatchDog – Version 1.4
Theremino_WatchDog_V 1.4
Theremino_WatchDog_V _WithSources 1.4 (complete design for programmers)
Version for all Windows in 32 and 64 bit. For Raspberry Pi, Linux, Android and OSX, read the installation notes.
Theremino KeyTester

This application is used to control the codes issued by keyboard. You can use it to monitor the operation of keyboards and to identify the “Scancode” to use in your applications.
Programming and educational
Like all other applications on your system Theremino, This software is written in the simplest possible way and can be used to study the programming. Here is a pretty “hard” as the keyboard Hook. The hooks intercept system-level events, before they are sent to applications.
Download Theremino KeyTester – Version 1.0
Theremino_KeyTester_V 1.0
Theremino_KeyTester_V 1.0 _WithSources (complete design for programmers)
Version for all Windows in 32 and 64 bit. For Raspberry Pi, Linux, Android and OSX, read the installation notes.
Theremino SystemMetrics
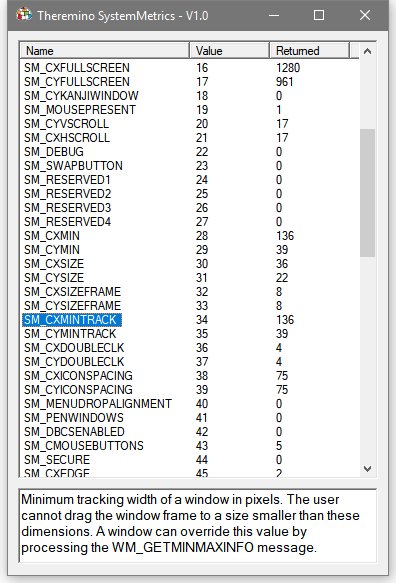
This software is useful for programmers, shows control properties, the windows and the operating system screens. For example, the width of window borders, the spacing between the icons, the size of the screens, the number of screens in the system, etc. Knowing how to read them can be very useful in some cases.
Download di Theremino SystemMetrics – Version 1.0
Theremino_SystemMetrics_V1.0_WithSources (complete design for programmers)
Version for all Windows in 32 and 64 bit. For Raspberry Pi, Linux, Android and OSX, read the installation notes.
Theremino MathHelper
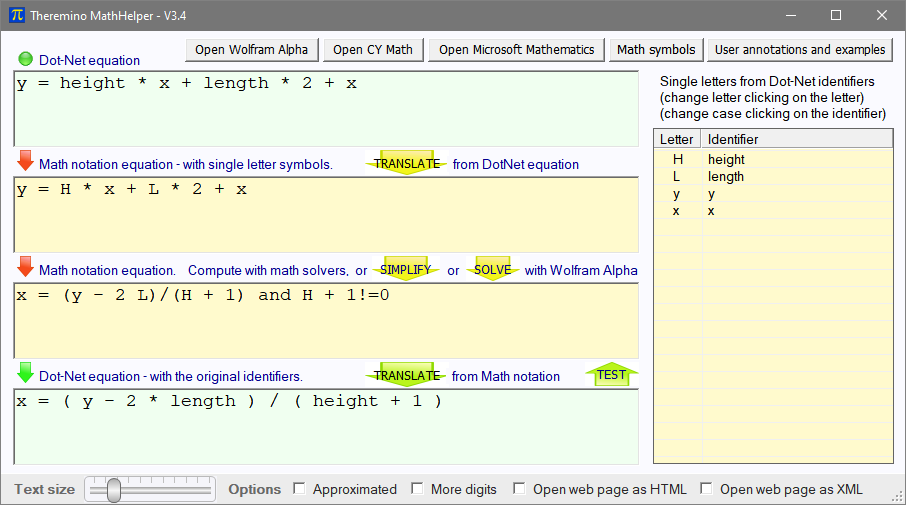
This application processes mathematical formulas and manages to extract variables from complex formulas that are difficult to handle manually.
The application transforms formulas from programming languages to mathematical language. Change the names of the functions and replace the variables with single letters. Then send the formula to the powerful symbolic engine WolframAlpha and extracts the formulas processed by his “under” of response. Finally, the application transforms the formulas back into a format understandable by computers. The final formulas again contain the variables with their original names and become readable even by humans.
Mathematicians could also do without it, but some programmers will find this application very useful. In particular, programmers who find it useful (like us) they read sensors and calculate electronics quantities. But also those that display variable quantities with linear and logarithmic graphs.
For an example of an application that contains linear and logarithmic graphs, and that uses direct and inverse formulas for the graph axes, downloaded Theremino Covid19. Formulas that calculate positions on the screen and return numeric values from positions on the screen, they were calculated with MathHelper and refined manually. You can find them in the functions “ValueToLinY”, “LinYToValue”, “ValueToLinX”, “LinXToValue”, “ValueToLogY”, “LogYToValue”, “ValueToLogX” and “LogXToValue”, that are located in the file “Class_Chart.vb”.
Some examples
Suppose we have this formula that calculates “y” to vary of “x”: y = 3 * x
In a few seconds we can get the inverse formula, that calculates “x” to vary of “y”: x = y / 3
The previous case was easy and could also be solved manually.
But suppose we have this formula: y = ( x * 12 ) + ( x + 3 ) + size
Turning it over begins to be less intuitive: x = 1 / 13 * ( y – 3 – size )
Then, as the formulas get more complex, solving them becomes more and more difficult.
Such as this: y = v1 * Math.Log ( x * v2 + v1 )
That becomes: x = ( Math.E ^ ( y / v1 ) – v1 ) / v2
Or this: y = ( x * 12 ) + ( x + 3 * x ) + v1 * 2 + x / 7
That becomes: x = – 7 / 113 * ( 2 * v1 – y )
Up to seemingly simple formulas like: y = a * x ^ 4 + b * x ^ 3 + c * x ^ 2
That turn into real “monsters”, like this: x = – 1 / 2 * Math.Sqrt ( b ^ 2 / ( 4 * a ^ 2 ) + ( Math.Sqrt ( ( 72 * to * c * y – 27 * b ^ 2 * y + 2 * c ^ 3 ) ^ 2 – 4 * ( c ^ 2 – 12 * to * y ) ^ 3 ) + 72 * to * c * y – 27 * b ^ 2 * y + 2 * c ^ 3 ) ^ ( 1 / 3 ) / ( 3 * 2 ^ ( 1 / 3 ) * to ) + ( 2 ^ ( 1 / 3 ) * ( c ^ 2 – 12 * to * y ) ) / ( 3 * to * ( Math.Sqrt ( ( 72 * to * c * y – 27 * b ^ 2 * y + 2 * c ^ 3 ) ^ 2 – 4 * ( c ^ 2 – 12 * to * y ) ^ 3 ) + 72 * to * c * y – 27 * b ^ 2 * y + 2 * c ^ 3 ) ^ ( 1 / 3 ) ) – ( 2 * c ) / ( 3 * to ) ) – 1 / 2 * Math.Sqrt ( b ^ 2 / ( 2 * a ^ 2 ) – ( ( 4 * b * c ) / a ^ 2 – b ^ 3 / a ^ 3 ) / ( 4 * Math.Sqrt ( b ^ 2 / ( 4 * a ^ 2 ) + ( Math.Sqrt ( ( 72 * to * c * y – 27 * b ^ 2 * y + 2 * c ^ 3 ) ^ 2 – 4 * ( c ^ 2 – 12 * to * y ) ^ 3 ) + 72 * to * c * y – 27 * b ^ 2 * y + 2 * c ^ 3 ) ^ ( 1 / 3 ) / ( 3 * 2 ^ ( 1 / 3 ) * to ) + ( 2 ^ ( 1 / 3 ) * ( c ^ 2 – 12 * to * y ) ) / ( 3 * to * ( Math.Sqrt ( ( 72 * to * c * y – 27 * b ^ 2 * y + 2 * c ^ 3 ) ^ 2 – 4 * ( c ^ 2 – 12 * to * y ) ^ 3 ) + 72 * to * c * y – 27 * b ^ 2 * y + 2 * c ^ 3 ) ^ ( 1 / 3 ) ) – ( 2 * c ) / ( 3 * to ) ) ) – ( Math.Sqrt ( ( 72 * to * c * y – 27 * b ^ 2 * y + 2 * c ^ 3 ) ^ 2 – 4 * ( c ^ 2 – 12 * to * y ) ^ 3 ) + 72 * to * c * y – 27 * b ^ 2 * y + 2 * c ^ 3 ) ^ ( 1 / 3 ) / ( 3 * 2 ^ ( 1 / 3 ) * to ) – ( 2 ^ ( 1 / 3 ) * ( c ^ 2 – 12 * to * y ) ) / ( 3 * to * ( Math.Sqrt ( ( 72 * to * c * y – 27 * b ^ 2 * y + 2 * c ^ 3 ) ^ 2 – 4 * ( c ^ 2 – 12 * to * y ) ^ 3 ) + 72 * to * c * y – 27 * b ^ 2 * y + 2 * c ^ 3 ) ^ ( 1 / 3 ) ) – ( 4 * c ) / ( 3 * to ) ) – b / ( 4 * to )
And above all the previous monster is only one of the four possible solutions.
Simple instructions
- The upper text box, with title “Dot-Net equation”, contains the original formula that you want to elaborate. This box accepts formulas copied directly from applications. If the formulas are in Dot-Net format (VBNET, CSharp o CPP), then the syntax is understood without problems. If, on the other hand, they come from other languages, it will be necessary to manually adjust the names of some functions. The functions that vary the most between one language and another are trigonometric functions (LN, Log, Log 10, Pow, Tan, Ata, etc…). Sometimes even the functions copied from DotNet may require small adjustments, for example, the conversion functions of the numeric types CDbl must be eliminated, CSng, etc…
. - By pressing the button “Translate” the original formula is translated into mathematical language. Now the second text box should contain the translated formula, with single letters instead of variables, and the list on the right should contain its corresponding variable for each letter. If you want to change some letters or make them lowercase or uppercase just click on the list.
. - By pressing the button “Solve” the formula of the second box comes “resolved” for a different variable. If the formula is already in the format Y = function(X) or X = function(Y), then the formula is reversed and X or Y is extracted as needed. Otherwise a box appears asking which variable you want to extract.
. - If instead of “Solve” you press “Simplify” then an attempt is made to simplify the formula. This is a difficult task and you don't always get something useful.
. - When you think you've got a valid formula with “Solve” or “Simplify”, then it's time to press “Translate” which re-transforms the formula into a comprehensible format for DotNet programs and programmers. The formula obtained in the text box below has the names of the original variables again, multiplication signs and trigonometric functions with names understandable by DotNet.
. - Sometimes the formulas produced by “Solve” or from “Simplify” there are more than one and each formula may also have validity conditions on the right. When there are multiple formulas the key “Translate” transform them one by one and in the box below we will find them one after the other.
. - Once you have the final formula in the box below, you can also try its validity with the button “Test”, which replaces all occurrences of the extracted variable with the complete formula in the first box at the top and also in the second. Once this is done press “Simplify” and, If all goes well, the word should appear in the third box from above “True” (other formulas and conditions may also appear, but the important thing is that the word also appears “True”). This test does not always succeed, because when you press “Test” the formula of the first box at the top may become too complex for the “Simplify”. However for medium complexity formulas this test usually works, and if it ends with “True” you can be sure that you have made no mistakes.
The buttons on the top row of the application
- Open Wolfram Alpha – Opens the math engine site with many useful possibilities, for example, you can view the graphs of the functions or ask questions of any kind.
- Open CY Math – Opens another website for solving mathematical problems. When it is not possible to solve a formula, CY-Math can sometimes help.
- Open Microsoft Mathematics – In some cases you may find it useful, but it is quite difficult to use it. This program must be installed on the local computer. If it is not installed then the Microsoft website will automatically open to install it.
- Math symbols – Opens a text file with the main mathematical and trigonometric functions of DotNet and the corresponding functions of WolframAlpha.
- User annotations and examples – Opens a text file that contains many examples of formulas and where you can write your own formulas, attempts and annotations.
The controls on the bottom line of the application
- Text size – Useful to enlarge the text or to fit multiple lines in a small space.
- Approximated – Look for approximate numerical solutions (it only acts on “Simplify” and “Solve”)
- More digits – Increase the number of digits in numerical solutions (just his “Simplify” and “Solve”)
- Open web page as HTML – If this option is selected the commands “Simplify” and “Solve” they are executed on the WolframAlpha WEB page where formulas can also be viewed with mathematical notation. For example the formula “monster” that we have seen above would look like in this image.
- Open web page as XML – If this option is selected the commands “Simplify” and “Solve” they are executed on the WolframAlpha WEB page and the result appears in XML format.
Trials and errors
Don't expect miracles, the WolframAlpha engine is powerful but there are unsolvable formulas, or that it would take Einstein to solve them. In these cases the “Solve” does not end, the WolframAlpha engine does not respond or responds with something unusable. Function too “Simplify” it may fail and in some cases it may make the function even more complex.
When the WolframAlpha engine fails, however, one has to wonder if it is really his fault, or if we are giving it a formula “wrong”.
Here are some examples of common mistakes when writing the formula in the first box at the top:
- Wrong number of brackets (a different number of open and closed parentheses).
- Forgetting the Initial Variable (For example, instead of y = x * 3 To write x*3 only).
- Forget the multiplication marks or use the font “x” in place of “*”.
- Leave programming functions in the formulas, for example, (CSng, CDbl, Mod, Sign, Round)
- Write math or trigonometric functions with invalid syntax for DotNet.
- Confusing trigonometric functions (ln instead of Log, Log instead of Log10, etc…).
So be careful: the mathematical notation is different from what programmers use and the four text boxes use different notations from each other. The first at the top is in DotNet type notation. The second from above is written in a mathematical notation suitable for making it understood by the WolframAlpha engine. The third from above is instead in the notation that WolframAlpha provides in output. And finally the bottom one is back in DotNet notation.
- To know the syntax of the DotNet functions and the corresponding WolframAlpha functions use the button “Math symbols” which opens a list with the main mathematical and trigonometric functions.
- In case of doubts about WolframAlpha notation consult these pages: page 1 and page 2 .
- As for DotNet consult these pages: page 1 and page 2 (hint for the english people: in the upper-right side of the page there is a language selector).
If you can't reverse a formula try to simplify it manually. You can also break the formula into sections that are easier to solve and make different attempts in order to better know the formula and its particularities.. And if you really can't, get help from a mathematician friend.
The WolframAlpha identifier
The Wolfram Alpha engine is free but there is a limit of two thousand requests every month. If this limit is exceeded then requests could be rejected until the following month.
You are now using our code and using it in common with everyone who downloads the application “MathHelper”, but you can request your code (for non-commercial use) and therefore have two thousand operations per month all for you (and they are very many).
To request your code go to This page and use the button “Get API Access”.
Once you have yours “Wolfram Alpha identifier” you'll have to replace it in the first few lines of the file “Theremino_MathHelper_INI.txt”, which is located next to the application's executable file.
To change the code with your personal code, make sure the application”MatHelper” is closed and then open the file “Theremino_MathHelper_INI.txt” with Notepad and replace them “x” of this example “APP-ID= xxxxxx-xxxxxxxxxx” with your code.
Download the MathHelper application
Notes for versions:
– Version 3.3 – First published version.
– Version 3.4 – We have corrected some defects on function names and when using lowercase or uppercase letters.
– Version 3.5 – The text boxes remain the right width even after minimizing the application.
– Version 3.6 – Fixed a small error that occurred when pressing Test with the lower box empty.
Version 3.7
– You can change the TextSize with the mouse wheel, but only when the mouse is over the cursor.
– Added link to “Graspable Math” <— TRY IT !!!
Download di Theremino MathHelper – Version 3.7
Theremino_MathHelper_V3.7
Theremino_MathHelper_V3.7_WithSources (complete design for programmers)
Version for all Windows in 32 and 64 bit. For Raspberry Pi, Linux, Android and OSX, read the installation notes.
Theremino MathTester

This application is just a skeleton where you can write your own functions and try them out. To use it you must install VisualStudio, know how to program and also have an idea of what you want to achieve.
Your test functions should be written in the forms “TestFunctions” and then you have to choose which module to use in the first function of Form1.
There are already four example modules, the first two are equal to each other except some lines of the second module where we tried two modified formulas. And the third module is also equal to the fourth.
You can then edit one of these modules and enter your own formulas to try, or you can copy one of the modules and then create a fifth, a sixth and so on (in this case you will also have to correct some names).
The numerical test values
The values you get depend on what your formulas have to do, so it will be up to you to judge whether they are right or wrong.
In the example image the values come from the form “TestFunctions_1”, in which we wrote the formulas to switch between numeric and pixel values and vice versa.
- The value column contains the test values
- Column x1 represents the values converted into pixels on the X axis
- Column x2 represents the values converted by the Pixels back to their original values
- Column y1 represents the values converted into pixels on the Y axis
- Column y2 represents the values converted by the Pixels back to the original values
At the bottom of the image the same tests are repeated, but using the formulas for stairs with logarithmic trend.
Download di Theremino MathTester – Version 1.0
Theremino_MathTester_V1.0_WithSources (complete design for programmers)
Version for all Windows in 32 and 64 bit. For Raspberry Pi, Linux, Android and OSX, read the installation notes.
Theremino CurveFitting
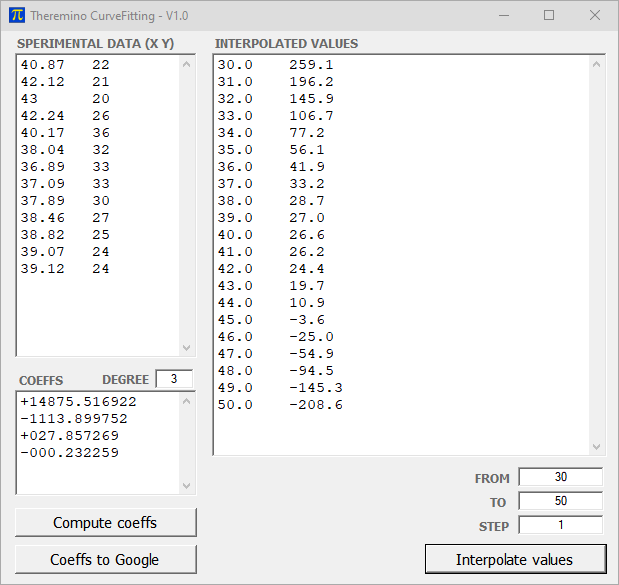
This application finds the coefficients that best approximate an experimental curve.
The coefficients of prime equations can be calculated, According to, third… and up to the ninth grade. Although those of the second or at most the third degree are usually used.
It is not easy to explain how to use it, Let's leave that to the mathematicians. Those who need it should know what they need it for and how to use it.
Download di Theremino CurveFitting – Version 1.0
Theremino_CurveFitting_V1.0
Theremino_CurveFitting_V1.0_WithSources (complete design for programmers)
Version for all Windows in 32 and 64 bit. For Raspberry Pi, Linux, Android and OSX, read the installation notes.
Theremino WinHelper

This application is a collection of useful links that are commonly used and that are hard to find in other ways.
WinHelper is written for Windows only 10. On older operating systems some commands will not work or give errors.
In version 1.1 we added the button “Power options” for easy access to sleep and power management settings.
In version 1.2 we added the button “Delete icon files” because the latest versions of Windows have made it even more difficult to renew icons. We've also added the ability to delete unused COM ports, and in the top bar, you can now read your public IP.
The WinHelper application after closing remains available in the bottom bar. So it opens easily when needed and also provides a convenient CPU load indicator.
![]()
Download di Theremino WinHelper – Version 1.2
Theremino_WinHelper_V1.2
Theremino_WinHelper_V1.2_WithSources (complete design for programmers)
Per Windows 10 to 32 and 64 bit.