
Sensor for OCG
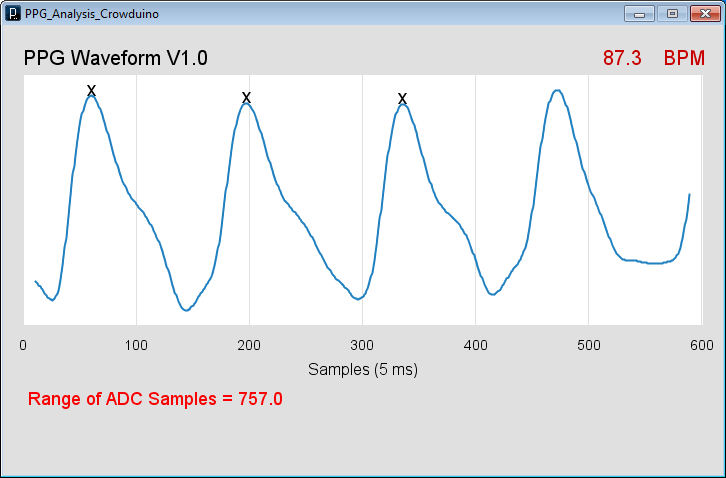
A sensor OCG (Note 1), to be applied on one finger can provide more information than what you normally think. In addition to heart rate can be observed arrhythmias and classify them in the main types. You can also see the effects of lower pressure on the amplitude of the signal and even periodic variations in heart rate caused by respiration.
(Note 1) The exact name for the optical detection would be "photoplethysmography" but it's hard to remember and even poorly composed. Since optical variations are detected rather than electric, the equivalent of "Electro" is not "PhotoPlethysmo" but "Optical" and so from now on we'll call OCG.
Arrhythmias are very frequent, for example the “Premature ventricular contractions” occur in the majority of people on various occasions (more information here). In most cases you don't have to worry about and are not recommended therapies, but it can't hurt to give out as many times as you have strange sensations. The method that we propose with this sensor and application Theremino ECG is the most suitable for frequent checks to do at home.
Arrhythmias often cause no symptoms. But you can feel a strange feeling in my chest, such as:
- Palpitations
- Weight in the chest
- Sinking heart (often described by patients)
- Greater awareness of your heartbeat
- Missing heartbeat feeling
Many of us have had these sensations and hardly anyone went to do an EKG to check. To do an ECG you must register, It takes hours and is almost certain that in the short time of the exam you will observe significant events. Murphy's law says so but it is also due to the fact that an ECG is done in hours, environments and mental States other than those that may cause arrhythmias.
Instead, with this tool you can make fast and easy testing. Don't serve electrodes, conductive paste, band-AIDS and alcohol, just the index finger and a few seconds of time. If then appears something strange will make the findings. But you will be safe and you will have something concrete, not just feelings and words. When you will go by your physician and cardiologist, It will show paper prints of paths that contain arrhythmias. Or take the Tablet and let him slide back in time a graph recorded. Some doctors may reject this information because they do not come from official investigations, in this case change doctor. Don't put your life in the hands of people so dumb not to recognize useful data when they see them.
Do not write here the usual phrases: “do not trust yourself”, “trust the official medicine”, in fact we encourage you to change your attitude towards medicine and not to delegate to others the health and life. Of course someone this sentence will not please, but no matter. An important part of the culture are who you relate to your health and help to propagate ideas that would keep everyone ignorant except physicians. We therefore recommend that you study, understand and learn all you can about the functioning of your body so you humor him and avoid what hurts.
However, there are dangers, We're not suggesting you take medicines, We're just asking and trying to learn more about ourselves. Studying DIY you can make mistakes? Yes, But even doctors make them anyway and nothing can be worse than ignorance.
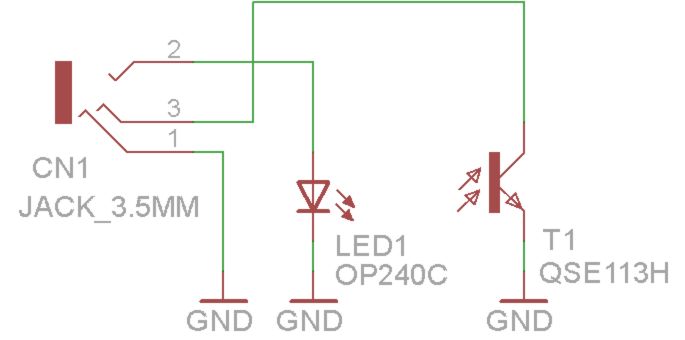
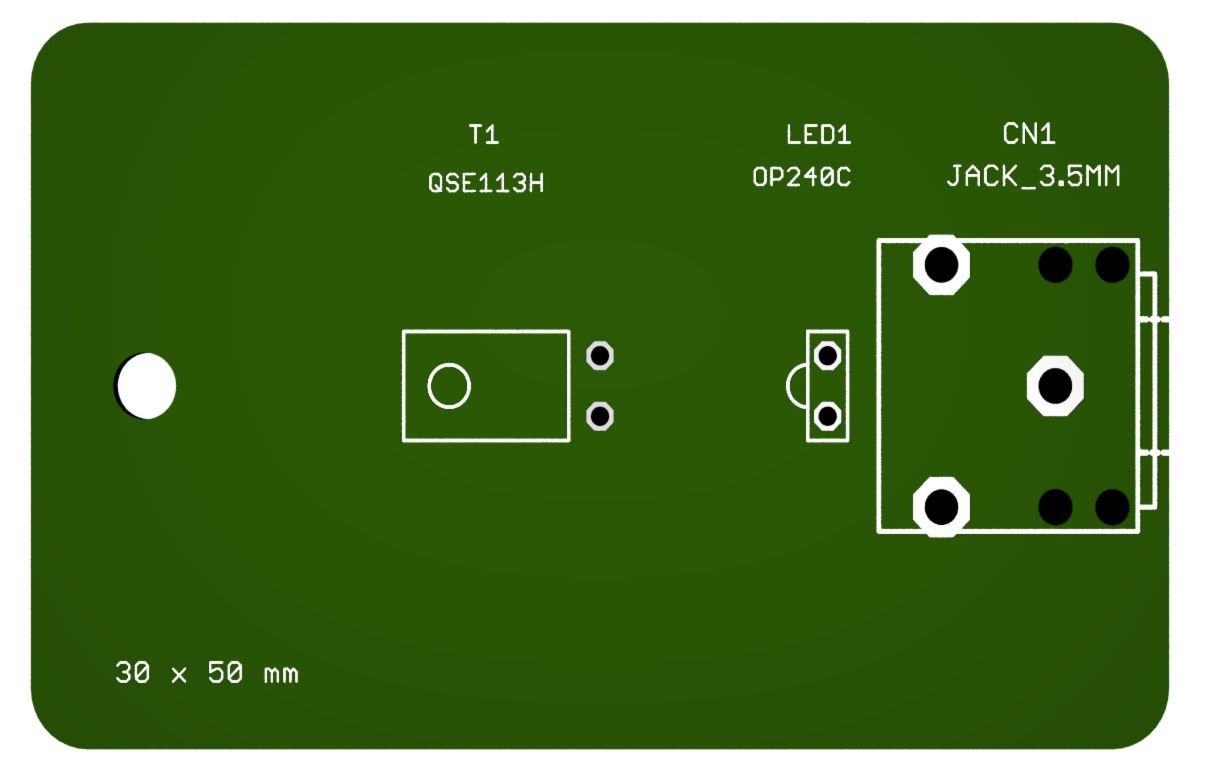
Sensor construction
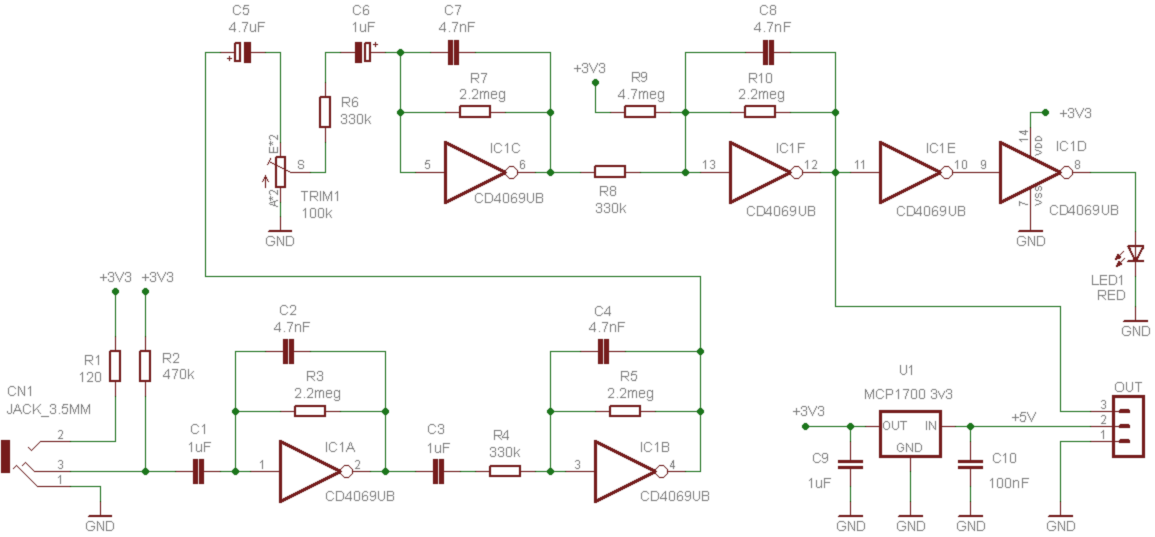
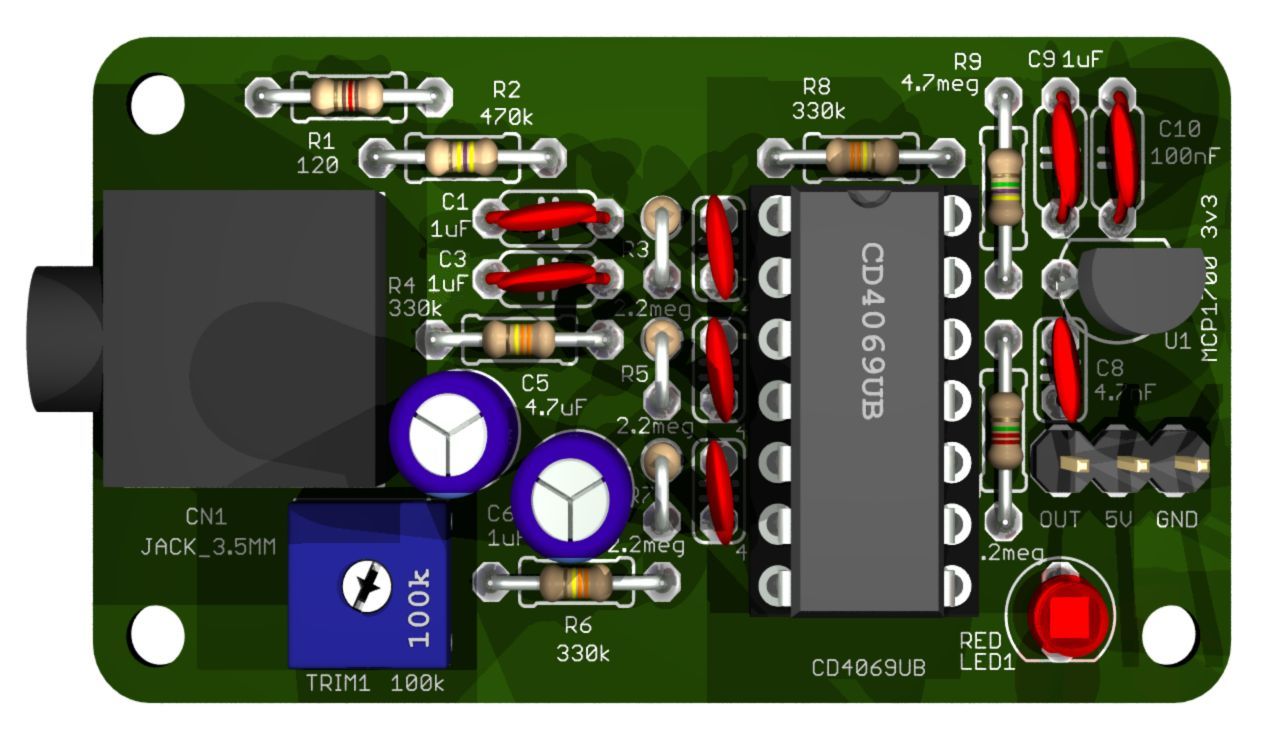
Construction of the amplifier module
Links

Documentation
Building instructions and details on the functioning
Theremino_Pulsometer_ITA.pdf
Theremino_Pulsometer_ENG.pdf
Download
Eagle projects with diagrams, 3D images and Spice simulations
PulsoSensor_V2.zip
Pulsometer_V6.zip
A good alternative for those who have difficulty to build the sensor
You can buy MAX30102 or MAX30105 sensors. There you can find on eBay for a few euros already mounted on comfortable platelets.
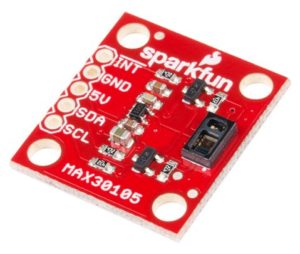
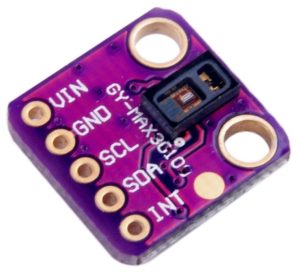
These sensors must be connected with four wires that carry I2C serial data type. So instead of a Master We will connect them to an Arduino Nano as explained on this page and particularly in the file “Reading_I2C_Sensors”.
These sensors can be mounted on a thousand-hole plate, the same sponge pipe insulation for heating ducts, as explained in the documentation “Theremino_Pulsometer”. The only difference is that you must use four wires so you can use a Jack for connecting. It is therefore advisable to solder the wires directly to the Arduino Nano, that is small and can fit in the rear extension of the same matrix Board holding the sensor.
Commercial sensors
Who has time and equipment may acquire the sensor on eBay or Amazon. There are different models, Some go so badly as to be entirely useless, others work so unreliable, in practice there is only one who is good enough to be usable, It's called "Easy Pulse".
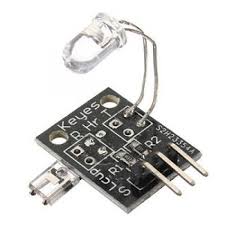
Small sensors
These let them Miss. Some on the Internet have written that the best use to which they can do is remove them and retrieve the components for other uses.
There are others with similar appearance and with emitter and sensor gathered together, forget it, too. L & #8217; only with the sensor and l & #8217; emitter on the same side that works a little’ is to pulsesensor.com that you see in the next image.
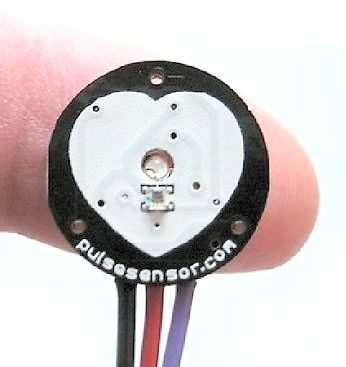
pulsesensor.com
This only works with people who have low blood pressure, only with your index finger and only if placed with precision and not too much pressure on the fingertip.
Hold your finger steady without doing too much pressure is difficult for which charts are always swings (with the base line not horizontal).
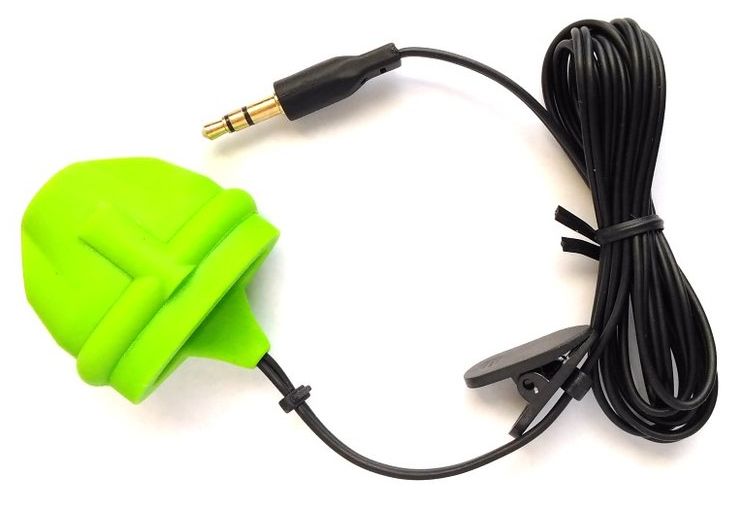
EasyPulse
This is the only recommended, a good choice for those who want to buy a complete device and ready for use, but has some flaws.
The first flaw is the non-shielded cable. To see it is a beautiful golden shielded cable to the Jack but in reality if you open it there is only the internal wires and plastic coating but nothing metal braiding.
The second flaw is the cost, Come on 10 AI 15 Euro for single sensor and more than double for the complete system of sensor and amplifier module.
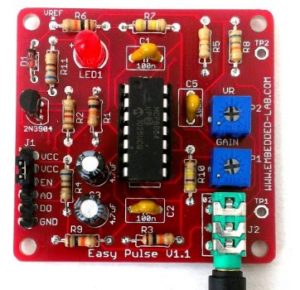
The amplifier module works fine but its bandwidth was tightened especially just 3 Hz to remove interferences in frequency (50 or 60 Hz) products from non-shielded cable.
Because of the narrow bandwidth of pulses are rounded and high frequency details are lost.
Arrhythmia research the pulse shape doesn't matter and therefore this sensor might be fine. Though sorry missed details of form d & #8217; wave that could come in handy in the future to do research. For example, there are studies that show that you can measure the elasticity of arteries through the pulse shape, for example this. But for these measures the bandwidth must be at least 15 or 20 Hz, otherwise the pulses are too rounded.
One last minor flaw of this sensor is that the amplitude of the pulses depends on the amount of light passing through the finger. Why people with little transparent skin, calloused fingers or with nail polish to the nails will have a lower signal. It is not a serious defect, only an inconvenience, simply twist a little’ The trimmer and the sensor will work with all people.
In the sensor, we studied this problem has been minimized by illuminating your finger from the front rather than from above and fueling the phototransistor with a resistor from 470 k instead that 10 k. With a high value resistor when c & #8217; is much light the transistor goes towards saturation and automatically compensates for the increased signal. These two differences make our most stable and almost independent of the person, by skin color and the finger you use.
Connect the sensor EasyPulse to Master module
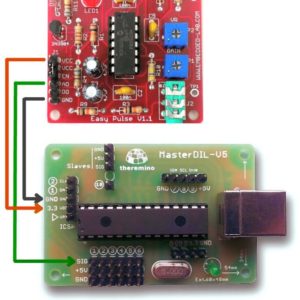
To attach the sensor EasyPulse to our system you have to use Dupont cable three wires connected to GND, AO and VCC.
The cable must be connected to our Master module with:
- GND connected to GND
- AO connected to SIGNAL a Pin of your choice
- VCC connected to 3.3 volts
Click on the image for a larger view.
The software
EasyPulse sensor can be used with its software that you download from This page. Its application does not see anything until you submit data through the virtual serial. To send you data you should install Processing and use application. Then you should also schedule an Arduino with a Sketch special. So we could not try it but in the next section there are videos that make you see.
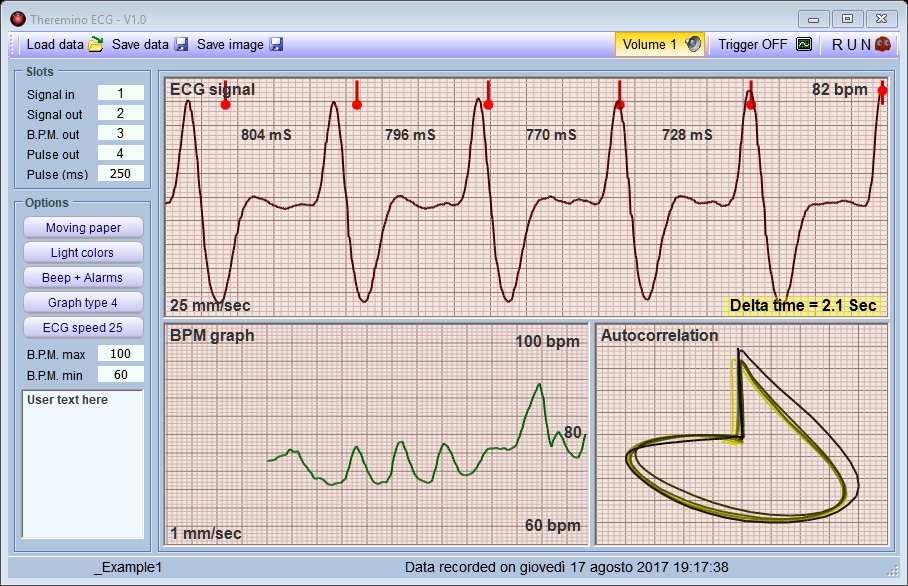
Alternatively you can use the sensor EasyPulse with our application Theremino_ECG, We tested it and it works fine.
Our application and those of Arduino
 Due to the huge popularity of Arduino many mess and discard a priori our system for the sole reason that ends with “INO”.
We must exploit every opportunity to show what are the differences. Compare application Theremino_ECG with applications for Arduino.
Arduino is a micro-programmable controller while our system is largely made up of software running on a PC. Arduino could work alone with a small display but in practice to feed it and display the data you end up connecting to a PC.
But since Arduino was born to be able to do without the PC hardware is more complex and connect it with the software on the PC is more difficult. Also in order to run the software you have to install Processing, Java or Python and the end results are noticeably less fluid because of the virtual serial connection and low efficiency of those languages.
- YouTube video – EasyPulse and Arduino
- YouTube video – Processing and Arduino
- YouTube video – Optical sensor with Arduino
- YouTube video – Optical sensor with Arduino
- YouTube video – Optical sensor with Arduino
- YouTube video – Optical sensor with Arduino
- YouTube video – Optical sensor with Arduino
- YouTube video – Arduino and Android
Oxygen saturation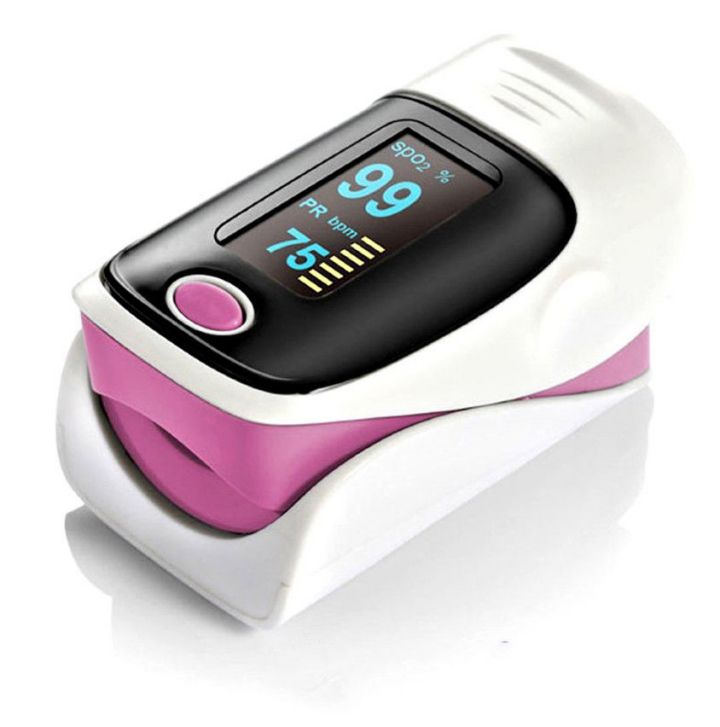
We evaluated whether to add also the extent saturation and we decided to focus on a single search of arrhythmias. The reasons for this decision are:
- There are comfortable and cheap finger pulse oximeters. There you can find on eBay or Amazon for less than nine euros with shipping from & #8217; Europe (postage and batteries included).
- Measuring the saturation could be useful only in case of serious illnesses. Normally the saturation is always okay and when it wasn't already aware of why.
- The circuit would be complex. It would take particular components and calibrations which would make impossible the autobuilder. In the absence of these precautions the accuracy would be so low as to make the measurements useless.
- But what convinced us the most is the poor accuracy of commercial gauges. The next paragraph speaks of their characteristics.
Accuracy of commercial pulse oximeters
Even the best commercial pulse oximeters State in their own features a precision of +/- 2% under the best conditions and +/- 3% When the signal is low or the patient moves.
The readings are still less accurate if:
– You have cold hands;
– You have circulation problems;
– You have nail polish, or artificial nails;
– When blood saturation levels are very low;
– When you get a little transparent skin, dark or thick or calloused fingers;
– If the sensor is too wide or too narrow;
– If the patient has creepy or suffer from recurrent seizures or tremor;
– If the patient is suffering from hyperventilation;
– If the ambient temperature is particularly high or low.
And you will get serious systematic errors in the following cases:
– An inadequate flow of blood oxygen saturation levels can be read even if the patient is having a case of hypoxia;
– High levels of meta-hemoglobin cause readings close to 85%, regardless of the actual blood oxygen saturation.
Therefore in some cases, errors may exceed the +/- 5%. So if for example the actual measurement was 95% You may read values from 90% (severe hypoxia) until 100 % (hyperventilation).
The table below shows what it means an imprecision of measurement ranging from 90% at 100%
- Il valore di 100% is a symptom of hyperventilation;
- Among the 96% and the 99% are considered normal values of O2;
- Among the 95% and the 93% are indicative of a partial absence of oxygen (mild hypoxia);
- Among the 92% and the 90% are indicative of insufficient oxygenation;
- Values below the 90% indicate a severe deficiency of oxygen (severe hypoxia).
The image below is taken from an extensive study on a large number of cases and view l & #8217; high degree of variability of the measurements performed with pulse oximeters on a finger.
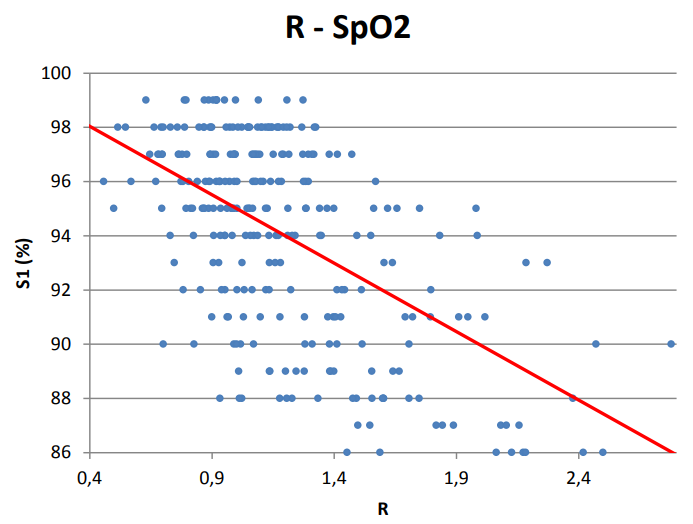
The original documentation, It also explains how to measure the precise technical saturation but invasive species, you download from this page.
ECG sensor

This is an electrocardiogram (first branch) obtained with a module AD8232 (a few euros on eBay) connected directly to an input form Adc16 theremino Master.
Special thanks to Lodovico of PhysicsOpenLab that made us know this form and did the first experiments, initially with the Adc24 and then, simplifying, He managed to obtain good results with the sole Master.
The module AD8232 contains a chip “Analog Devices” specifically designed for electrocardiographs and allows to obtain clean tracks even in electrically noisy environments.
The application Theremino SignalScope, originally designed as an oscilloscope or how DataLogger is perfect to store and display the ECG. You can record data for a very long time, even hours or days. And then you can scroll backwards through time and enlarge greatly, until you see the individual samples of Adc ’ and details of a few milliseconds.
The SignalScope also has two cursors to measure voltages and frequencies times.
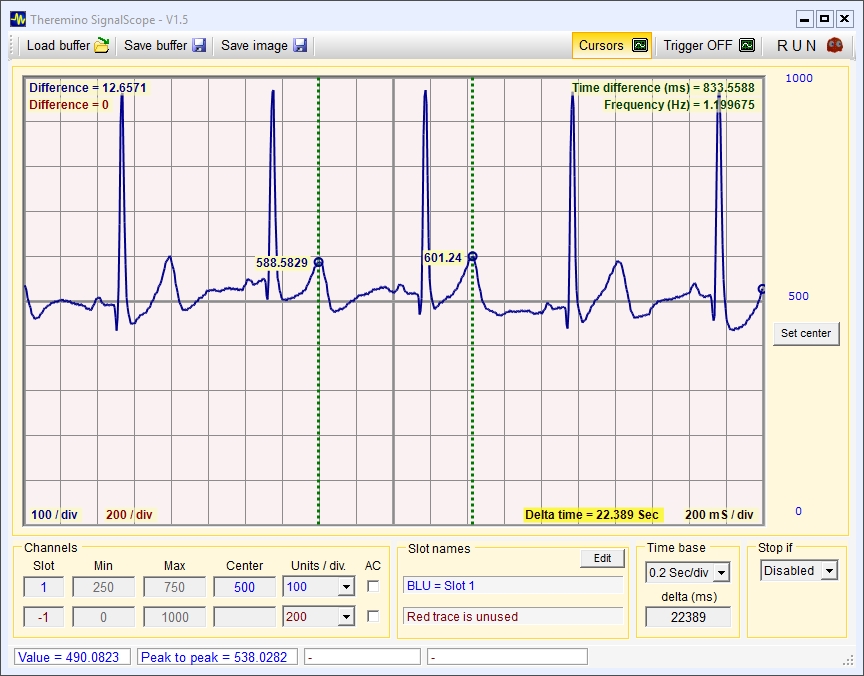
The SignalScope application you download from this page.
To configure the inputs of the Master and then to read them during operation you must download the application HAL from this page.
Remember that when you communicate via the USB ’ the application must always be active HAL, Maybe minimized but active. Read on this page How to create folders “portable” and open and close the HAL and SignalScope with just one Click, without having to search and click one by one.
Place electrodes
You do not need to attach the third electrode to the right leg as written in other publications. You will get the same results by placing it near the ’ electrode “L”.
The position of the electrodes that you see in this picture (call “first branch”) is the one that provides the strongest signal and less disturbed.
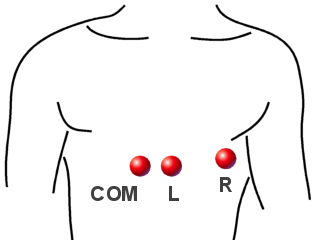
The PADS have a metal button to connect them to the connectors. Before applying the electrodes to the skin it is important to clean it with alcohol, otherwise it remains a film of fat which is insulator.
If the electrodes are not good contact then the baseline of the graph does not stand still and it swings up and down with breathing and to every single patient movement. So it is important to follow these steps:
1) Engage the "pussoir".
2) It cleans the skin with alcohol.
3) He removes his cap and pasting positioning them as per picture
Important to follow the sequence and tap the "pussoir" before gluing the electrodes, otherwise then you press too much on the skin.
Connections between the module AD8232 and the Master module
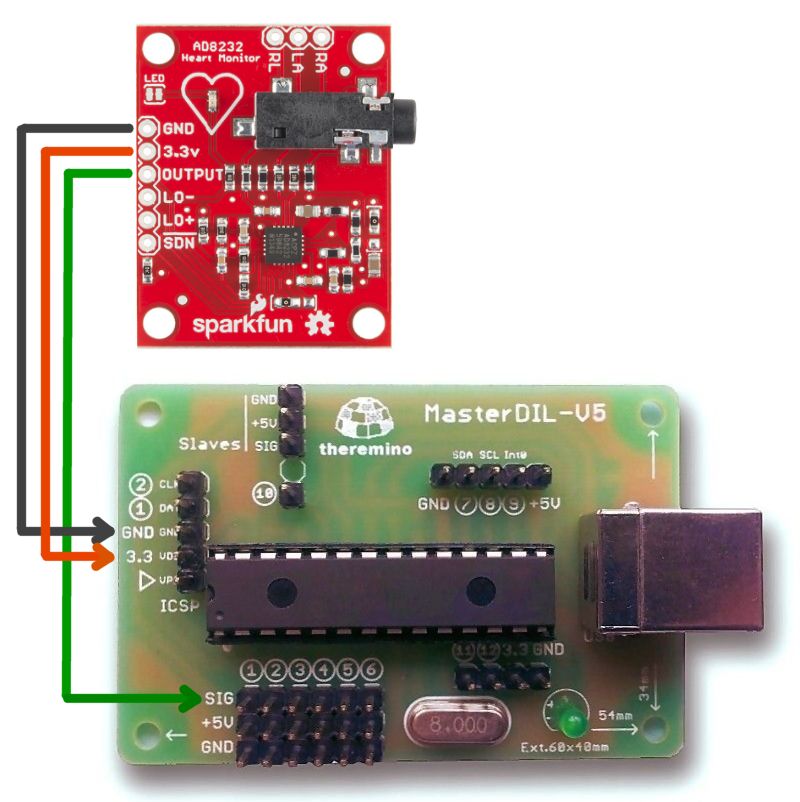
For the connection you can use a cable female female Dupont, three or five wires.
It is not necessary to connect the signals- and LO +
Linking them you could have even l ’ information that the two electrodes are applied to the patient.
To connect them you would use a female female Dupont, from five wires and you would connect Pin signal inputs 2 and 3, as the following table:
The- ---> MR LO Pin2 +---> MR Pin3
Input setting
To set the inputs of the Master module using the application HAL.
== === === === === === === === === === === === === === Master Setting == === === === === === === === === === === === Master Comm. speed = 10, 11 or 12

--------------------------------------
Impostazione Pin 1
--------------------------------------
Pintype = Adc16 Response speed = 100
Pulsante Response Speed NON premuto

--------------------------------------
Impostazione Pin 2
--------------------------------------
Pintype = DigIn Response speed = 100
Pulsante Response Speed NON premuto

--------------------------------------
Impostazione Pin 3
--------------------------------------
Pintype = DigIn Response speed = 100
Pulsante Response Speed NON premuto
Other biometric sensors

For now the whole (little) related material is in the Blog: https://www.theremino.com/blog/biometry